用意するもの
「ilhtcas3.zip」 ファイルを Flightsim.com からダウンロードしてください。
(重要)
TCAS ゲージを動作させるには FSUIPC.dll の v3.00 以上が必須です。
http://www.schiratti.com/dowson.html
1.ゲージファイルのコピー
「ilhtcas3.zip」を解凍してできた「ILH_TCAS.gau」ファイルを FS2004\Gauges\ フォルダーにコピーしてください。
2.パネル定義ファイルのバックアップ
TCAS 計器を導入したい 767PIC 機体フォルダーの「Panel」フォルダー内の「Panel.cfg」ファイルをコピーして名前を「Panel_save.cfg」に変更します。
導入でなにか失敗をした時に元に戻すために必要となります。
3.パネル定義ファイルを編集 1つめ
「Panel.cfg」ファイルをメモ帳などのテキストエディターで開きます。
[window01]セクションの下で以下の行を探します。
gauge14=B767Wvsi, 556, 406, 136
この行を次の2行に変更します。
//gauge14=B767Wvsi, 556, 406, 136
gauge14=ILH_TCAS!IVSI, 545, 391, 158, 158,
2行目の最後のカンマ[,]を忘れないように注意してください。
4.パネル定義ファイルを編集 2つめ
[window04]セクションの下で以下の行を探します。
gauge06=B767Wxpdr, 205, 586
この行を次の2行に変更します。
//gauge06=B767Wxpdr, 205, 586
gauge06=ILH_TCAS!Transponder, 204, 586, 228, 89,
2行目の最後のカンマ[,]を忘れないように注意してください。
変更ができたら保存してください。
これでインストールは完了です。
5.簡単使用方法
VSI_TCAS 計器の左上を右クリック数回、左クリック数回で表示モードが切替ります。
VSI_TCAS 計器の右上を右クリック数回、左クリック数回で表示の範囲が切替ります。
6.README.txt 翻訳
「ilhtcas3.zip」を解凍してできる「README.txt」ファイルを翻訳してみました。
自動翻訳をしたあと、わかるところは意訳しました。
わかりにくいところ、間違っているところいっぱいあるかと思いますが、参考程度にご覧ください。
-----------------------------------------
IVSI/TCAS With 767PIC Interface
767PICインターフェースIVSI/TCA
version 1.1.16
バージョン1.1.16
30 July 2003
2003年7月30日
Lee Hetherington
リー・ヘザリントン
ilh@sls.lcs.mit.edu
REQUIREMENTS BEFORE YOU START
始める前の必要条件
This gauge requires FSUIPC for the source of TCAS traffic information.
このゲージは「TCAS」トラフィック情報を得るための情報源としてFSUIPCが必要です。
Without it this addon will not work properly.
FSUIPC なしではこのaddonは適切に働きません。
Get it
ここをご覧下さい
http://www.schiratti.com/dowson.html.
Note that this gauge contains a license key enabling it to work with an unregistered copy of FSUIPC 3.x.
このゲージがFSUIPC 3.xの未登録のコピーでそれが働くことができるライセンス・キーを含むことに注意してください。
Note: although 767PIC does not currently work in FS2004, this gauge does.
注:767PICは現在FS2004ではうごきませんが、このゲージはFS2004でも動作可能です。
訳者注:このサイトで説明しているように767PICをFS2004で動かす方法があります。
___________________________________________________________________________
INSTALLATION INSTRUCTIONS FOR USE WITH 767 PIC
767PICで使用の場合の導入方法
1. Copy the file ILH_TCAS.gau to FS2002's Gauges subfolder (e.g., C:\Program Files\Microsoft Games\FS2002\Gauges).
1. FS2002のゲージフォルダー(例えば、C:\Program Flies\Microsoft Games\FS2002\Gauges)にILH_TCAS.gauファイルをコピーしてください。
2. Next, go to the FS2002\Aircraft\767 PIC Wilco Publishing\Panel folder and make a backup copy of your current Panel.cfg.
2. 次に、FS2002\Aircraft\767 PIC Wilco Publishing\Panel フォルダーにある現在のPanel.cfgのバックアップ・コピーを作ります。
Rename it something like Panel_save.cfg.
それをPanel_save.cfgなど別のファイル名にリネームしてください。
3. If you are still using an unchanged, original panel.cfg from 767PIC, you can copy the ILH_TCAS_767PIC_Panel.cfg file included in this package to Panel.cfg.
3. 767PICをインストールしたままのオリジナルのpanel.cfgをまだ使用している場合は、パッケージに含まれたILH_TCAS_767PIC_Panel.cfgファイルをPanel.cfgにリネームして上書きコピーで使用することができます。
However, if you have edited this file in any way, you should do the following to panel.cfg using a text editor such as Notepad:
しかし、なにかの理由でPanel.cfgを編集しているのであれば、メモ帳などのテキストエディターを使用してpanel.cfgに下記の変更を行なってください:
訳者注:このサイトの方法でFS2004に767PICを導入している場合は必ず以下の方法で変更してください。
a. To install the IVSI gauge, under the Main Panel [Window01] section, find and replace the line that reads
a. [Main panel]の[Window01]セクションの下で以下の変更をして下さい
gauge14=B767Wvsi, 556, 406, 136
この行を見付けて下のように変更してください
//gauge14=B767Wvsi, 556, 406, 136
gauge14=ILH_TCAS!IVSI, 545, 391, 158, 158,
Please not the final comma ",".
最後についている「,」を忘れないように注意してください
It is useful to add this so that you can later add parameters.
その後パラメーターを加えることができるように、これを加えることは有用です。
Such parameters are described in the GAUGE OPTIONS section below.
そのようなパラメーターは、GAUGE OPTIONSセクションに下に記述されます。
b. To install the transponder, under the pedestal [Window04] section, find and replace the line that reads
b. [Pedestal]の[Window04]セクションの下でトランスポンダをインストールするため以下の変更をして下さい
gauge06=B767Wxpdr, 205, 586
この行を見付けて下のように変更してください
//gauge06=B767Wxpdr, 205, 586
gauge06=ILH_TCAS!Transponder, 204, 586, 228, 89,
TCAS TRAFFIC SYMBOLS
TCASのトラフィックシンボル
Traffic is displayed with one of four symbols, a two-digit relative altitude, and an arrow indicating a vertical rate of at least +/- 300fpm.
トラフィックは4つのシンボル、2桁の相対的な高度、および少なくとも +/- 300fpm の垂直の割合を示す矢印のうちの1つで表示されます。
The altitude is indicated in units of 100ft, with a + indicating above ourself, and a - indicating below.
高度は100ft単位で表示され自機より高度が高い場合は「+」、自機より高度が低い場合は「-」が数値と一緒に表示されます
A red square indicates a Threat and would be accompanied by an aural warning and a commanded vertical speed along the VSI scale for a Resolution Advisory (RA).
赤い正方形は脅威(危険性が高い)を示し、解決勧告(Resolution Advisory = RA)のために音声警告とVSIスケールの指示昇降速度が出されます。
Neither the aural warning or vertical command is implemented at this time.
しかし現在のバージョンでは音声警告または指示昇降速度のどちらも出されません。
I hope to have a future version that implements both aural warnings and vertical speed advisories.
音声警告と指示昇降速度の両方を将来のバージョンで実行したいと思っています。
A yellow circle indicates a Potential Threat and would be accompanied by the aural warning "Traffic, Traffic" for a Traffic Advisory (TA).
黄色の円は潜在的な脅威を示し、交通勧告(Traffic Advisory = TA)のために音声警告が出されます「トラフィック、トラフィック」。
A TA generally precedes an RA by 15-20 seconds.
TAは一般に15-20秒ずつRAに先行して発っせられます。
A blue or white solid diamond indicates Proximate Traffic that is within 6nm and +/- 1200ft vertically and is not an RA or TA.
青あるいは白の塗りつぶしの菱形は、距離で6nm以内および高度で+/-1200ft以内にあり、かつRAでもTAでもないトラフィックを示します。
A blue or white hollow diamond indicates Other Traffic that is within a settable vertical range of own aircraft.
青あるいは白の枠だけの菱形は、自機の設定可能な昇降レンジ内の他のトラフィックを示します。
See the option "other" below for this setting, and the setting of ABOVE/N/BELOW on the transponder gauge for exceptions to this range.
このセッティングおよびこのレンジの設定をトランスポンダー上で ABOVE(以上)/N/BELOW(以下)設定する事に関しては下の「その他」の設定を参照してください。
Note that for the duration of an RA or TA all Other Traffic is removed from the screen so as to remove clutter during a potentially critical encounter.
RAかTAが発生すると他の交通の表示がこれらの危険の表示を判り難くしないようにスクリーンから取り除かれることに注意してください。
The blue/white color for Proximate and Other Traffic is settable via gauge options, as described below.
下の説明のように、近接した他のトラフィックの青/白表示はゲージオプションによって設定することができます。
Note that Potential Threat and Threat traffic that would otherwise be offscreen is drawn right at the edge so it can be seen.
潜在的な脅威と脅威のトラフィックについてはスクリーン右下の角の見えないボタンを押すことにより表示できる事に注意してください。
In this case, the range is incorrectly displayed, but the bearing is correct.
この場合、レンジは不正確に表示されますが、ベアリングは正確です。
Also note that the traffic is displayed with heading and not track up.
またトラフィックはヘディングが表示され、トラックが上に表示されているわけではない事に注意してください。
USAGE
使用法
The IVSI gauge has four hidden click spots that operate as follows:
IVSIゲージは、以下のように作動する4つの隠されたクリック・スポットを持っています:
訳者注:マウスの右クリックで順方向に、左クリックで逆方向に切替わって行きます。
o upper left: cycles the transponder mode between TEST, (STBY), (XPDR), TA, and RA;
o 左上:トランスポンダ・モードの切り替えサイクル、TEST→(STBY)→(XPDR)→TA→RA;
o upper right: cycles the TCAS range between 6, 12, 18, 24, and 40nm;
o 右上:TCASの表示レンジ、6→12→18→24→40nm
o lower left: cycles TCAS vertical range between (BELOW), (N), (ABOVE); and
o 左下:TCASの昇降レンジ(垂直方向のレンジ)、(BELOW)→(N)→(ABOVE)
o lower right: cycles the TCAS altitude display between (REL) and (ABS).
o 右下:TCASの高度表示の切替、(REL)→(ABS)。
Here, labels put in parentheses are not displayed on the IVSI itself, but they are displayed on the transponder panel.
ここで括弧で示されたラベルは「IVSI」自体には表示されません。しかし、それらはトランスポンダ・パネルに表示されます。
All of the above can also be controlled by clickspots on the transponder panel.
トランスポンダ・パネル上のクリックスポットも上記のものをすべてコントロールすることができます。
In addition, you can control the squawk code.
さらに、スコークコードをコントロールすることができます。
NOTE: all click spots on both the IVSI and transponder are sensitive to both LEFT and RIGHT mouse clicks.
注:IVSIおよびトランスポンダの両方の全てのクリックポイントはマウスの左クリック、右クリックにて順/逆にサイクルします。
A LEFT click reduces a setting, and a RIGHT click increases it.
左クリックはセッティングを縮小します。また、右クリックはそれを増加させます。
The modes are as follows:
モードは以下のとおりです:
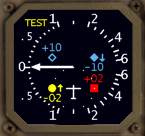
o TEST: a test pattern with all four intruder types displayed.
o TEST:4つのタイプすべてを表示したテスト・パターンを表示します。
The range is displayed as 6nm, regardless of the TCAS range selector.
レンジはTCASレンジセレクターにかかわらず6nmとして表示されます。
o STBY: transponder is in standby (not squawking), and TCAS is disabled.
o STBY:トランスポンダはスタンバイ(スコーク無し)になり、TCASは無効になります。
o XPDR: transponder is active, but TCAS is disabled.
o XPDR:トランスポンダはアクティブになりますが、TCASは無効になります。
o TA: transponder is in TA ONLY mode, displaying other, proximate, and potential threat traffic, but no threats will be identified.
o TA:トランスポンダはTA ONLYモードになり、その他、近接、潜在的脅威のトラフィックが表示されますが、脅威は識別されません。
o RA: transponder is in TA/RA mode, the normal TCAS mode, displaying all types of intruders.
o RA:トランスポンダはすべてのタイプの侵入者を表示するTA/RAモードとなります。これは通常のTCASモードです。
If RA processing were fully implemented, threats would generally result in vertical speed commands on the IVSI.
もしRA処理が完全に実行されれば、脅威は一般に IVSI に関する垂直の速度コマンドに帰着するでしょう。
For all ranges, a 2nm range circle is displayed around the aircraft.
すべての範囲については、2nmの範囲円が航空機のまわりで表示されます。
For selected ranges greater than 6nm, a 5nm range ring is added.
6nmを越える選択された範囲については、5nmの範囲の輪が加えられます。
The ABOVE/N/BELOW selection can be used to limit how much traffic is visible by limiting the vertical range of other traffic.
ABOVE/N/BELOW選択はどれだけのトラフィックを他のトラフィックのの垂直の範囲の制限により目に見えるようにするかを制限するために使用することができます。
By default, selecting N will only show traffic in the relative flight level range -27 to +27.
デフォルトでは、Nの選択は相対的なフライトレベル範囲 -27 ~ +27 内のトラフィックを表示します。
With ABOVE, the range is -27 to +99.
ABOVEでは、範囲は -27 ~ +99 です。
With BELOW, the range is -99 to +27.
BELOWでは、範囲は -99 ~ +27 です。
(The value 27 is settable via the gauge parameter "other" on the IVSI gauge line in the Panel.cfg.)
(値27は、Panel.cfgの中のIVSIゲージの記述でゲージ・パラメーター「other」によってセットできます。)
Finally, the ABS/REL selection controls how altitudes are displayed for TCAS intruders.
最後に、ABS/REL 選択は高所がTCAS侵入者のためにどのように表示されるかコントロールします。
With ABS, absolute flight levels are displayed.
ABSでは、絶対的なフライトレベルが表示されます。
With REL, relative flight levels are displayed.
RELでは、相対的なフライトレベルが表示されます。
You should make sure your FSUIPC settings have TCAS enabled, preferably to 40nm range so that the gauge's 40nm range is fully utilized.
ゲージの40nmの範囲が完全に活用されるようにFSUIPCセッティングが40nmの範囲に設定されている事を確かめておいてください。
If you have TCAS turned off in FSUIPC's settings (i.e., range set to 0nm), you will not see any TCAS targets.
FSUIPCのセッティングをもし 0nm と範囲をセットした場合はTCASが表示されない事になります。
If you see an amber TCAS "flag" and no plane or range rings, then a usable to connection to FSUIPC could not be established.
アンバーのTCAS「フラグ」が出ている場合は機体の印や範囲の輪は表示されません。FSUIPCとの接続が確立されていない事を示します。
This could mean that FSUIPC is not properly installed, or that the licensing for this gauge is no longer valid.
これはFSUIPCが適切にインストールされないか、このゲージのための許可がもはや有効ではないことを意味するかもしれません。
TCAS will be functional, but the gauge will still display V/S.
TCASは機能的になりますが、ゲージはV/Sを表示するでしょう。
767PIC SPECIFICS
767PIC詳細
Two new additions are proper integration with 767PIC's power busses and intertial reference units (IRUs).
新しい2つの追加は767PICのパワーバスと Intertial Reference Units(IRUs)に最適な統合がはかられています。
The IVSI/TCAS gauge will get its power from the left main bus, as do the EADI, EHSI, and upper EICAS.
EADI、EHSIおよび上部のEICASと同様に、IVSI/TCASゲージは左のメイン・バスから電力を供給されます。
If for any reason the left main bus does not have power, the IVSI/TCAS gauge will be completely blank.
何らかの理由のために、左のメイン・バスが電力を供給できなくなると、IVSI/TCASゲージは完全にブランクになるでしょう。
The IVSI/TCAS gauge will only be able to display the VSI needle if the IRU selected on the captain's instrument source selector is aligned.
キャプテンの Instrument Source Selector がアラインされ、選択されたIRUが提携する場合、IVSI/TCASゲージはVSI指針を単に表示することができるでしょう。
If it is not aligned, the VSI needle will not be displayed and an amber V/S "flag" will be displayed in the lower left of the IVSI/TCAS gauge.
それが提携しない場合、VSI指針は表示されず、アンバーのV/S「フラグ」がIVSI/TCASゲージの左下に表示されるでしょう。
TCAS will continue to function, although if in RA mode, you will see an amber RA "flag" in the lower right since RA vertical commands would not be possible without V/S data.
RAモードでアンバーのRAフラグを見れば、右下の「フラグ」はRAの垂直のコマンドはV/Sデータなしで可能ではないでしょうが、TCASは機能し続けるでしょう。
Note that several folks have told me that V/S data continues to work if the selected IRU is in ATT mode, unlike the original PIC VSI gauge, and I have implemented this functionality.
選択されたIRUがATTモードである場合オリジナルのPIC VSIゲージと異なり、V/Sデータが作動し続けると数人の人々が私に教えてくれたので、この機能性をインプリメントしたことに注意してください。
MULTIPLAYER OR SQUAWKBOX USE
マルチプレーヤーまたはスコークボックスの使用
You will need the program AIBridge, available in the AVSIM file library, in order to see other aircraft.
他の航空機を見るためにはプログラムAIBridge(AVSIMファイルライブラリーにて利用可能)を必要とするでしょう。
AIBridge injects multiplayer traffic into FSUIPC's traffic tables.
AIBridgeはFSUIPCのトラフィックテーブルにマルチプレーヤーのトラフィックを送りこみます。
Otherwise, only AI traffic seen by FSUIPC and thus this IVSI/TCAS gauge.
そうでなければ、FSUIPCは単にAIトラフィックだけをIVSI/TCASゲージに送ります。
Within SquawkBox, the multiplayer range setting will limit the range of visible TCAS traffic.
SquawkBoxでは、マルチプレーヤーの範囲セッティングが、TCASトラフィックの可視の範囲を制限するでしょう。
I have heard that SB3, currently under development, will inject traffic directly into FSUIPC without the need for AIBridge.
私は次のことを聞いていました。現在開発中のSB3ではAIBridgeの必要なしでFSUIPCにトラフィックを直接送りこむことができるようになるでしょう。
GAUGE OPTIONS
ゲージ・オプション
The following options can be specified in the panel.cfg file for the ILH_TCAS!IVSI gauge (Main Panel, [Window01] section, after the final comma "," on the "gauge14" line as mentioned above):
次のオプションは、ILH_TCAS!IVSIゲージ(メインパネル、上に言及されるような「gauge14」ライン上の最終のコンマ","の後の[Window01]セクション)用のpanel.cfgファイルの中で指定することができます:
fontscale:<N>
文字フォントの大きさ
Scale the TCAS altitude font by <N> (e.g., 0.8 or 0.9).
(例えば0.8あるいは0.9)によってTCAS高度フォントの大きさを変更します。
You may want a value smaller than 1.0 depending on your eyesight and the resolution at which you run FS.
あなたの視力、およびFSを実行する解決に依存して、1.0未満で値を望んでもよい。
other:<N>
その他
Limit Other Traffic to +/- <N> hundred feet.
他のトラフィック制限 +/-<N> 100フィート単位。
The default is 27.
デフォルトは27です。
Some carriers might use 45.
いくつかのキャリアーは45を使用するかもしれません。
Setting this to 99 will show all possible traffic regardless of the setting of ABOVE/N/BELOW.
99にこれをセットすることは、ABOVE/N/BELOWのセッティングにかかわらずあらゆるトラフィックを示すでしょう。
blueplane:<yes|no>
The TCAS self plane and distance scales will be blue if "yes", otherwise white.
TCAS上の自機および距離表示を青くすることができます。Yes:青、no:白
The Other and Proximate Traffic will be the opposite color of the self plane.
他方および近接のトラフィックは自機の色の反対の色で表示されます。
Think of this as a carrier option and defaults to "no".
no の選択がデフォルトの設定です。
vsirate:<N>
The target rate in redraws per second for the VSI needle.
VSI 指針の再描画/秒の割合を設定します。
The default of 18 means once per 1/18th second FS tick, and 0 means for every FS frame, which in my opinion would be overkill.
デフォルトでは 18 すなわち 1/18 秒間隔、0 を設定するとFSの毎フレームでの描画となります。
aa:<yes|no>
Whether antialiasing should be used within the gauge.
アンチエイリアシングはゲージ内に使用されるべきであるかどうか。
Defaults to "yes".
Yes:デフォルト。
You could set it to "no" to see the effect of antialiasing.
アンチエイリアシングの影響を見るために no をセットすることができます。
I do not support the "no" option as it really offers no advantages.
実際には長所がないので「no」オプションをサポートしません。
pic:<yes|no>
Whether the gauges should respond to 767PIC internal state such as panel lighting, power status, IRU status, etc.
ゲージはパネルライティング、パワーステータス、IRUステータスなどの767PIC内部ステータスに応答するべきですか。
You will want to use no if you are using the gauge(s) outside of 767PIC.
767PICの外部ゲージを使用している場合使用したいと思うでしょう。
This option also works on the ILH_TCAS!Transponder gauge.
このオプションは、さらにILH_TCAS!Transponderゲージに作用します。
The following is an example of changing the "fontscale" and the "other" options:
下記は、「fontscale」および「other」オプションの変更の例です:
gauge14=ILH_TCAS!IVSI, 545, 391, 158, 158, other:45 fontscale:0.8
USING THE GAUGES OUTSIDE OF 767PIC
767PIC以外でのゲージの使用
There are so-called "named variables" that can be used to control the IVSI, and the transponder is linked to the IVSI through them.
「変数」とよばれるIVSIおよびトランスポンダをコントロールするために使用することができる設定があり、それらによってIVSIにリンクされます。
Email me if you are a panel designer and wish to control these gauges.
あなたがパネル・デザイナーで、これらのゲージをコントロールしたい場合は、私にemailしてください。
KNOWN ISSUES
既知問題
Some versions of FSUIPC before 2.973 are known to cause blinking of TCAS targets when used with AIBridge traffic.
2.973の前のFSUIPCのいくつかのバージョンはAIBridgeでのトラフィックと共に使用された時TCASターゲットの明滅が起きることがあります。
This gauge was developed to work with 767PIC patches 1.2 and 1.3 for FS2002.
このゲージは、FS2002のための767PICパッチ1.2および1.3で働くために開発されていました。
Various offsets into APS.dll are used to read the state of panel flood lighting, left main bus available, and the left IRU alignment status.
APS.dllの中への様々なオフセットはパネル照明、利用可能な残されたメイン・バスおよび左のIRUアライメントステータスの状態を読むために使用されます。
For other versions of APS.dll, the 767PIC specifics will be inoperable.
APS.dllの他のバージョンについては、767PIC詳細が実施不可能になります。
LEGAL
正当
This IVSI/TCAS gauge(s) is a freeware product and a labor of love and may NOT be included in any commercial package or website without permission.
このIVSI/TCASゲージ(s)はフリーウェア製品および篤志事業で、任意の商用パッケージあるいは許可のないウェブサイトに含まれていないかもしれません。
The IVSI/TCAS gauge(s) is an add-on to Wilco's 767PIC and is not endorsed, part of, or related to Wilco Publishing.
IVSI/TCASゲージ(s)はWilcoの767PICのアドオンであり、承認無し、1部分、あるいは関係があった。
If you decide to use any part of this package, whether it is for freeware use or commercial, you MUST obtain prior permission from me, the author.
それがフリーウェア使用のためにか、あるいは商用でも、このパッケージのどんな部分も使用することを決定する場合、あなた、MUST、私、著者から先の許可を得ます。
Should there be any damage done to your system after using this package, I and all parties involved will not be held responsible.
そこで含まれていたこのパッケージ、Iおよびすべてのパーティーの使用が責任を負うと判決されない後あなたのシステムに終わった任意の損害であるべきです。
ACKNOWLEDGEMENTS
確認応答
Nick Jacobs of Dreamfleet gave me several pointers on general gauge programming that proved invaluable.
Dreamfleetのニック・ジェーコブスは、私に非常に貴重であると分かった一般的なゲージ・プログラミング中のいくつかのポインターを与えました。
Mark McGrath, Ryan O'Malley, and John Selph provided me with TCAS documentation that was very helpful in developing my threat classification and display code.
マークMcGrath、ライアンO'MalleyおよびジョンSelphは、私の脅威分類およびディスプレイ・コードの開発において非常に有用だったTCASドキュメンテーションを私に供給しました。
Claude Troncy provided guidance on a technique to read the main panel lighting status through an offset into APS.dll for the 1.2 patch.
クロードTroncyは、1.2のパッチのためにAPS.dllへオフセットによって主要なパネルライティング・ステータスを読むために技術上のガイダンスを提供しました。
I have since figured out many other offsets for the 1.2 and 1.3 patches.
私は、その後1.2および1.3のパッチのための他の多くのオフセットを解きました。
Mark McGrath provided the motivation for me to implement the new transponder, and Ian Riddel provided a photo that served as the starting point for the background bitmap.
マークMcGrathは、私が新しいトランスポンダをインプリメントするべき動機づけを提供しました。また、イアンRiddelは、背景ビットマップの出発点として役立った写真を提供しました。
Finally, the beta testers Michael Bevington, Robert Hall, Mark McGrath, John Selph, and Ryan O'Malley, all provided valuable feedback on the first version of this gauge.
最後に、ベータテスターマイケルBevington、ロバート・ホール、マークMcGrath、ジョンSelphおよびライアンO'Malley(このゲージの第1のバージョン中のすべての提供される価値のあるフィードバック)。
Beta testers Michael Bevington, Robert Hall, Mark McGrath, Bill Van Caulart, and Ian Riddel helped extensively with testing this version and its documentation.
ベータテスターマイケルBevington、ロバート・ホール、マークMcGrath、ビル・ヴァンCaulartおよびイアンRiddelは、このバージョンおよびそのドキュメンテーションをテストすることを広範囲に手伝いました。
Thanks!