17
D. FMC FIX Page
The FIX page provides a means to determine
where a particular FIX is in relation to
the aircraft or route of flight.
FIXページは、飛行の航空機かルートに関して特別のFIXがどこか決める手段を提供します。
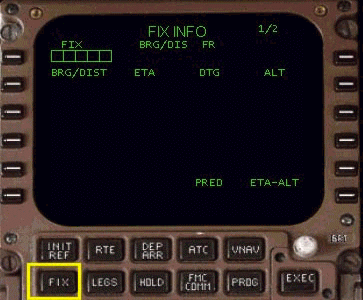
To access the FIX page, press the “FIX”
button on the FMC keyboard.
FIXページにアクセスするためには、FMCのキーボード上で「FIX」ボタンを押してください。
Pressing this button displays the page shown
at right.
このボタンを押すことで、右で示されたページを表示します。
A data block with boxes displays at the 1L
LSK position to indicate that the FMC awaits
data entry.
ボックスのあるデータ・ブロックは、FMCがデータ・エントリーを待つことを示す
1L LSK 位置で表示します。
The fix page accepts the following
waypoint
types in the 1L data block:
FIXページは、ウェイポイントの位置を 1L のデータ・ブロックにタイプインすると受け入れます:
VOR, NDB, ILS, AIRPORT, INTERSECTION.
VOR、NDB、IL、空港、インターセクション。 |
 |
Enter the waypoint name into the scratchpad
and press the 1L LSK to enter the data.
スクラッチパッドにウェイポイント名を入力して、データを入力するために
1L LSK を押してください。
If more than one named fix is available,
the “waypoint selection” screen is displayed.
FIX としての名前が同じの複数のウェイポイントも可能で、その場合は「ウェイポイント・セレクション」スクリーンが表示されます。
If this is the case, press the appropriate
left hand LSK of the desired fix for entry
into the FIX page.
その場合は、FIXページへ希望の位置の適切な左側のLSKを押してください。
Once a fix is entered, the screen shown below
is displayed in the FMC and the waypoint
is drawn on the EHSI screen (if in range)
and enclosed with a green circle.
一旦FIXが入力されれば、下に示されたスクリーンはFMCで表示されます。また、ウェイポイントは
EHSI スクリーン(レンジ内なら)上に表示され、緑の円で囲まれます。
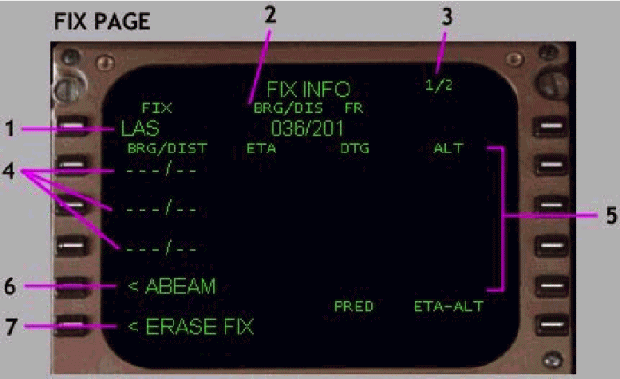
1- FIX name entry block: The name of the desired fix is entered into
this data block.
FIX 名エントリー・ブロック: 希望の
FIX の名前はこのデータ・ブロックに入力します。
In this case we have selected the “LAS”
VOR for display.
この例では、ディスプレイに「LAS」VORを選びました。
2- Bearing/Distance information: The bearing and distance from the aircrafts
present position to the currently selected
fix is displayed here.
ベアリング/距離 情報:: 航空機の現在位置と選択された
FIX とのベアリングと距離はここに表示されます。
In this case, our aircraft is 201 miles from
the LAS VOR at a bearing of 036摯.
この例では、航空機は 036 度のベアリングで
LAS VOR から201マイルです。
3- Page indicator: It is possible to enter two separate fixes
into the fix page.
ページインジケーター: FIX ページへ2つの別個の
FIX を入力することが可能です。
We are using page 1 for this fix presentation.
この FIX プレゼンテーションのために1ページを使用しています。
To enter a second fix, pressing the NEXT
PAGE key displays a “fresh” fix page (2/2)
with a new data block for fix entry.
2番目の FIX を入力するために、NEXT PAGEキーを押して、「fresh」
FIX ページ (2/2) と FIX を入力する新しいデータブロックが表示されます。
4- BRG/DIST entries: For each FIX it is possible to make bearing
and distance references display on the EHSI.
BRG/DISTエントリー: 各FIXについては、EHSI
の表示を参照してベアリングと距離を設定する事が可能です。
Valid entries here are XXX, XXX/XXX, or /XXX.
有効なエントリーは XXX , XXX/XXX あるいは
/XXX です。
You can enter a bearing only (XXX), a bearing
and distance (XXX/XXX), or just a distance
(/XXX) reference.
ベアリングのみ ( XXX )、ベアリングと距離
( XXX/XXX ) 、あるいは単に距離よみ ( /XXX
) を入れることができます。
In the case of a bearing, the bearing is
drawn as a radial from the selected fix on
the EHSI.
ベアリングの場合には、ベアリングはEHSIの上の選択された
FIX からのラディアルで描画されます。
In the case of a distance, a distance ring
is drawn on the EHSI around the fix.
距離の場合には、EHSI の上で距離の輪が FIX
のまわりに引かれます。
Entry of up to 3 separate bearings and/or
distances is possible for each fix in the
FIX page.
3つまでの別個のベアリングおよび(または)距離のエントリーは、FIXページの各 FIX
にとって可能です。
Detailed examples are provided further down
in this section.
詳細な例は、このセクション中のさらに下で提供されます。
18
5- ETA/DTG/ALT information: When a bearing or distance is entered for
a given fix, the FMC determines if the bearing
or distance line intersects with the active
route.
ETA/DTG/ALT情報: ベアリングか距離が登録される場合、もしベアリングか距離の線がアクティブルートと交叉するならば
FMC は確定します。
If there is an intersecting point, data is
displayed under the ETA,DTG and ALT columns.
交差するポイントがある場合、データは、ETA、DTGおよびALTカラムに表示されます。
|
ETA = |
Estimated Time of Arrival at the intersecting
point.
交差するポイントへの到着の予測時間。
|
|
DTG = |
Distance to Go to the intersecting point
from current aircraft position.
現在の航空機位置からの交差するポイントに行く距離。
|
|
ALT = |
Predicted altitude when reaching the intersecting
point.
交差するポイントに達する場合、予想される高度。
|
If a DIST entry is made that results in a
circle that crosses the active route twice,
the data displayed represents the first intersecting
point on the route.
アクティブルートを2度横断する円に帰着するDISTエントリーがなされる場合、表示されたデータはルート上で第1の交差するポイントを表わします。
When data exists for a for a route crossing
point, reselection of the corresponding left
LSK transfers the intersecting data into
the scratchpad.
ルート横断地点についてのデータが存在する場合、対応する左のLSKの再選択でスクラッチパッドへ交差地点のデータを転送します。
That data can be used to create a waypoint
along the current route in the LEGS page.
そのデータはLEGSページに現在のルートに沿ったウェイポイントを作成するために使用することができます。
Examples are shown later in this section.
例としてこのセクション中でその後示されます。
6- ABEAM point: Pressing this LSK causes the FMC to look
for a point along the active route that represents
the “abeam” point to the selected FIX.
ABEAMポイント: このLSKを押すと、FMCは選択されたFIXに「真横の」ポイントを表わす、アクティブルートに沿ったポイントを捜します。
That point is transferred into the scratchpad
and can be used in the LEGS page to create
an along track abeam point.
ポイントはスクラッチパッドへ転送され、軌跡に沿って、アビームポイントを作成するためにLEGSページの中で使用することができます。
7- ERASE fix: Pressing this key erases all FIX data from
the FMC and the EHSI for the displayed fix
only.
ERASE FIX: このキーを押すことは、FMCおよび
EHSI に表示された FIX のみ用のEHSIからFIXデータをすべて削除します。
A fix entered on the other fix page is not
affected.
別の FIX ページに登録された FIX は影響されません。
● FIX Page Examples
FIX ページ例
The following pictures show the fix page
in action.
次の図は FIX ページ示します。
Hopefully these examples will solidify your
understanding of the FIX page and how it
can be used during your flights.
おそらく、これらの例は FIXページについてそれがフライトの間にどのように使用できるかの理解を深めてくれるでしょう。
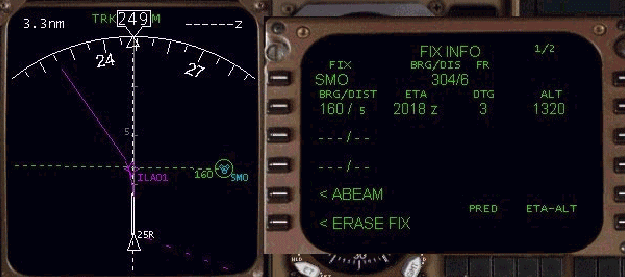
This is an example of how to use the fix
page for a departure.
これは出発のために FIX ページを使用する方法の例です。
The LAXX3 departure at KLAX requires that
the aircraft cross the SMO 160摯 radial on
runway heading and then turn to a 220摯
heading.
KLAXのLAXX3デパーチャーは、航空機は滑走路ヘディングとSMO
160度で交差し、次に220度ヘディングに変わることを必要とします。
To visually indicate the SMO 160摯 radial
on the EHSI, enter SMO in the FIX page.
視覚的にEHSIの上でSMO 160ラディアルを示すためには、FIXページにSMOを入力してください。
Notice that the SMO VOR symbol is drawn with
a green circle around it on the EHSI.
EHSIの上のそのまわりの緑の円でSMO VORシンボルが引かれることに注目してください。
Entry of “160” into the BRG/DIST column
creates the 160摯 radial drawing on the EHSI.
BRG/DISTカラムへの「160」のエントリーは、EHSIの上の160度ラディアルの描画を作成します。
Notice that there are entries for ETA, DTG
and ALT listed in the same row.
同じ列にリストされたETA、DTGおよびALTへのエントリーがあることに注目してください。
This is the time, distance and altitude to
the crossing radial as predicted by the FMC.
これはFMCによって予想されるような交差ラディアルへの時間、距離および高度です。
19
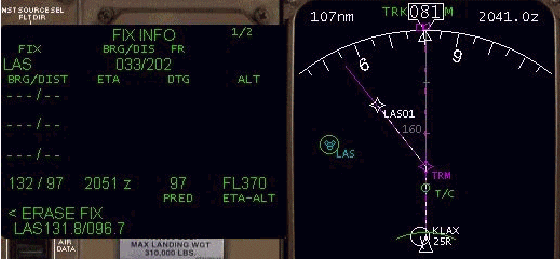
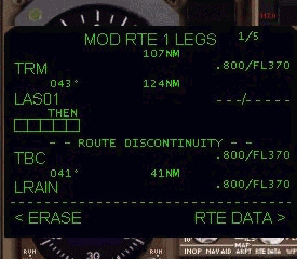
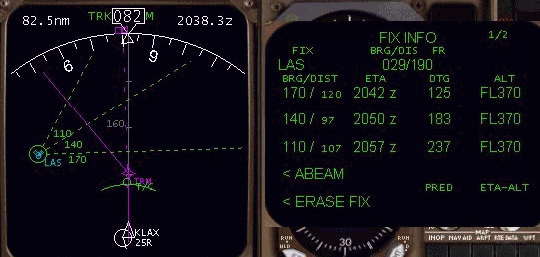
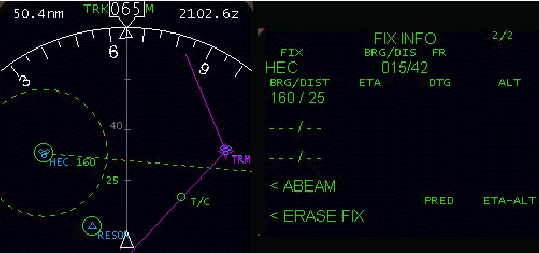
This is an example of how to create an “abeam
point” along the route of flight.
これは飛行のルートに沿った「真横のポイント」を作成する方法の例です。
Using the FIX page, it is possible to determine
when the aircraft would cross a point that
is abeam the LAS VOR on the current route
of flight.
FIXページを使用して、航空機が真横に飛行の現在のルート上のLAS
VORであるポイントといつ交差するか決めることは可能です。
The LAS fix has been entered into the FIX
page and is displayed on the EHSI.
LAS FIX はFIXページに入力されており、EHSIに表示されます。
Pressing the “< ABEAM” prompt at the
5L LSK transfers the calculated abeam point
coordinates to the scratchpad as shown (left
graphic).
5L LSK のところの <ABEAM プロンプトを押すことで(左のグラフィック)のようにスクラッチパッドへの計算された真横のポイント座標送られます。
These coordinates can then be added to the
route via the LEGS page as shown (right graphic)
.
その後、これらの座標は、(右のグラフィック)のようにLEGSページによってルートへ加えることができます。
Also notice the ETA, DTG and ALT estimates
for crossing the abeam point on the FIX page.
さらにFIXページの真横のポイントと交差するためのETA、DTGおよびALTが表示されます。
This is an example of how to create multiple
crossing radials for a given fix.
これは与えられた FIX 用の多数の交差するラディアルを作成する方法の例です。
In this case, we are using the LAS VOR again.
この場合、私たちはLAS VORを再び使用しています。
On the FIX page, 3 different radials have
been entered into the FIX page BRG/DIST data
lines.
FIXページに、3つの異なるラディアルが、FIXページBRG/DISTデータ行に入力されました。
The EHSI has drawn each of these radials.
EHSIは、これらのラディアルの各々を描画します。
The FMC has calculated that each radial crosses
the currently active route and the intersection
crossing data is displayed for each point.
FMCは、各ラディアルが現在アクティブルートを横断すると推定しました。また、インターセクション交差データは各ポイントのために表示されます。
To make the above entries, we simply typed
in the desired radial and then pressed one
of the BRG/DIST line select keys.
上記のエントリーを行なうために、次にBRG/DISTラインのうちの1つを(キーを選択)して欲しいラディアルを単にタイプインするだけです。
For example, we entered “170” into the
scratchpad and pressed the 2L LSK to create
the LAS 170摯 radial.
例えば、スクラッチパッドへ「170」を入力し、LAS
170度ラディアルに作成するために 2L LSK を押します。
20
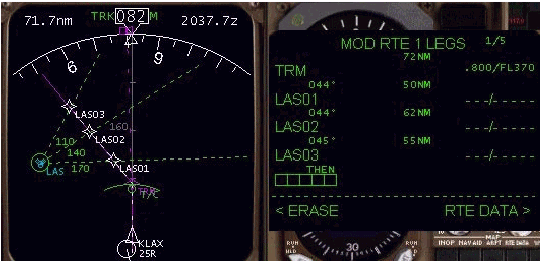
The picture above shows that along track
waypoints can be created along the route
of flight for all of the crossing radials.
上の図はトラックウェイポイントに沿って交差するラディアルのすべてのための飛行のルートに沿って作成できることを示しています。
This feature is similar to the ABEAM waypoint
feature in that pressing the LSK next to
the BRG/DIST listing transfers the exact
along track coordinates for that point to
the scratchpad.
この特徴は、そのポイントのためのトラック座標に沿ってスクラッチパッドにBRG/DISTリストのLSKを押すことが正確なものを転送するという点でABEAMウェイポイントの特徴に似ています。
These coordinates can then be added to the
LEGS page as shown.
その後、これらの座標は示されるようなLEGSページに加えることができます。
The picture above shows an example of how
to display an AIRPORT on the fix page.
上記の絵は、FIX ページにAIRPORTを表示する方法の例を示します。
This is helpful when trying to determine
the exact distance to an alternate airport.
交互の空港への正確な距離を決定しようとする場合に役に立ちます。
This can be helpful when sitting on the ramp
and trying to determine if a desired takeoff
alternate is within the legally prescribed
distance as well.
傾斜路に座り希望の離陸が交替するかどうか決めようとすることが、法律上規定された距離内に同様にある場合、これは有用になりえます。
The FIX page accepts the ICAO identification
for any airport in the database just like
the ROUTE page.
FIXページは、ちょうどROUTEページのようなデータ・ベース中の任意の空港用のICAOの識別を受理します。
21
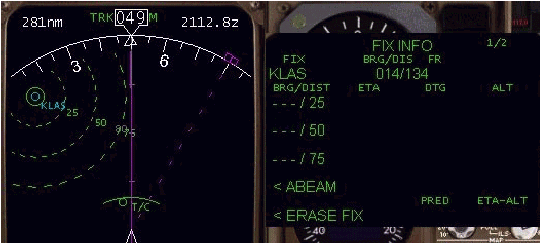
This picture demonstrates the ability to
build distance rings around a given fix.
この絵は、与えられた FIX のまわりに距離の輪を構築する能力を表示しています。
In this example, the KLAS airport is used
to show this capability.
この例において、KLAS空港はこの能力を示すために使用されています。
However, you can use any entered fix to create
distance rings.
しかしながら、距離の輪を作るためにどんな入力された位置も使用することができます。
To enter a DIST value only, use the format
“/XXX” for this purpose.
DISTの値のみを入力するためには、フォーマット「/XXX」を使用してください。
For example, to enter the 25 mile ring we
entered “/25” into the scratchpad and pressed
the 2L LSK.
例えば、25マイルの輪に入るためには、スクラッチパッドに「/25」と入力し
2L LSKを押します。
If a distance ring crosses the active route,
ETA/DTG/ALT information is displayed for
the first point that crosses the route.
距離の輪がアクティブルートを横断する場合、ETA/DTG/ALT情報はルートを横断する最初のポイントで表示されます。
Notice that in the above example there is
no extra data displayed for the three distance
entries.
上記の例において、3つの距離のエントリーのために表示された余分なデータがないことに注目してください。
This is because none of the rings crosses
the active route.
これは輪のどれもアクティブルートを横断しないからです。
The rings are labeled on the EHSI for their
exact distance from the fix.
ラベルは、FIX からのそれらの正確な距離用のEHSIの上で輪に付けられます。
In this case, the three rings are 25, 50,
and 75 miles from KLAS respectively.
この場合、3つの輪は、KLASからそれぞれ25、50および75マイルです。
Distance rings can be helpful to build a
“poor mans” DME arc, and can be used as
a reference when flying said procedure.
距離の輪は「poor mans」DMEの弧を構築するのに有用で、前述の飛行の手続きをする場合参照として使用することができます。
This final example shows the combination
of a distance ring and radial.
この最終例は、距離の輪および放射状のコンビネーションを示します。
To do this, we entered “160/25” into the
scratchpad and pressed the 2L LSK.
これをするために、スクラッチパッドに「160/25」を入力し、2L
LSK を押します。
|
 |
 |