Manually Programming Route Data
The previous section discussed loading flight plan data created using a flight planner.
前のセクションでフライトプランナーを使って作成したフライトプランデータのローディングについて説明しました
This section discusses how to program the ROUTE pages manually.
このセクションでは ROUTE ページでのマニュアルでのプログラム方法について説明します
To successfully program a route manually you must have a route of flight in mind.
ルートのプログラムをマニュアルで成功させるにはフライトのルートについて注意が必要です
A route can be created using any combination of VORs, NDBs, intersections, lat/long points, Victor airways, or Jet airways.
ルートは VOR 、 NDB 、 インターセクション、緯度/経度、ビクター航空路、またはジェット航空路のどのコンビネーションを使っても作成することができます
The ROUTE page is formatted to accept this data and creates waypoints using the programmed information.
ROUTE ページはこのデータを受け入れてフォーマットされています。プログラムされた情報を使用してウェイポイントを作成します
As we previously learned, the FMC can store two routes in memory.
前に学んだように、FMC はメモリーに 2 つのルートを覚えておくことができます
We will be working with RTE1 for explanation purposes.
説明の目的として RTE1 について見ていきます
When the FMC is initially loaded, there are two ROUTE pages available for RTE1.
FMC が最初のロードを行った時、2 つの ROUTE ページがあり、RTE1 が可能になります
Page one is programmed with the departure airport, departure runway, and arrival airport.
ページ 1 は出発空港、出発滑走路、到着空港がプログラムされます
Page two is used to begin manually programming the route.
ページ 2 はルートのマニュアルプログラムを始めるために使用します
Pressing the RTE key on the FMC keyboard displays page one of the ROUTE page.
FMC キーボード上の RTE キーを押すと ROUTE ページのページ 1 が表示されます
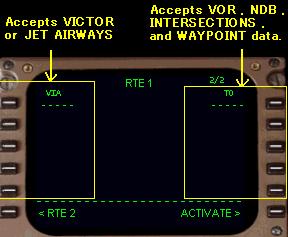
Pressing the NEXT PAGE key displays the page shown at right.
NEXT PAGE キーを押すと右の図のようにページが表示されます
This page is used to program the route of flight.
このページはフライトのルートをプログラムするために使用します
There are two columns on this page for the entry of route data.
このページにはルートデータの入力のための 2 つのカラムがあります
The dashed lines in the data boxes abeam the 1L and 1R LSKs indicated where route data can be entered.
1L と 1R LSK の真横にあるデータボックスのダッシュラインはルートデータの入力位置を示します
Manual route programming always begins with the RIGHT column labeled “TO”.
マニュアルルートプログラミングはいつも "TO" と書かれた RIGHT カラムから始めます
The RIGHT column is used to program individual waypoints.
RIGHT カラムはウェイポイントの構成をプログラムするために使用します
A waypoint is basically a point in the route.
ウェイポイントは基本的にルート内のポイントです
Valid waypoints are created from VORs, VOR intersections, NDBs, or latitude/longitude entries.
有効なウェイポイントは VOR 、 VOR インターセクション、NDB 、または緯度/経度入力から作成されます
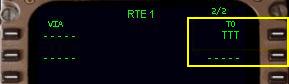
For example, entering “TTT” into the scratchpad and pressing the 1R LSK makes the TTT VOR the first waypoint in the route.
たとえば、スクラッチパッドに "TTT" と入力し、 1R LSK を押すと TTT VOR がルートの最初のウェイポイントとして作られます
The dashed line now moves down to the 2R LSK for entry of another waypoint.
点線は次の 2R LSK に他のウェイポイントを入力するために下に移動します
When another waypoint is entered into the 2R data block, the dashed lines move down to the 3R LSK data block.
他のウェイポイントを 2R データブロックに入力した時、ダッシュラインは次の 3R LSK データブロックに移動します
The FMC continues to accept individual waypoints in this fashion.
FMC はこの機能で有効なウェイポイントの受け入れを続けていきます
When the page is filled with waypoints, the FMC automatically adds another ROUTE page that can be accessed by pressing the NEXT PAGE key.
ページがウェイポイントで満たされた時、FMC は自動的に他の ROUTE ページを追加し、NEXT PAGE キーを押すことによりアクセスできます
The LEFT column labeled “VIA” is used to program JET and VICTOR airways.
"VIA" と書かれた LEFT カラムは JET と VICTOR 航空路のプログラムに使用します
The FMC accepts airway names in the LEFT column data boxes.
FMC は LEFT カラムデータボックスに入れた航空路名を受け入れます
It then automatically adds the waypoints that constitute that airway into the route.
そうするとルート上の航空路を構成するウェイポイントが自動的に追加されます
For the FMC to accept an airway entry, the airway must be “anchored”.
FMC の航空路入力の受け入れのために航空路は "anchored"( 固定 ) しなければなりません
This means you must enter the first waypoint of the airway in the right “TO” column for the FMC to know where the airway begins.
この意味は、FMC に航空路の始まりを知らせるため、右側の "TO" カラムに入っている航空路の最初のウェイポイントを入力しなければならないということです
For this reason, FMC route programming never starts with an entry in the “VIA” column, it must always start with a waypoint entry in the “TO” column.
この理由は、FMC ルートプログラミングは "VIA" カラムの入力からのスタートはできず、いつも "TO" カラムのウェイポイント入力からスタートしなければなりません
019
The name of the airway is entered into the LEFT column on the line just below the anchoring waypoint entry.
LEFT カラムに入力された航空路の名前は固定入力された航空路のライン上になります
The airway must then be “closed” by entering the last waypoint needed in the airway.
航空路は最後のウェイポイント ( 航空路に必要な ) の入力により "closed" しなければなりません
If you attempt to enter an airway without a valid “anchor” point, the FMC will generate an error message.
もし有効な "anchor" ポイント無しで航空路を入力を試しても、FMC はエラーメッセージを出すだけです
The same will happen if an invalid “closing” point is entered.
同じことは、もし無効な "closing" ポイントを入力しても起こります
Lets look at an example of airway programming.
航空路プログラミングの例を見てみましょう
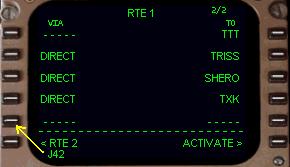
Using TTT as a starting point, we added some more waypoints in the “TO” column to take us to the TXK VOR.
"TTT" をスターティングポイントに使用して、"TO" カラムに TXK VOR などいくつかのウェイポイントを追加します
These waypoints were added individually by entering the waypoint name in the scratchpad and pressing the right LSK containing the dashed line.
これらのウェイポイントはスクラッチパッドにウェイポイントの名前を入力し、ダッシュラインのある右側の LSK を押すことにより個々に追加されていきます
From the TXK VOR we want to proceed via J42 to the MEM VOR.
TXK VOR から J42 を通って MEM VOR へ続けます
Both the TXK VOR and MEM VOR are part of the J42 airway.
TXK VOR と MEM VOR の両方は J42 航空路の一部です
Therefore, TXK becomes our “anchor” waypoint.
その結果、TXK は "anchor" ウェイポイントになります
Type “J42” into the scratchpad and press the left LSK with the dashed lines (the 5L LSK in our example).
"J42" とスクラッチパッドに入力し、左のダッシュラインのある LSK を押します ( この例では 5L LSK )
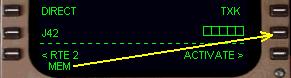
As soon as an airway entry is made in the “VIA” column, the “TO” column automatically displays data entry boxes on the same line.
航空路の入力が "VIA" カラムに作られるとすぐに "TO" カラムに自動的に同じラインにデータ入力ボックスが表示されます
This indicates that a waypoint entry is mandatory for the FMC to accept the airway in the route.
これは航空路の入力が FMC がルート上の航空路を受け入れるために命令された表示です
Without a “closing” waypoint entry, the FMC would not know where to stop adding waypoints from the requested airway.
"closing" ウェイポイント入力無しでは、FMC はリクエストした航空路からウェイポイントの追加を終了させるのがどこかわかりません
To close the airway entry, type “MEM” into the scratchpad and press the LSK abeam the data boxes (the 5R LSK in our example).
航空路入力を閉めるため、 "MEM" とスクラッチパッドに入力し、データボックスの真横の LSK を押します ( この例では 5R LSK )
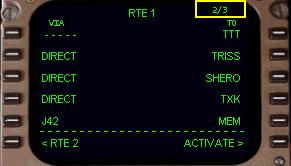
The results of our programming are shown at right.
プログラミングの結果が右図のようになります
The route of flight can be read off exactly as the FMC will draw it.
フライトのルートは正確に FMC の表示から読み取ることができます
The route starts at the TTT VOR and goes direct to each of the next 3 waypoints.
ルートは TTT VOR からスタートし、ダイレクトでそれぞれ次の 3 ウェイポイントに行きます
Then after the TXK VOR, the FMC adds to the route all waypoints from J42 up through the MEM VOR.
それから、TXK VOR の後、FMC は MEM VOR までの航空路 J42 上の全てのウェイポイントをルートに追加します
The waypoints and airways programmed on the route page can be viewed on the LEGS page.
ルートページでプログラムしたウェイポイントと航空路は LEGS ページで見ることができます
The LEGS page lists all waypoints that make up the programmed route, including those from J42.
LEGS ページは J42 からのものを含めたプログラムされたルートから全てのウェイポイントをリストします
How to access and use the LEGS page is described later in this chapter.
LEGS ページの表示と使い方はこの項の後で説明します