Advanced FMC Route Programming
上級の FMC ルートプログラミング
Based on the teachings of the previous section, you should have no problem getting a route programmed into the FMC.
前のセクションでは基本的なことを学びました、FMC にルートをプログラムすることができるようになりました
However, there are some advanced features of the FMC that can make manually programming the FMC easier.
しかしながら、FMC にはいくつかのもっとすぐれた機能があり、FMC に簡単にマニュアルでプログラムすることができます
This next example demonstrates these advanced features and also takes you through every step required to properly program the route page manually.
この次のデモの例で、これら進んだ機能とルートページでマニュアルで適切にプログラムするために必要な全てのステップを見てみましょう
The route programmed in this example is used for the explanation of FMC functions in the next section.
この例でのルートプログラムは次のセクションの FMC 機能の説明を使用します
Therefore, it is important to run through this example to have the FMC properly setup for future learning.
その結果、この例で FMC の機能を学ぶために適切にセットアップする必要があります
Some of the information provided during this example repeats concepts already described.
情報のいくつかは提供します。この例を繰り返し概要を描きます
This is done to reinforce the programming concepts presented earlier.
これは早くプログラミングの概要を見せるために行います
As previously stated, we shall be programming a flight from KDFW to KLGA.
以前に述べたとおなじ、KDFW から KLGA へのフライトのプログラミングをやってみましょう
This example demonstrates the use of Standard Instrument Departures (SIDs), Jet airways, waypoints, and Standard Instrument Arrivals (STARs).
このデモの例ではスタンダードインスツルメントデパーチャー ( SID ) 、Jet 航空路、ウェイポイント、スタンダードインスツルメントアライバル ( START ) を使用します
Our route of flight is as follows:
フライトのルートは以下の通りです
KDFW.DALL6.TXK.J42.MEM.J42.GVE.MINKS1.LGA
To translate: departing the Dallas-Fort Worth International airport via the Dallas6 departure (SID) using the Texarkana transition to the Texarkana VOR, then via Jet 42 to the Memphis VOR, then via Jet 42 to the Gordonsville VOR, then via the MINKS1 arrival (STAR) to the LaGuardia airport.
説明しますと:ダラス−フォートワース国際空港を Dallas6 デパーチャー ( SID ) で出発し、Texarkana トランジッションを使用して Texarkana VOR へ、そのあと Jet 42 を通って Memphis VOR へ、そのあと Jet 42 を通って Gordonsville VOR へ、そのあと MINKS1 アライバル ( START ) を通って LaGuardia 空港に到着します
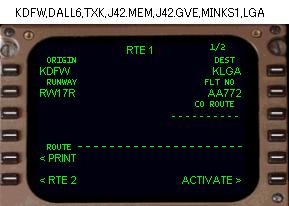
To begin programming, press the RTE key on the FMC keyboard to access the ROUTE page.
プログラミングの開始、FMC キーパッドの RTE キーを押して ROUTE ページを出してください
All data programmed from previous examples must be removed from the ROUTE page.
前の例にて全てのデータはプログラムされていますので ROUTE ページから削除しなければなりません
To do this, press the DEL key on the FMC keyboard followed by the 1L LSK.
これをするには、FMC キーボードの DEL キーを押して、1L LSK を押し出発空港を消します
This removes all route data stored in the FMC.
これによって FMC に覚えさせていた全てのルートデータが削除されます
The data boxes abeam the 1L and 1R LSK indicate that data entry is required in these areas.
1L と 1R LSK の真横のデータボックスはこれらのエリアが必要とするデータ入力を表します
Therefore, the first information entered on the ROUTE page is the origination and destination airports.
そう、ROUTE ページの最初の情報の入力は出発空港と到着空港です
The FMC accepts the 4-letter ICAO identifier for each airport.
FMC はそれぞれの空港に対応する 4 文字の ICAO 識別番号を受け入れます
To enter the origin, type “KDFW” into the scratchpad and then press the 1L LSK.
出発空港を入れます。"KDFW" とスクラッチパッドに入力し、1L LSK を押します
To enter the destination, type “KLGA” into the scratchpad and then press the 1R LSK.
到着空港を入れます。"KLGA" とスクラッチパッドに入力し、1R LSK を押します
The next required entry is the departure RUNWAY in the data block abeam the 2L LSK.
次の入力要求は 2L LSK の真横のデータブロックで、出発 RUNWAY です
In our example we will depart runway 17R. Therefore, type “17R” into the scratch pad and then press the 2L LSK to enter the data.
この例では出発滑走路 17R です。"17R" とスクラッチパッドに入力し、2L LSK を押してデータを入力してください
An alternate method to select departure runway using the DEP ARR key will be explained later.
代替の方法として、DEP APP キーを使用して出発滑走路を選択することもできます。これは後で説明します
021
The FLT NO data block at the 2R LSK is used to enter the optional flight number.
FLT NO データブロックが 2R LSK にあり、自由に選択できるフライトナンバーの入力に使用されます
You can enter any combination of letters and numbers to represent your current flight.
文字と数字の組み合わせを使って現在のフライトの番号を自由に付けてください
In our example we are American flight 772, therefore we type “AA772” into the scratchpad and press the 2R LSK to enter the data.
この例ではアメリカンフライト 772 としています。"AA772" とスクラッチパッドに入力し、2R LSK を押してデータを入力します
The CO ROUTE data block is not used when manually programming a route.
CO ROUTE データブロックはマニュアルのルートプログラミングでは使用しません
It must remain blank.
ブランクのままにしておきます
The RTE 1 page should look exactly as pictured above prior to the moving on to the next step.
RTE 1 ページは図のように見えます。より重要な次のステップに移動します

Programming of the actual route begins on page 2 of the ROUTE page.
実際のルートのプログラミングは ROUTE ページのページ 2 から始まります
Press the NEXT PAGE key to access page 2/2.
NEXT PAGE キーを押して 2/2 ページを出してください
There are two columns on page 2 labeled “VIA” and “TO”.
ページ 2 には "VIA" と "TO" の 2 つのカラムがあります
The right “TO” column is used to enter individual waypoints in the route.
右の "TO" カラムはルートの構成するウェイポイントを入力するのに使用します
For example, if you wanted to start out going direct to a VOR (or other named waypoint) you would type in the name of the point in the scratchpad and place it in the 1R data box.
この例では、もし 最初はダイレクトに VOR ( またはその他の名前のウェイポイント ) に行きたい場合は 、スクラッチパッドにそのポイントの名前を入力し、1R データボックスに入れます
The dashed line would then move to the 2R position where you can insert the next waypoint in the route.
ダッシュラインは 2R ポジションに移動し、ルートの次のウェイポイントを入力できるようになります
You can continue programming the route in this fashion until all waypoints have been entered.
同じ要領で全てのウェイポイントを入力し、ルートのプログラミングを続けることができます
There are many different valid entries to create waypoints.
たくさんの異なる有効なウェイポイントの作成方法があります
Please see the “LEGS” page discussion of this manual for details about the valid waypoint formats.
"LEGS" ページを見てください。有効なウェイポイントのフォーマットについての詳細が説明されています
The left “VIA” column is for the entry of Jet and Victor airways.
もとのルートページで、左の "VIA" カラムは Jet と Victor 航空路の入力を行います
The ROUTE page provides for the insertion of Jet and Victor airways in place of inserting the individual airway waypoints manually.
ROUTE ページは Jet と Victor 航空路の挿入が行えます。航空路を構成するウェイポイントをマニュアルで挿入できます
The airway must start with a waypoint entry in the “TO” column.
航空路は "TO" カラムへのウェイポイントの入力から始めなければなりません
This waypoint must be part of the airway to be entered.
このウェイポイントは入力した航空路の一部でなければなりません
Then to complete the airway, the last waypoint of the airway used in the route is entered into the “TO” column.
航空路が完了したら、航空路の最後のウェイポイントはルートを使用して、"TO" カラムに入力します
This will be explained later in our example.
これに付いてはこのあと例に沿って説明します
Please note that the airway database was extracted from the FS2000 database, so there may be some missing airways.
注意してください。航空路のデータベースは FS2000 データベースから引き抜かれますが、いくらかの不良航空路もあるようです
This could result in getting an error message when programming an airway.
これは結果として、航空路のプログラミングの時エラーメッセージが出されることがあります
In this case, you would have to enter all of the airway waypoints manually using the “TO” column.
このケースでは全ての航空路のウェイポイントをマニュアルで "TO" カラムに入力することにより回避できます
Our route of flight starts with the use of a Standard Instrument Departure (SID).
ここでのフライトルートのスタートはスタンダードインスツルメントデパーチャー ( SID ) を使用します
To access the SID page of the FMC you must press the “DEP ARR” key on the FMC keyboard.
FMC キーボードの "DEP ARR" キーを押して FMC の SID ページにしてください
This calls up the departure/arrival index page.
これは出発/到着インデックスページを呼び出します
From the DEP/ARR INDEX page you can access the departure and arrival procedures for your origination and destination airports.
DEP/ARR INDEX ページから出発空港と到着空港のそれぞれ出発と到着のプロシージャーにアクセスできます
(Note: For more information about the SID/STAR database, review the “Saving FMC Data” section near the end of the FMC manual).
( ノート:SID/STAR データベースについてのもっと情報が欲しい場合は FMC マニュアルの最後のほうの "Saving FMC Data" セクションを見てください )
022
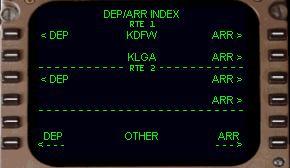
Notice that the index page has prompts for both RTE 1 and RTE 2.
インデックスページは RTE1 と RTE2 の両方のプロンプトを持っていることに注意してください
Since we are programming with RTE 1, KDFW and KLGA are listed in the RTE 1 index.
RTE 1 にプログラミングします。 KDFW と KLGA は RTE 1 インデックスにリストされます
At this point we want to select a SID for KDFW in RTE 1.
このポイントは RTE 1 の KDFW のための SID を選択します
Pressing the 1L LSK “<DEP” prompt calls up the departure page for the KDFW airport.
"< DEP" プロンプトの 1L LSK を押して KDFW 空港のための出発ページを呼び出します
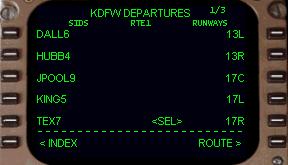
The KDFW departure page is shown here.
KDFW デパーチャーページが表示されています
You can do two things on this page; select a SID, and/or select a departure runway.
このページでは 2 つのことができます:SID の選択、そして/または、出発滑走路の選択
Notice in the upper right corner that this page is only 1 of 3 pages available.
右上隅にこのページが 1 of 3 ページと表示されていることに注意してください
This indicates that there are more pages of SIDs and/or runways available.
この表示は SID そして/または出発滑走路の可能なページがもっとあるということです
To access these pages, use the NEXT/PREV PAGE keys on the FMC keyboard.
これらのページをアクセスするには FMC キーパッドの NEXT/PREV PAGE キーを使用します
The available runways are listed on the right side of the page.
利用可能な滑走路はページの右側にリストされます
We previously entered runway 17R using the ROUTE page, therefore notice the “<SEL>” prompt next to the 17R listing.
前に ROUTE ページに滑走路 17R を入力していますので、"<SEL>" プロンプトが 17R の横に表示されていることに注意してください
To change the departure runway from this page, simply press the right LSK abeam the desired runway.
このページから出発滑走路の変更をしたい場合は、たんに望みの滑走路の横の LSK を押すだけで行えます
For example, press the 3R LSK to select runway 17C for departure.
たとえば、3R LSK を押すと 17C 滑走路が選択されます
The “<SEL>” prompt would then move up to the 17C data block.
"<SEL>" プロンプトは 17C データブロックに移動します
The ROUTE page would also change to reflect the new departure runway.
ROUTE ページもまたこの新しい出発滑走路が反映されて変更されます
Since KDFW has more than just 5 runways, selection of other runways is possible by looking on pages 2 and 3 using the NEXT/PREV PAGE keys on the FMC keyboard.
KDFW に存在する、今表示中の 5 滑走路以外のほかの滑走路は FMC キーボードの NEXT/PREV PAGE キーで 2 と 3 ページを表示させることにより選択できるようになります
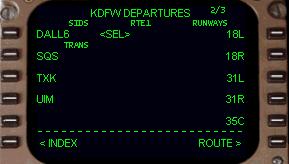
The available SIDs for KDFW are listed on the left side of the departure page.
利用可能な KDFW 空港の SID はデパーチャーページの左側にリストされています
Notice that there are five available SIDs listed on page 1.
ページ 1 には利用可能な 5 つの SID が表示されていることに注意してください
More SIDs may be available by looking on pages 2 and 3.
さらにちがう SID はページ 2 と 3 を表示することで利用できます
Since our route of flight uses the DALL6 departure, press the 1L LSK to select the SID.
ここでのフライトのルートは DALL 6 デパーチャーを使用します。1L LSK を押して SID を選択してください
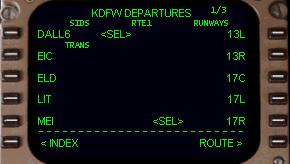
Pressing the 1L LSK displays the page shown at right.
1L LSK を押すと右のように表示されます
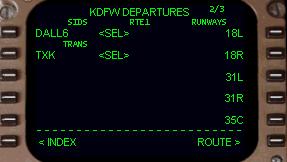
The selected SID is listed in the 1L data block.
SID の選択は 1L データブロックにリストされます
Below the selected SID name are the available SID transitions.
SID 名の選択のつぎに SID トランジッションを利用します
Not all SIDs have transition procedures.
全ての SID がトランジッションプロシージャーを持っているわけではありません
If a SID has no transitions available, the word “<NONE>” is listed in the TRANS column.
もし SID が利用できるトランジッションを持っていない場合は TRANS カラムに "<NONE>" とリストされます
Our flight plan calls for the use of the TXK transition.
ここでのフライトプランは TXK トランジッションを使用します
Since we do not see that transition listed on page 1, we must use the NEXT PAGE key to look for it on page 2.
ページ 1 にはまだトランジッションは見えません。NEXT PAGE キーを使用して次のページ 2 にしてください
Pressing the NEXT PAGE key displays the page shown here.
NEXT PAGE キーを押して、このような表示になります
Notice that we are now on page 2/3 and that the TXK TRANS is listed abeam the 3L LSK.
ページ 2/3 が表示され、TXK TRANS が 3L LSK の真横にリストされていることに注意してください
To select the TXK transition procedure simply press the 3L LSK.
TXK トランジッションプロシージャーの選択は単に 3L LSK を押すだけでできます
023
Pressing the 3L LSK results in the remaining TRANS procedures disappearing and a “<SEL>” prompt displayed next to the selected
transition.
3L LSK を押すと、TRANS プロシージャーが見えなくなり "<SEL>" プロンプトが、選択されているトランジッションに表示されます
If a mistake is made in the selected TRANS or even the selected SID, simply start fresh by pressing the “<INDEX” prompt at the 6L LSK.
もし TRANS の選択を間違えるか、またはさらに SID を選択する場合は、たんに 6L LSK "< INDEX" を押すだけでフレッシュスタートされます
This redisplays the DEP/ARR INDEX page where you can start the procedure over.
これは DEP/ARR INDEX ページ ( プロシージャーオーバーのスタートができる ) が再表示されます
If a selected departure is no longer required, or a different departure procedure is desired, selection of a different procedure is possible at any time by returning to the departure page and selecting a new procedure.
もしデパーチャーが必要で無くなり、または違う望みのデパーチャープロシージャーが選択したいなら、違うプロシージャーの選択はいつでもデパーチャーページで新しいプロシージャーを選択することにより可能です
The FMC will automatically remove the old procedure and place the new procedure into the route.
FMC は自動的に古いプロシージャーをはずし、新しいプロシージャーをルートに入れます
This eliminates the need to manually remove waypoints in the route from the old procedure prior to selecting a new one.
この削除は新しいプロシージャーを選択する前の古いプロシージャーからルート内のウェイポイントをマニュアルではずす必要があります
Now that the proper SID and SID TRANS are selected, return to the ROUTE page by pressing the 6R LSK labeled “ROUTE>”.
適切な SID と SID TRANS を選択したら、6R LSK "ROUTE >" を押して ROUTE ページに戻ってください
Pressing the 6R LSK takes us to page one of the RTE1 pages.
6R LSk を押すと RTE 1 ページのページ 1 になります
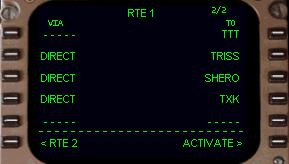
Upon selecting page 2/2 (using the NEXT PAGE key), we find that the waypoints of the selected SID and SID TRANS are now listed in the “TO” column as shown here.
ページ 2/2 を選択すると ( NEXT PAGE キーを使用 ) 、選択した SID と SID TRANS のウェイポイントが表示されて、右の絵のように "TO" カラムにリストされます
This listing differs a bit from the real FMC in that the real FMC would not list all waypoints of the procedure, rather just the name of the procedure and the TRANS fix.
このリストは実際の FMC とは少し違います。実際の FMC ではプロシージャーのすべてのウェイポイントがリストされません。プロシージャーの名前と TRANS fix のみです
The RTE1 listing shown above is how this page would look if the waypoints had been programmed manually rather than added automatically by selecting a SID.
RTE 1 の上にリストされているのはこのページにもしウェイポイントがマニュアルでプログラムされていたら、選択された SID に自動的に追加されています
Notice that the dashed lines have moved down to the 5L and 5R LSK positions just below the last waypoint entry.
ダッシュラインは 5L と 5R LSK ポジションに移動し、最後のウェイポイント入力になっていることに注意してください
This is where the next airway or waypoint entry would be made.
これは次の航空路またはウェイポイントを入力する場所です
In our example, we are going to join up with J42 from the TXK VOR.
この例では TXK VOR から J42 につながっていきます
Since the TXK VOR is part of J42 it serves as the “anchor” waypoint for the airway.
TXK VOR は J42 の一部分で航空路のための "anchor"アンカーウェイポイントになっています
The Jet airway can now be placed in the “VIA” column.
Jet 航空路は "VIA" カラムに入力できます
Do this by typing “J42” into the scratchpad and pressing the 5L LSK.
"J42" とスクラッチパッドに入力し、5L LSK を押してください
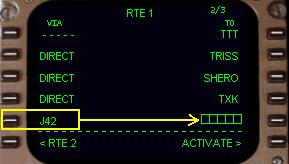
Notice in our picture that J42 (highlighted) is now in the VIA column and that a group of boxes has appeared in the TO column.
この絵で J42 ( 明るく表示 ) は VIA カラムに入り、 TO カラムにはボックスのグループが表示されていることに注意してください
These boxes indicate that the FMC requires a waypoint entry along J42 to complete the insertion of the airway into the route.
これらのボックスは FMC が必要とするルート上の航空路の挿入する J42 の完璧なウェイポイントの入力のために表示されます
024
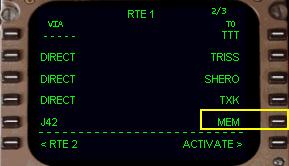
Our flight plan requires that we fly along J42 until reaching the MEM VOR.
ここでのフライトプランには J42 に沿って MEM VOR に届くまで必要です
Type “MEM” into the scratchpad and press the 5R LSK to place it into the data box.
"MEM" とスクラッチパッドに入力し、5R LSK を押してデータボックスに入れてください
Doing so completes the airway entry as shown here.
完全にできたら右の絵のようになります
If an attempt is made to complete an airway entry with a waypoint that is not part of the airway, the FMC will display an INVALID ENTRY message in the scratchpad.
もし航空路の入力で航空路の一部ではないウェイポイントもいっしょに入力すると、FMC はスクラッチパッドに INVALID ENTRY メッセージを出します
If this happens, press the CLR key to remove the error message and then enter the correct waypoint to complete the airway entry.
もしこのエラーメッセージがでたら、CLR キーを押してエラーメッセージを消し、航空路の正しいウェイポイントを入力してください
After the MEM waypoint, the flight plan requires that we continue along J42 until reaching the GVE VOR.
MEM ウェイポイントの後、フライトプランは J42 につづく GVE VOR までを要求します
Since we have run out of space on page 2, the FMC automatically adds another page to the ROUTE pages.
ページ 2 の場所を使いきったら、FMC は自動的に ROUTE ページに別のページを追加します
Move to page 3 using the NEXT PAGE key on the FMC keyboard.
FMC キーバッドの NEXT PAGE キーでページ 3 に移動します
Page 3 will have the dashed entry lines available abeam the 1L and 1R LSKs for entry of more route data.
ページ 3 ではもっとルートデータを入力するため 1L と 1R LSK の横にダッシュラインの入力場所があります
Use the same procedure as before to enter the next airway in the route page.
同じ手順によってルートページに次の航空路の入力をしていきます
Type “J42” into the scratchpad and press the 1L LSK.
"J42" とスクラッチパッドに入力し、1L LSK を押します
Then type “GVE” into the scratchpad and press the 1R LSK.
"GVE" とスクラッチパッドに入力し、1R LSK を押します
This completes the Jet route entry.
これでジェットルートの入力は完了です

The resulting page should look exactly as shown at right.
その結果のページが右の絵のようになります
The data entry lines have now moved down to the 2L and 2R LSK positions awaiting more data.
データ入力ラインは 2L と 2R LSK に移動し、さらなるデータ入力を待っています
If more airways (or waypoints) were required in the route, they would be entered here.
もしもっと航空路 ( またはウェイポイント ) がルートに必要ならばそれらを入力してください
However, our route calls for a STAR into KLGA.
ここでのルートでは KLGA 空港の STAR を使用します
So we need to return to the DEP ARR page using the DEP ARR key on the FMC keyboard.
FMC キーパッドの DEP ARR キーを使って DEP ARR ページに戻ってください
Press the DEP ARR key to display the DEP/ARR INDEX page.
DEP ARR キーを押すと DEP/ARR INDEX ページが表示されます
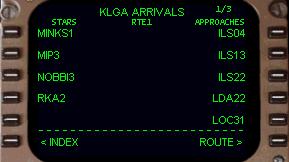
This time select the KLGA “ARR>” prompt at the 2R LSK to display available arrivals.
このとき 2R LSK の KLGA "ARR >" を選択し可能な到着を表示します
The arrival screen is set up similarly to the departure screen.
アライバル ( 到着 ) スクリーンはデパーチャー ( 出発 ) スクリーンとほとんど同じです
Available STARs for KLGA are listed along the left side.
KLGA 空港で利用可能な STAR が左側にリストされます
Available approach procedures and runways are listed on the right side.
利用可能なアプローチプロシージャーと滑走路が右側にリストされます
Approaches and runways will be discussed later in this manual.
アプローチと滑走路はこのマニュアルの後のほうで説明します
Our flight plan calls for the use of the MINKS1 arrival into KLGA.
ここでのフライトプランは KLGA 空港の MINKS1 アライバルを使用します
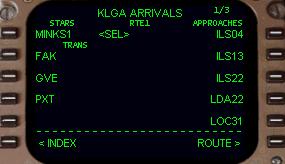
Pressing the 1L LSK selects the MINKS1 arrival and displays available STAR transitions.
1L LSK を押して MINKS1 アライバルを選択し、利用可能な STAR トランジッションを表示します
Since our flight plan uses the GVE VOR, select the GVE TRANS by pressing the 3L LSK.
ここでのフライトプランでは 3L LSK を押すことにより GVE TRANS を選択し GVE VOR を使用します
This connects our route to the STAR.
これで STAR がルートに接続されます
If a mistake is made in selecting a STAR or TRANS, return to the INDEX page by pressing the 6L LSK and start again by selecting the KLGA ARR prompt.
もし STAR や TRANS の選択を間違えた場合は、6L LSK を押して INDEX ページに戻り、KLGA ARR プロンプトの選択からもう一度始めてください
Also, if at anytime during the flight a different STAR is required, return to the arrival page using the DEP ARR key and make the changes.
もしフライトが異なる STAR を要求するなら、DEP ARR キーを使ってアライバルページに戻り、変更してください
When changes are made to the STAR, the FMC automatically updates the route to reflect the changed STAR procedure.
STAR の変更を行った時、FMC は自動的に STAR プロシージャーの変更を反映し、ルートをアップデートします
This eliminates the need to manually remove waypoints added by the previously selected STAR .
これはその前に選択されていた STAR によるウェイポイントの追加や削除をマニュアルで行う必要はないということです

Once the STAR is selected, return to the ROUTE page by pressing the 6R LSK labeled “ROUTE>”.
いったん STAR が選択されたら、6R LSK "ROUTE >" を押して ROUTE ページに戻ってください
Page through the route pages to double check the programmed route using the NEXT/PREV keys.
ページがルートページを通り NEXT/PREV キーを使用してダブルチェックがプログラムルートにされます
Notice that after the GVE VOR the MINKS1 arrival waypoints have been added as shown at right.
右の絵のように GVE VOR の後に MINKS1 アライバルウェイポイントが追加されていることに注意してください
This completes the programming of our example route.
これでここでの例のルートのプログラミングは完了です
When satisfied with the programmed route, the route can be “activated” and the preflight of the FMC can continue.
ルートのプログラムが満足した時、ルートは "activated" できるようになり、FMC のプリフライトを続けることができます