Activating a Route
The “ACTIVATE>” prompt at the 6R LSK is used to “activate” a programmed route.
6R LSK "ACTIVATE" プロンプトを使ってプログラムしたルートを "activate" にします
Since there are two routes available in the FMC, activation of a route tells the FMC to use the route displayed.
FMC には 2 つの利用可能なルートがあります。FMC 上に使用するルートを表示してアクティブにします
After loading or programming a route into RTE 1, press the 6R LSK to activate this route.
RTE 1 にルートをローディングまたはプログラムしたあと、6R LSK を押してこのルートをアクティブにします
When the 6R LSK is pressed to activate the route, the EXEC key will subsequently illuminate.
6R LSK を押してルートをアクティブにしたとき、そのあと EXEC キーが点灯します
Pressing the EXEC key “executes” the requested route activation.
EXEC キーを押してリクエストしたルートのアクティブを "executes" 実行します
In our example, the programmed route in RTE1 is now the active route displayed on the EHSI.
ここの例では、RTE 1 のプログラムされたルートが EHSI 上にアクティブルートとして表示されます

After activating and executing RTE 1, the prompt at the 6R LSK changes to “PERF INIT>”.
RTE 1 のアクティブと実行を行った後、6R LSK のプロンプトは "PERF INIT >" に変わります
Pressing the 6R LSK displays the “Performance Initialization” pages.
6R LSK を押すと "Performance Initialization" ( パフォーマンス初期化 ) ページが表示されます
These pages are the next pages that require data entry during the pre-flight programming of the FMC.
これらのページは FMC のプリフライトプログラミングページでデータ入力を要求します
Now that route programming is complete and the route has been activated, the route programming can be saved for future recall using the CO ROUTE data block on page one of the ROUTE pages.
ルートプログラミングは完了し、ルートはアクティブになりました。このルートプログラミングはあとで呼び出しできるように ROUTE ページの 1 つのページで CO ROUTE データブロックを使って保存することができます
Information on how to save a programmed route for future recall can be found in the “Saving FMC Data” section later in this manual.
プログラムしたルートをあとから呼び出しできるように保存する方法についての情報は、このマニュアルの後のほうの "Saving FMC Data" で説明しています
026
Here are some important points to remember when working with routes in the FMC.
FMC でルートが働く時の覚えておいて欲しい重要なポイントがいくつかあります
Since the FMC is capable of accepting two routes into memory (RTE 1 and RTE 2), it is important to remember that only one route can be activated at one time.
FMC はメモリー ( RTE 1 と RTE 2 ) の 2 つのルートを受け入れることができますが、その時その時でアクティブにできるのは 1 つのルートだけであることを覚えておいてください。これは重要なことです
After activating one of the routes, only the active route is listed on the EHSI.
ルートの 1 つをアクティブにした後、EHSI 上にはアクティブルートだけがリストされます
Changes made to the “active” route during flight changes the course followed by the AFDS in LNAV mode.
フライト変更で LNAV モードの AFDS によりコースに従うには "active"アクティブルートを変更してください
Changes to the “inactive” route do not affect the activated route of flight.
ルートを "inactive" に変更してください。フライトのアクティブなルートには影響しません
Anytime you are working with the inactive route, the “ACTIVATE>” prompt shall be displayed at the 6R LSK position.
いつでも "inactive" ( アクティブでない ) ルートは 6R LSK の場所に表示される "ACRIVATE >" プロンプトを使って働かせることができます
Also, when the inactive route is viewed in the FMC, a dotted course is displayed on the EHSI in addition to the currently active “pink” course line.
アクティブでないルートが FMC に見えている時、点線のコースが現在アクティブになっているピンクのコースラインに追加して EHSI 上に表示されます
This dotted course line represents the route programmed into the inactive route pages.
この点線のコースラインはインアクティブルートページにプログラムされているルートを表しています
The AFDS always follows the active (pink) route regardless of the presence of the inactive route course on the EHSI.
AFDS は EHSI 上に表示されているインアクティブルートコースには関係無く、いつもアクティブ ( ピンク ) ルートに追従します
Changes to the inactive route do not affect the active route.
インアクティブルートの変更はアクティブルートには影響しません
In our example we activated RTE 1.
ここでの例では RTE 1 がアクティブになっています
Pressing the “<RTE 2” prompt at the 6L LSK displays the RTE 2 pages.
6L LSK "< RTE 2" を押して RTE 2 ページを表示します
When viewing the RTE 2 pages, the prompt at 6L changes to “<RTE 1” and when pressed, take you back to the RTE 1 pages.
RTE 2 ページが見えた時、6L は "< RTE 1" に変わり、これを押すと元の RTE 1 ページに戻ります
When RTE 1 is the “active” FMC route, an “ACTIVATE>” prompt is displayed at the 6R LSK when viewing RTE 2.
RTE 1 が FMC ルートのアクティブになっているとき、RTE 2 が見えている時は "ACTIVATE >" プロンプトが 6R LSK に表示されます
This indicates that modifications and additions to the data in the RTE 2 pages can be made without affecting the active RTE 1 pages, or the course followed by the AFDS in LNAV mode.
この表示は RTE 2 ページのデータの修正と追加で、アクティブの RTE 1 ページ、または LNAV モード中の AFDS によるコースの追従にはまったく関係無く行うことができます
If at any time in flight you want to use the routing programmed into RTE 2, simply “ACTIVATE” and “EXECUTE” the route as was done with RTE 1.
もしフライトのどんな時でも RTE 2 にプログラムされているルートを使用したいと思った場合は、RTE 1 でやったのと同じように "ACTIVATE" と "EXECUTE" で簡単に行えます
In this case, RTE 1 becomes the inactive route and RTE 2 becomes the active route displayed on the EHSI and followed by the AFDS in LNAV mode.
このケースでは、RTE 1 がインアクティブルートになり、RTE 2 がアクティブルートになって EHSI に表示され、LNAV モード中の AFDS が追従します
Here is something else to keep in mind when programming waypoints into a route.
ルートにウェイポイントをプログラムするときの注意点は他にもあります
There can be many waypoints throughout the world with the same name.
世界中には同じ名前のウェイポイントがたくさん存在します
Anytime a waypoint is entered into the FMC and is found to have more than one location, the FMC presents you with a choice of waypoint locations.
いつでも FMC にウェイポイントが入力され、1ヵ所以上見つかった時は FMC はウェイポイントの位置を選択するように提出されます
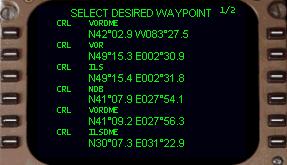
An example of a waypoint selection screen is shown at right.
ウェイポイントの選択スクリーンの例が右の絵です
This screen displays the latitude/longitude of each waypoint option as well as the type waypoint being defined.
このスクリーンはそれぞれのウェイポイントの緯度/経度がウェイポイントの確定のために表示されます
The first waypoint listed at the 1L LSK is always the waypoint closest to your currently programmed route or aircraft position, and is most likely the waypoint needed for your route.
最初のウェイポイントは 1L LSK にリストされます。いつもこのウェイポイントは現在のプログラムされているルートまたは飛行機のポジションに近く、ルートに必要なもっともそれらしいポイントです
Pressing the 1L LSK selects the waypoint location shown in the 1L data block for insertion of the waypoint into the route.
1L LSK を押してウェイポイントの位置を選択すると、ルートのウェイポイントの挿入が行われ 1L データブロックに入ります
Pressing any of the other left LSKs selects the waypoint location listed in the corresponding data block.
その他の左側の LSK を押すとそこのデータブロックに一致するウェイポイントの位置リストから選ばれます