FOR FLIGHT SIMULATOR USE ONLY. NOT FOR USE
IN REAL AVIATION. Level-D Simulations 767-300...........Page
79
FLIGHT MANAGEMENT SYSTEM (FMS)
| <<TOPページ | <Level-D 767 メニュー | <マニュアル目次 | <前のページ | >次のページへ |
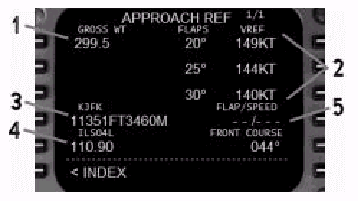
Approach Reference Page (APPROACH REF)
アプローチ参照ページ(APPROACH REF)
Pressing the INIT REF key while in flight
calls up the Approach Reference page.
フライト中にINIT REFキーを押すとアプローチ参照ページが呼び出されます。
On the ground, this page is available via
the INIT REF INDEX page.
地上では、このページはINIT REF INDEXページを介して利用可能です。
Approach reference data is displayed and
updates automatically based on aircraft weight.
アプローチ参照データが表示され、航空機の重量に基づいて自動的にアップデートされます。
1- Gross Weight: The FMC automatically calculates the gross
weight of the aircraft.
総重量 : FMCは航空機の総重量を自動的に計算します。
This value may be manually entered if the
gross weight is not shown or is incorrect.
総重量が表示されていなかったり、正しくないときはマニュアル入力できます。
2- Approach Reference Speeds: Approach Vref speeds update automatically
when a weight is entered into the GROSS WT
field.
アプローチ参照速度 : GROSS WT領域に重量が入力されると、アプローチVref速度が自動的にアップデートされます
Flaps 25 and 30 are normal flap landing speeds.
フラップ25と30が通常フラップの着陸速度です。
Flaps 20 is the landing speed used for single
engine operations.
フラップ20はシングルエンジンオペレーションのための着陸速度です。
3- Runway Length: The length in feet and meters of the selected
departure or arrival runway.
滑走路長 : 選択された出発または着陸滑走路長がフィートとメートルで表示されます。
The reference airport is shown in small type
above the data box.
データBOXの上に、参照空港が小さい文字で表示されます。
The departure runway length is displayed
until the lesser of 400 miles from the departure
airport or halfway to the destination.
出発空港から400NM以内か、目的地の半分までは出発空港の滑走路長が表示されます。
Otherwise, the runway length for the arrival
runway in the active route is displayed.
そうでなければ、アクティブルートの到着滑走路の滑走路長が表示されます。
4- Frequency and Course: The ILS frequency and approach course for
the selected runway is displayed here and
at the 5R position.
周波数とコース : 選択された滑走路のILS周波数とアプローチコースが、ここと5Rの位置に表示されます。
The frequency shown is for the departure
runway until the lesser of 400 miles from
the departure airport or halfway to the destination.
出発空港から400NM以内か目的地の半分までは、出発滑走路の周波数が表示されます。
Otherwise, the frequency and course for the
arrival runway in the active route are displayed.
そうでなければ、アクティブルートの到着滑走路周波数とコースが表示されます。
5- Flap/Speed: This line accepts the entry of a different
flap/speed combination.
フラップ/速度 : この行は、異なるフラップ/速度の組み合わせの入力を受け付けます。
Entries in this data field have no effect
on other performance data.
このデータ領域への入力はその他の性能データに影響しません。
Route Page (RTE)
ルートページ(RTE)
The flightplan to be used by the FMC is entered
on the route page.
FMCが使用するフライトプランはルートページで入力します。
A route is made up of connected waypoints
that the FMC can navigate toward.
ルートはFMCがナビゲートできるウエイポイントを接続して構成されます。
The connection of these waypoints creates
the flight path to be followed when engaging
the AFDS in the LNAV mode.
これらのウエイポイントの接続で、AFDS LNAVモードがエンゲージされたときにフォローされる飛行経路が生成されます。
The Route page is displayed by pressing the
RTE function key.
RTEファンクションキーを押すとルートページが表示されます。
The FMC is capable of storing two routes:
RTE 1 and RTE2.
FMCはRTE1とRTE2の二つのルートを記憶することができます。
Only one route can be activated at a time
while the inactive route remains stored in
memory.
アクティブでないルートがメモリーに保存されている場合、一度にひとつのルートだけをアクティブにできます。
When working with an inactive route, the
waypoints are drawn on the EHSI and connected
with a blue dashed line.
アクティブでないルートの作業中は、ウエイポイントはEHSI上に表示され青い点線で接続されます。
The waypoints in the active route are drawn
full time on the EHSI and connected with
a magenta line.
アクティブなルートのウエイポイントは常にEHSIに表示され、マゼンタの線で接続されます。
The active route is used when navigating
in LNAV mode.
LNAVモードでナビゲートされているときは、アクティブルートが使用されます。
The page title at the top of the screen indicates
which route is displayed.
スクリーン上部のページタイトルは、どのルートが表示されているかを示します。
The following page titles are possible: (X=1
or 2)
以下のページタイトルが表示され得ます:(Xは1か2)
Route Page 2 is accessed by pressing the
NEXT PAGE function key.
ルートページ2はNEXT PAGEファンクションキーを押してアクセスします。
The entry of waypoints and airways is made
from this page.
ウエイポイントと航空路の入力はこのページから行います。
When the page is full of waypoints, a new
RTE page is created for continued route programming.
ページがウエイポイントで一杯になると、ルートプログラムを継続するために新しいRTEページが生成されます。
Moving between RTE pages is accomplished
using the NEXT and PREV PAGE function keys.
RTEページ間を移動するには、NEXTとPREVページファンクションキーを使用します。
When working with an inactive route, changes
made on the RTE pages do not require execution.
アクティブでないルートの作業中は、RTEページへの変更にエグゼキュートは必要ありません。
When working with an active route, any changes
made on the RTE pages require execution with
the EXEC key before becoming active.
アクティブルートについて作業中は、RTEページへのどのような変更もアクティブにする前にEXECキーを押してエグゼキュートする必要があります。
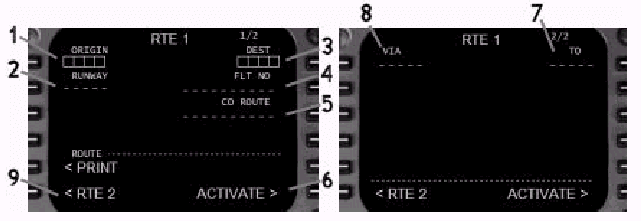
1- Origin: Enter the 4-letter ICAO identifier for the
departure airport.
出発点 : 出発空港の4レターICAOコードを入力します。
Making an entry in this data field on the
ground clears the programmed route.
地上でこのデータ領域に入力すると、プログラムされたルートがクリアされます。
Entry is inhibited in flight.
フライト中の入力は禁止されています。
This field is automatically filled when loading
a flight plan using the CO ROUTE feature.
CO ROUTE機能を使用してフライトプランをロードした場合、この領域は自動的に入力されます。
2- Departure Runway: Enter the departure runway for the origin
airport.
出発滑走路 : 出発空港の出発滑走路を入力します。
This field is automatically filled when using
the CO ROUTE feature.
CO ROUTE機能を使用すると、この領域は自動的に入力されます。
The departure runway can also be selected
using the DEPARTURES page.
出発滑走路はDEPARTURESページを使用しても選択できます。
The runway selected must be in the nav database.
選択された滑走路はNAVデータベースに入っていなければなりません。
3- Destination: Enter the 4-leter ICAO identifier for the
arrival airport.
到着地 : 到着空港の4レターICAOコードを入力します。
This field is automatically filled when loading
a flight plan using the CO ROUTE feature.
CO ROUTE機能を使用してフライトプランをロードする場合、この領域は自動的に入力されます。
4- Flight Number: Optional entry of the flight number can
be made here.
フライト番号(便名) : オプションの便名をここに入力できます。
The flight number (if entered) displays on
the PROGRESS page.
便名は(入力されていれば)PROGRESSページに表示されます。
5- Company Route: Enter the name of a saved flight plan to
automatically load a pre-programmed route.
カンパニールート : 保存されたフライトプラン名を入力し、事前にプログラムされたルートを自動的にロードします。
Saving routes in the FMC is discussed later
in this chapter.
FMCへのルートの保存についてはこの章の後で説明されます。
6- Activate Prompt: Pressing the 6R LSK arms the displayed route
for activation.
アクティベートプロンプト : 6R LSKを押すと、表示されたルートがアクティベーションのためにアームされます。
Pressing the illuminated EXEC function key
activates the route.
点灯しているEXECファンクションキーを押すと、ルートがアクティベートされます。
To cancel activation (prior to pressing EXEC),
use the "<ERASE" prompt that
appears at the 6L LSK.
(EXECを押す前に)アクティベーションをキャンセルするには、6L
LSKに表示されている"ERASE"プロンプトを使用します。
This cancels the activation, but does not
clear the programmed route.
これはアクティベーションをキャンセルしますが、プログラムされたルートはクリアしません。
7- TO Column: The entry of waypoints is made in the TO
column.
TO 列 : ウエイポイントの入力はTO列に行います。
Valid waypoint entries include fixes, navaids,
airports, runways, and special waypoints
(see Valid Waypoint Types in the next section
for examples).
有効なウエイポイントの入力はFIX、NAVAID、空港、滑走路、スペシャルウエイポイントを含みます。(有効なウエイポイントタイプの例として、次のセクションを見てください)。
To make a waypoint entry, type the name into
the scratchpad and press the LSK abeam the
dashed prompts in the right hand column.
ウエイポイントを入力するためには、名前をスクラッチパッドにタイプし、右側の列のdashedプロンプト"-----"横のLSKを押してください。
Anytime box prompts are displayed in the
TO column, a waypoint entry is required.
TO列にBOXプロンプト"□□□□□"が表示されているときは、ウエイポイントの入力が要求されています。
This occurs anytime an airway entry is made
in the VIA column.
これはVIA列に航空路を入力するといつも起こります。
When waypoints are entered into the TO column
without an airway entry in the VIA column,
the word DIRECT appears in the VIA column.
VIA列に航空路を入れずに、TO列にウエイポイントを入力すると、VIA列にDIRECTという文字が現れます。
8- VIA Column: The entry of airways is made in the VIA
column.
VIA列 : 航空路の入力はVIA列に行います。
To enter an airway, a starting waypoint must
be entered in the TO column.
航空路を入力するには、TO列にスタートのウエイポイントが入力されていなければなりません。
The airway name is then entered in the VIA
column on the next line down from the starting
waypoint.
次に、スタート・ウエイポイントの下の行のVIA列に航空路の名前を入力します。
Box prompts open up in the TO column because
an ending waypoint on the airway is required
to complete the programming.
プログラム完了のために航空路の最後のウエイポイントが必要なので、TO列にBOXプロンプトが開きます。
Consider the following route programming
example: RBV..J64..RAV
プログラムのサンプルとして以下のルートについて考察しましょう:RBV..J64..RAV
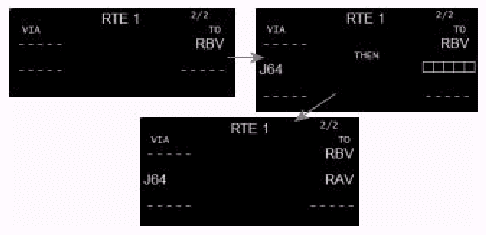
This example shows a Jet airway being programmed.
この例はジェット航空路のプログラムを表しています。
The same entry method is used for Victor,
Amber, Upper and other types of airways.
同じ入力方法がヴィクター、アンバー、アッパー他のタイプの航空路に使用されます。
The only difference is the starting letter.
唯一の違いは最初の文字だけです。
If an incorrect entry is made when programming
an airway, an INVALID ENTRY message is generated
in the scratchpad.
航空路プログラム時に入力を間違えると、INVALID
ENTRYメッセージがスクラッチパッドに表示されます。
If the ending waypoint is not entered in
the box prompts, the airway entry is deleted
automatically upon execution.
BOXプロンプトに最後のウエイポイントが入力されていないと、エグゼキュート時に航空路の入力は自動的に削除されます。
Other data is displayed automatically in
the VIA column.
その他のデータはVIA列に自動的に表示されます。
When making waypoint to waypoint entries
in the TO column, the word DIRECT appears
in the VIA column.
TO列にウェイポイントからウエイポイントへの入力を行っているときは、DIRECTという文字がVIA列に表示されます。
When selecting a departure or arrival procedure
from the nav database (using DEP ARR key),
the name of the selected procedure is shown
in the VIA column.
NAVデータベースから(DEP ARRキーを使用して)出発/到着経路を選択すると、選択された経路がVIA列に表示されます。
9- RTE X Prompt: (X=1 or 2) Press the 6L LSK to switch between
the display of RTE 1 and RTE 2.
RTE Xプロンプト : (Xは1か2)6L LSKを押すとRTE
1とRTE 2の表示を入れ替えます。
Switching between routes has no affect on
the active route.
ルートの入れ替えはアクティブルートに何の影響も与えません。
Modifications to the inactive route have
no affect on the active route.
インアクティブルートの変更はアクティブルートに影響を与えません。
To activate the inactive route, press the
"ACTIVATE>" prompt at the 6R
LSK followed by the EXEC key.
インアクティブなルートをアクティベートするには、6R
LSKの"ACTIVATE>"プロンプトを押して、引き続いてEXECキーを押します。
The previously active route remains in memory
as the inactive route.
以前アクティブだったルートはインアクティブルートとしてメモリーに残ります。
Valid Waypoint Types
有効なウエイポイントのタイプ
The following is a list of waypoint types
that can be entered in the TO column on the
RTE page.
下記は、RTEページのTO列に入力可能なウエイポイントタイプのリストです。
The same types can be entered into the LEGS
page as well.
同じタイプはLEGSページでも同様に入力可能です。
If a waypoint has more than one definition
in the FMC database, a waypoint selection
screen titled SELECT DESIRED WPT is presented.
ウエイポイントがFMCデータベースに一つ以上定義されている場合、SELECT
DESIRED WPTと表示されるウエイポイント選択画面が現れます。
The choices are listed in distance order
from the route or aircraft, with the closest
waypoints listed first.
選択項目はルートか航空機からの距離によって並べられ、最も近いウエイポイントが最初に並びます。
Press the LSK abeam the desired waypoint
to select it into the route.
希望のウエイポイント横のLSKを押して選択し、ルートに入れます。
In most cases, the selection abeam the 1L
LSK will be the desired waypoint.
多くの場合、1L LSKが希望のウエイポイントになるでしょう。
Departure and Arrival Page (DEP ARR)
Departure(出発)とArrival(到着)のページ(DEP ARR)
The Departure and Arrival pages are used
to select pre-programmed procedures in the
FMC database.
DepartureとArrivalのページはFMC内にあらかじめプログラムされた手順を選択するために使用します。
Standard Instrument Departures (SID), Standard
Terminal Arrivals (STAR), and Approach procedures
are available for addition to RTE 1 or RTE
2.
標準計器出発方式(SID)、標準到着経路(STAR)とアプローチ手順をRTE1とRTE2に追加して利用可能です。
These procedures contain waypoints and runway
specific procedures for departure and arrival.
これらの手順ウエイポイントとは出発と到着滑走路に固有の手順を含みます。
Their use facilitates programming standard
instrument procedures for the origin and
destination airports.
それらを使用すると、出発と到着空港での標準計器方式のプログラムが容易になります。
Departure and arrival runway selections may
also be made from these pages.
出発と到着滑走路の選択はこれらのページからもできます。
Pressing the DEP ARR function key displays
the DEP/ARR INDEX page when there is no active
route.
アクティブなルートが無い時にDEP ARRファンクションキーを押すと、DEP/ARR
INDEXページが表示されます。
The index page is used to select a departure
or arrival page for the origin and destination
airports programmed into RTE 1 and RTE 2.
indexページはRTE1とRTE2にプログラムされた出発/到着空港のための出発/到着ページを選択するために使用します。
If the DEP ARR key is pressed when a route
is active, the departure or arrival procedure
page for the origin or destination airport
in the active route is displayed automatically
depending on phase of flight.
ルートがアクティブなときにDEP ARRキーを押すと、フライトのフェーズに応じて自動的に、アクティブルートの出発か到着空港の出発か到着手順のページが表示されます。
If a different DEP ARR page is required,
the "<INDEX" prompt at the 6L
LSK found on all DEP ARR pages can be used
to return to the DEP ARR index page.
異なるDEP ARRページを要求する場合は、全てのDEP
ARRページで表示される6R LSKの"<INDEX"プロンプトでDEP
ARR INDEXページに戻れます。
DEP/ARR INDEX Page
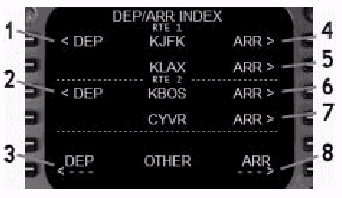
1- Departure Page (RTE 1): Press to display the DEPARTURES page for
RTE 1.
Departure(出発)ページ(RTE 1) : 押すとRTE1のDEPARTUREページを表示します。
The ORIGIN airport, if programmed, is displayed
in the middle.
出発空港が、プログラムされていれば、中央に表示されます。
2- Departure Page (RTE 2): Press to display the DEPARTURES page for
RTE 2.
Departure(出発)ページ(RTE 2) : 押すと、RTE2のDEPARTUREページを表示します。
The ORIGIN airport, if programmed, is displayed
in the middle.
出発空港が、プログラムされていれば、中央に表示されます。
3- Departure Page (OTHER): Used to display the DEPARTURES Page of an
airport not shown in the DEP/ARR INDEX.
Depatrure(出発)ページ(その他) : DEP/ARR
INDEXページに表示されていない空港のDEPARTUREページを表示するために使用します。
Type the ICAO airport code into the scratchpad
and press the 6L LSK to display the DEP Page
for that airport.
ICAO空港コードをスクラッチパッドに入力し6R
LSKを押すと、その空港のDEPページが表示されます。
The display is for reference only and cannot
be selected.
表示は参照のみで、選択できません。
4- Arrival Page (RTE 1 - ORIGIN): Press to display the ARRIVALS Page for the
RTE 1 ORIGIN airport.
Arrival(到着)ページ(RTE1 - 出発) : 押すとRTE1出発空港のARRIVALページを表示します。
The ORIGIN airport, if programmed, is displayed
in the middle.
出発空港が、プログラムされていれば、中央に表示されます。
This page facilitates route programming if
a divert back to the departure airport is
required.
このページは出発空港にダイバートして戻る必要がある場合のルートプログラムを容易にします。
5- Arrival Page (RTE 1 - DEST): Press to display the ARRIVALS Page for the
RTE 1 DEST airport.
Arrivalページ(RTE1 - 目的地) : 押すとRTE1到着空港のARRIVALページを表示します。
The DEST airport, if programmed, is displayed
in the middle.
目的の空港が、もしプログラムされていれば、中央に表示されます。
6- Arrival Page (RTE 2 - ORIGIN): Press to display the ARRIVALS Page for the
RTE 2 ORIGIN airport.
Arrival(到着)ページ(RTE2 - 出発) : 押すとRTE2出発空港のARRIVALページを表示します。
The ORIGIN airport, if programmed, is displayed
in the middle.
出発空港が、もしプログラムされていれば、中央に表示されます。
This page facilitates route programming if
a divert back to the departure airport is
required.
このページは出発空港にダイバートして戻る必要がある場合のルートプログラムを容易にします。
7- Arrival Page (RTE 2 - DEST): Press to display the ARRIVALS Page for the
RTE 2 DEST airport.
Arrivalページ(RTE2 - 目的地) : 押すとRTE2目的空港のARRIVALページを表示します。
The DEST airport, if programmed, is displayed
in the middle.
目的空港が、もしプログラムされていれば、中央に表示されます。
8- Arrival Page (OTHER): Used to display the ARRIVALS Page of an
airport not shown in the DEP/ARR INDEX.
Arrival(到着)ページ(その他) : DEP/ARR
INDEXページに表示されていない空港のARRIVALページを表示するために使用します。
Type the ICAO airport code into the scratchpad
and press the 6R LSK to display the ARR Page
for that airport.
ICAO空港コードをスクラッチパッドにタイプし6R
LSKを押すと、その空港のARRページが表示されます。
The display is for reference only and cannot
be selected.
表示は参照のみで、選択できません。
DEPARTURES Page
DEPARTURE(出発)ページ
The departure page is used to select the
departure runway and SID (if available) for
the ORIGIN airport of the selected route.
departureページは、選択したルートの出発空港の出発滑走路とSID(もし利用可能なら)を選択するために使用されます。
The title banner across the top of the screen
indicates the airport and route for which
the procedures apply.
スクリーン上部を横切るタイトルバナーは、その手順が適用される空港とルートを示します。
When a selection is made on this page, all
waypoints for the selected procedure are
added to the route.
このページで選択されると、選択された手順の全てのウエイポイントがルートに追加されます。
When working with an active route, the EXEC
key must be pressed to activate the changes.
アクティブルートに対する作業の場合は、変更をアクティベートするためにEXECキーを押す必要があります。
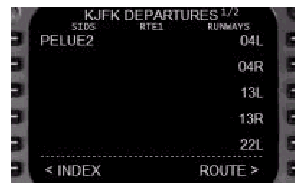
Available SIDs are listed in the left column
of the screen and available runways are listed
in the right column of the screen.
利用可能なSIDがスクリーンの左の列に並び、利用可能な滑走路がスクリーンの右の列に並びます。
Selections are made by pressing the LSK next
to the procedure or runway name.
手順か滑走路名横のLSKを押すことで選択します。
When a selection is made, <SEL> is
displayed abeam the selection name and all
other selections in that column are cleared
from the screen.
選択されると、選択された名前の横に<SEL>と表示され、列のその他の選択名はスクリーン上からクリアされます。
If a selection was made in error while working
with an inactive route, return to the DEP/ARR
INDEX page and reselect the DEP screen to
restore the display of all procedures.
アクティブでないルートの作業中に誤ったときは、DEP/ARR
INDEXページに戻ってDEPスクリーンを再度選択し全ての手順を再表示させます。
If working with an active route, simply press
the "<ERASE" prompt that appears
at the 6L LSK to cancel the selections made.
アクティブルートに対する作業中は、6L LSKに現れる"ERASE"プロンプトを単純に押して、選択をキャンセルします。
When a selection is activated using the EXEC
function key, <ACT> is displayed abeam
the selection.
選択がEXECファンクションキーを使用してアクティベートされると、選択の横に<ACT>と表示されます。
When a SID is selected, only those runways
appropriate for the selected SID are displayed.
SIDが選択されると、選択されたSIDに適切な滑走路のみが表示されます。
If the SID is not runway specific, all runways
remain displayed.
SIDが滑走路固有でない場合は、全ての滑走は表示されたままです。
Available SID transitions are displayed automatically
upon SID selection.
SID選択に伴い、利用可能なSIDトランジションが自動的に表示されます。
To select a SID transition, press the LSK
abeam the transition name.
SIDトランジションをセレクトするには、トランジション横のLSKを押します。
1- SID Name: Press the LSK abeam the SID name to add
the SID to the route.
SID名 : SID名の横のLSKを押して、SIDをルートに追加します。
The <SEL> prompt indicates a selected
SID that has not been activated.
<SEL>プロンプトは選択されたSIDがアクティベートされていないことを示します。
<ACT> is displayed for an activated
SID.
アクティベートされたSIDには<ACT>が表示されます。
2- SID Transitions: SID transition procedures (if available)
are displayed when a SID is selected.
SIDトランジション : SIDが選択されると、SIDトランジション手順が(もし利用可能なら)表示されます。
Press the LSK abeam the TRANS name to add
the SID transition to the route.
TRANS名の横のLSKを押して、SIDトランジションをルートに追加します。
3- Runways: Press the LSK abeam the runway name to make
it the departure runway.
滑走路 : 滑走路名の横のLSKを押して、その滑走路を出発滑走路とします。
The <SEL> prompt indicates a selected
runway that has not been activated.
<SEL>プロンプトは選択された滑走路がアクティベートされていないことを示します。
<ACT> is displayed for a currently
active runway.
現在アクティブな滑走路に対して<ACT>と表示されます。
4- INDEX Prompt: Press the 6L LSK to display the DEP/ARR
INDEX page.
INDEXプロンプト : 6L LSKを押すとDEP/ARR
INDEXページを表示します。
When working with an active route, an "<ERASE"
prompt is displayed any time a selection
is made.
アクティブルートを作業中の場合は、選択が実行されるといつも"<ERASE"プロンプトが表示されます。
5- ROUTE Prompt: Press the 6R LSK to display the route page
being programmed.
ルートプロンプト : 6R LSKを押すとプログラム中のルートページを表示します。
ARRIVALS Page
ARRIVALS(到着)ページ
The arrivals page is used to select the landing
runway, STAR, and APPROACH for the destination
airport of the selected route.
Arrivals(到着)ページは、選択されたルートの到着空港の着陸滑走路、STAR、アプローチを選択するために使用されます。
The title banner across the top of the screen
indicates the airport and route for which
the procedures apply.
スクリーン上部のタイトルバナーはその手順が適用される空港とルートを示します。
When a selection is made on this page, all
waypoints for the selected procedure are
added to the route.
このページで選択されると、選択された手順の全てのウエイポイントがルートに追加されます。
If an approach procedure is selected, the
landing runway is automatically added to
the route.
アプローチ手順が選択されると、着陸滑走路が自動的にルートに追加されます。
When working with an active route, the EXEC
key must be pressed to activate the changes.
アクティブルートについての作業の場合、変更をアクティブにするために、EXECキーをプレスしなければなりません。
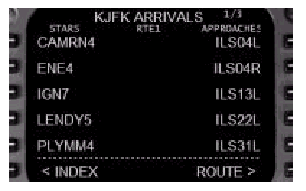
Available STARs are listed in the left column
of the screen.
利用可能なSTARがスクリーン左の列にリストアップされます。
Available approaches and runways are listed
in the right column of the screen.
利用可能なアプローチと滑走路がスクリーン右の列にリストアップされます。
Selections are made by pressing the LSK next
to the procedure or runway name.
手順や滑走路名の隣のLSKを押すことで、選択できます。
When a selection is made, <SEL> is
displayed abeam the selection name and all
other selections in that column are cleared
from the screen.
選択されると、選択された名前の真横に<SEL>と表示され、列のその他の選択はスクリーンから消去されます。
If a selection was made in error while working
with an inactive route, return to the DEP/ARR
INDEX page and reselect the ARR screen to
restore the display of all procedures.
アクティブでないルートの作業中に選択を誤った場合は、DEP/ARRページに戻りARRスクリーンを再度選択し、全ての手順を再表示させます。
If working with an active route, simply press
the "<ERASE" prompt that appears
at the 6L LSK to cancel the selections made.
アクティブルートについての作業なら、6L LSKに現れている“<ERASE”プロンプトを単純に押して、選択をキャンセルします。
When a selection is activated using the EXEC
function key, <ACT> is displayed abeam
the selection.
選択がEXECファンクションキーでアクティベートされると、選択の真横に<ACT>と表示されます。
When a STAR is selected, only those approaches
and runways that apply to the selected star
are displayed.
STARが選択されると、選択されたSTARに適用されるアプローチと滑走路のみが表示されます。
If the STAR is not runway specific, all approaches
and runways remain displayed.
STARが滑走路固有でない場合、全てのアプローチと滑走路が表示されたまま残ります。
Available STAR transition procedures are
displayed automatically upon STAR selection.
利用可能なSTARトランジション手順が自動的にSTAR選択の上に表示されます。
To select a STAR transition, press the LSK
abeam the transition name.
STARトランジションを選択するためには、トランジション真横のLSKを押します。
Available APPROACH transitions are displayed
automatically upon APPROACH selection.
利用可能なAPPROACHトランジションが自動的にアプローチ選択の上に表示されます。
To select an APPROACH transition, press the
LSK abeam the transition name.
APPROACHトランジションを選択するには、トランジション名真横のLSKを押します。
If a previously selected STAR is runway specific
and an approach is selected that does not
apply to the selected STAR, the STAR is automatically
de-selected.
事前に選択されたSTARが滑走路固有で、そのSTARが適用されないAPPROACHを選択すると、STARが自動的に選択解除されます。
Available RUNWAYS are listed in the right
column after the available approaches.
利用可能な滑走路が右の列の利用可能なアプローチの後に表示されます。
Selection of a runway is not required when
selecting an approach procedure since the
runway selection is automatic.
アプローチ手順を選択すると、滑走路が自動的に選択されるため、滑走路の選択は要求されません。
Selection of a runway without an approach
procedure is done by pressing the LSK abeam
the runway name.
アプローチ手順無しで滑走路を選択するには、滑走路名の横のLSKを押します。
When a runway selection is made, a RWY EXT
prompt displays at the 3R LSK.
滑走路を選択すると、3R LSKにRWY EXTプロンプトが表示されます。
When a value is placed in the displayed data
box, a waypoint is automatically created
on the runway inbound course at the distance
specified.
表示されたデータボックスに値を入力すると、指定された距離での滑走路に向かうコースのウエイポイントが自動的に生成されます。
Valid distance entries are from 1.0 to 25.0.
The FMC adds a waypoint called RXxxx, where
xxx is the runway name.
有効な距離の入力は1.0から25.0です。FMCはRXxxxと呼ばれるウエイポイントを追加します。xxxは選択された滑走路名です。
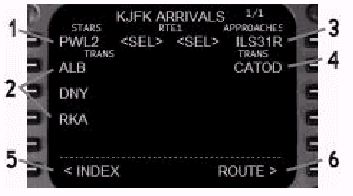
1- STAR Name: Press the LSK abeam the STAR name to add
the STAR to the route.
STAR名称 : STAR名称真横のLSKを押して、STARをルートに追加します。
The <SEL> prompt indicates a selected
STAR that has not been activated.
<SEL>プロンプトは、選択されたSTARがまだアクティベートされていないことを示します。
<ACT> is displayed for an activated
STAR.
アクティベートされたSTARには<ACT>と表示されます。
2- STAR Transitions: STAR transition procedures (if available)
are displayed when a STAR is selected.
STAR トランジション : STARが選択されると、STARトランジション手順が(利用可能であれば)表示されます。
Press the LSK abeam the TRANS name to add
the STAR transition to the route.
TRANS名称の横のLSKを押すと、STARトランジションがルートに追加されます。
3- Approaches/Runways: Available approaches and runways are listed
in this column.
アプローチと滑走路 : 利用可能な滑走路とアプローチがこの列にリストアップされます。
Press the LSK abeam the approach or runway
name to add it to the route.
アプローチか滑走路名の横のLSKを押して、ルートに追加します。
If an approach is selected, the runway is
automatically selected.
アプローチが選択されると、滑走路は自動的に選択されます。
The <SEL> prompt indicates a selected
approach or runway that has not been activated.
<SEL>プロンプトは、選択されたアプローチか滑走路がアクティベートされていないことを示します。
<ACT> is displayed for a currently
active approach and/or runway.
現在アクティブなアプローチ/滑走路に対しては<ACT>と表示されます。
4- Approach Transitions: Approach transition procedures (if available)
are displayed when an approach is selected.
アプローチトランジション : アプローチが選択されると、アプローチトランジション手順が(利用可能であれば)表示されます。
Press the LSK abeam the TRANS name to add
it to the route.
TRANS名称の横のLSKを押すと、ルートに追加されます。
5- INDEX Prompt: Press the 6L LSK to display the DEP/ARR
INDEX page.
INDEXプロンプト : 6L LSKを押すと、DEP/ARR
INDEXページを表示します。
When working with an active route, an "<ERASE"
prompt is displayed any time a selection
is made.
アクティブルートに対する作業中は、何かを選択するといつも"<ERASE"プロンプトが表示されます。
6- ROUTE Prompt: Press the 6R LSK to display the route page
being programmed.
ルートプロンプト : 6R LSKを押すと、現在プログラム中のルートページを表示します。
Route Discontinuity
ルートの不連続
A route discontinuity exists when two waypoints
are not connected by an airway or direct
entry in the VIA column on the RTE page.
二つのウエイポイントが航空路やRTEページVIA列の直接入力で接続されていない場合、ルートが不連続になります。
Multiple discontinuities are possible within
the route.
ルート中には複数の不連続が発生することもあります。
To close a route discontinuity, line select
a waypoint below the discontinuity and place
it in the discontinuity boxes in the TO column.
ルートの不連続をつなぐには、不連続の下のウエイポイントの行を選択し(LSKを押す)
それをTO列の不連続ボックスに入力します。
If working with the active route, press the
EXEC key to activate the changes.
アクティブルートを作業中の場合は、変更をアクティベートするためにEXECキーを押します。

A discontinuity most often occurs when a
SID, STAR, approach or runway is added to
the route.
不連続は、SID、STAR、アプローチ、滑走路をルートに追加したときにしばしば発生します。
In the above example, the PELUE2 SID was
selected which resulted in a discontinuity
between the last waypoint of the SID and
the first route waypoint.
上の例では、PELUE2 SIDを選択すると、SID最後のウエイポイントとルート最初のウエイポイントの間が不連続になります。
The continuity was closed by pressing the
LSK abeam RBV and then pressing the LSK abeam
the discontinuity boxes.
不連続をつなぐには、RBV真横のLSKを押して、次に不連続ボックス横のLSKを押します。
(訳注:原文はcontinuity was closedとなっていますが、discontinuity
was closedのような気がします。)
Discontinuities are mirrored on the LEGS
pages (explained below) and are resolved
in the same fashion.
不連続はLEGSページ(以下で説明されます)にも反映され、同じやり方で解決します。
LEGS Page (LEGS)
LEGS(レグ)ページ
The LEGS page lists all waypoints for a route
programmed into either RTE 1 or RTE 2.
LEGSページはRTE1かRTE2にプログラムされたルートの全てのウエイポイントをリストアップします。
The waypoints are arranged in their proper
flight planned sequence.
ウエイポイントはフライトプランシーケンスに応じて配置されます。
Also, waypoints that are part of a procedure
or airway entry on the RTE page are listed
individually on the LEGS page.
また、RTEページの(出発/到着)手順や航空路を構成するウエイポイントもまた、個々にLEGSページにリストアップされます。
Pressing the LEGS function key displays page
1 of the active LEGS page.
LEGSファンクションキーを押すと、アクティブなLEGSページの1ページを表示します。
From this page, waypoints in the route can
be managed when navigating via LNAV.
このページから、LNAVでナビゲーション中にルート中のウエイポイントを管理することが出来ます。
Also, waypoint speed and altitude constraints
for VNAV operation are entered from this
page.
ウエイポイントのVNAV操作時の速度と高度の制限についてもまた、このページから入力します。
The waypoint entry concepts explained for
the RTE pages are the same for the LEGS page
except that the presentation and handling
of waypoints is different.
LEGSページのウエイポイント入力のコンセプトはRTEページで説明したものと同じです。例外として、ウエイポイントの存在と取り扱いが異なります。
Also, the entry of airways is not possible
on the LEGS page since waypoints are listed
individually.
また、LEGSページでは航空路の入力は不可能です。というのもウエイポイントが個々にリストアップされているからです。
Airway entry is only possible on the RTE
page.
航空路の入力はRTEページでのみ可能です。
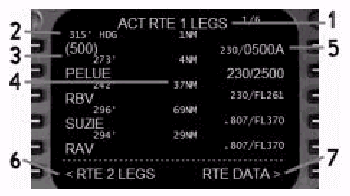
1- LEGS Page Title: Indicates the status of the displayed route
as follows: (X= 1 or 2)
LEGSページタイトル : 以下のような表示されるルートの状態を示します。(X=1か2)
2- Leg Heading: Displays the direction to the waypoint as
a magnetic course (xxx ー), heading (xxx ー
HDG), or track (xxx ー TRK).
LEGの針路 : ウエイポイントまでの方向を磁航路(xxx°)、磁針路(xxx°HDG)、トラック(xxx°TRK)として表示します。
All headings between waypoints are calculated
great circle leg headings.
ウエイポイント間の全ての方位は大圏レグ針路で計算されます。
(訳注:ウエイポイントは平面上にあるのではなく、球面上にあります。
Special procedures are displayed here as
well (ex. HOLD AT).
特殊な手順についても同様にここに表示されます。(例:HOLD
AT=ここでホールド)
3- Waypoint Name: The waypoint name is displayed abeam each
LSK starting at the 1L position.
ウエイポイント名 : ウエイポイント名は各LSKの真横に、1Lから表示されます。
The waypoint information displayed at the
1L LSK on the first page represents the active
leg.
最初のページの1L LSKに表示されるウエイポイント情報はアクティブ・レグを意味します。
Waypoints can be added, deleted, and re-sequenced
using the LSKs abeam each waypoint.
ウエイポイントは、各ウエイポイント横のLSKを用いて、追加/削除/並べ替えが出来ます。
Route discontinuities are displayed as boxes
in the waypoint name space.
ルートの不連続はウエイポイント名の間の箱として表示されます。
Waypoints with brackets are conditional waypoints.
括弧()つきのウエイポイントは条件付のウエイポイントです。
The condition is contained in the bracket
and the lateral command contained in the
Leg Heading display.
条件は括弧の中に入っています。水平方向のコマンドはLEG針路表示に含まれます。
The above example shows a conditional waypoint
that results in an LNAV heading of 315 ー
until reaching 500 feet before proceeding
direct to PELUE waypoint.
上の例ではPELUEウエイポイントにダイレクトで向かう前に500ftに達するまではLNAV方位の315°を維持する条件付ウエイポイントを表します。
4- Waypoint Distance: The distance between each waypoint is displayed
here.
ウエイポイント距離 : 各ウエイポイント間の距離はここに表示されます。
For the active waypoint, the distance displayed
is from the aircrafts current position to
the active waypoint.
アクティブウエイポイントについては、航空機の現在位置からアクティブウエイポイントまでの距離が表示されます。
5- Waypoint Speed/Altitude: Format is speed/altitude.
ウエイポイント速度/高度 : フォーマットは速度/高度です。
Speed is displayed as airspeed or mach (xxx
or .xxx).
速度は対気速度かマック速度です(xxx か .xxx)
Altitude is displayed in thousands or as
flight levels (xxxxx or FLxxx).
高度は1000の単位かフライトレベルで表示されます(xxxxx
か FLxxx)
Small type data represents FMC waypoint crossing
predictions based on performance data.
小さい文字のデータはパフォーマンスデータに基づいたウエイポイント通過時のFMC予測値を表します。
Large type data are speed and/or altitude
VNAV crossing constraints for the waypoint.
大きい文字のデータそのウエイポイントを通過するときのVNAV制限速度や高度です。
The FMC uses these constraints to calculated
the VNAV climb and descent profiles.
FMCはこれらの制限をVNAV上昇や降下のプロファイル計算に使用します。
The constraints entered are handled as climb
or descent constraints depending on phase
of flight.
入力された制限は、フライトのフェーズに応じて上昇や降下の制限として取り扱われます。
All constraints entered for waypoints that
occur prior to the aircraft reaching the
programmed CRZ ALT (on the PERF INIT page)
are treated as climb constraints.
入力されたウエイポイントの制限のなかで、航空機がPERF INITページでプログラムされた巡航高度(CRZ
ALT)に達する前に発生するものは、上昇の制限として扱われます。
Any constraints entered after the CRZ ALT
has been reached are considered descent constraints.
CRZ ALT到達後の全ての制限は降下の制限とみなします。
Waypoint crossing constraints may be entered
manually or automatically (by procedure).
ウエイポイント追加の制限はマニュアルか自動的(手順によって)に入力されます。
Constraints are entered manually by typing
the airspeed/altitude constriction into the
scratchpad followed by the right side LSK
abeam the desired waypoint.
制限をマニュアル入力するには、対気速度/高度をスクラッチパッドにタイプし、次に希望するウエイポイント横のLSKを押します。
Constraints are filled in automatically when
they are part of a selected SID, STAR or
approach procedure.
選択したSID、STAR、アプローチ手順に制限がある場合は自動的に入力されます。
To delete a constraint, press the DEL data
entry key followed by the right side LSK
abeam the constriction to be deleted.
制限を削除するには、DELデータエントリーキーを押して、次に削除したい制限の右側のLSKを押します。
A waypoint altitude constraint may be entered
with or without an airspeed constraint.
ウエイポイントの高度制限入力は速度制限を伴う場合と伴わない場合があります。
To enter an altitude constraint without an
airspeed constraint, type the altitude into
the scratchpad (format XXX, XXXX, XXXXX or
FLXXX) and press the right side LSK abeam
the desired waypoint.
速度制限無しで高度制限だけを入力するには、高度をスクラッチパッドに入力し(フォーマットはXXX,
XXXX, XXXXX or FLXXX)、希望するウエイポイント右側のLSKを押します。
A suffix may be added to the altitude constraint
as follows:
高度制限に対する添え字は以下のように付け加えられます :
Individual data entries into the right side
LSKs that are not separated by a "/"
are assumed to be altitude constraints.
右側のLSKに"/"で分離されていない一つのデータを入力すると、高度制限と仮定されます。
Data entries separated by a "/"
are assumed to be a combination airspeed/altitude
entry.
"/"で分離されているデータ入力は対気速度/高度の組み合わせと仮定されます。
The format is "xxx/XXXXX", where
xxx is airspeed and XXXXX is altitude.
フォーマットは"xxx/XXXXX"で、xxxが対気速度でXXXXXが高度です。
The format to enter an airspeed constraint
only is "xxx/".
対気速度の制限として入力できるフォーマットは"xxx/"だけです。
Cruise speed and altitude predictions are
shown for all waypoints after the cruise
altitude set in the PERF INIT page has been
reached.
巡航速度と高度の予測値は、PERF INITページで設定した高度に達した後の全てのウエイポイントで表示されます。
Cruise altitude predictions are based on
performance calculations resulting from the
STEP SIZE entered on the PERF INIT page.
巡航高度の予測値は、PERF INITページに入力されたステップサイズからの性能計算に基づきます。
When the step size is set to "0",
the altitude prediction will match the programmed
CRZ ALT.
ステップサイズを"0"にセットすると、高度の予測値はプログラムされたCRZ
ALTに整合します。
When a step size is specified, the altitude
prediction displays the recommended cruise
altitude based on performance data and step
size.
ステップサイズを明記すると、高度の予測値は性能データとステップサイズに基づいて推奨される巡航高度を表示します。
The altitude prediction displayed will not
match the CRZ ALT when a step climb is recommended.
ステップクライムが推奨される場合は、表示される高度の予測値はCRZ
ALTと整合しません。
Cruise speed and altitude changes are not
made through LEGS page entries.
巡航速度と高度の変更はLEGSページの入力からは出来ません。
This is discussed in the VNAV section of
this manual.
これについては、このマニュアルのVNAVセクションで説明されます。
6- Route X Legs Prompt: (X=1 or 2) Press the 6L LSK to switch between
the display of RTE 1 LEGS and RTE 2 LEGS.
ルートXレグプロンプト : (X=1か2)。6L LSKを押すと、RTE
1 LEGSとRTE 2 LEGSページ間の表示を切り替えます。
Switching between legs pages has no affect
on the active route.
LEGSページ間のページ切り替えはアクティブルートには影響しません。
Modifications made on the inactive LEGS page
have no affect on the active route.
アクティブでないLEGSページ上の変更はアクティブルートには影響しません。
To activate the inactive route from the LEGS
page, press the "ACTIVATE>"
prompt at the 6R LSK followed by the EXEC
key.
LEGSページから、アクティブでないルートをアクティブにするには、6R
LSKの"ACTIVATE>"プロンプトを押して、引き続いてEXECキーを押します。
The previously active route remains in memory
as the inactive route.
以前アクティブだったルートはアクティブでないルートとしてメモリーに残ります。
7- 6R LSK Prompt: There are there possible prompts displayed
at 6R:
6R LSKプロンプト : 下記の利用可能なプロンプトが6Rに表示されます。
| <<TOPページ | <Level-D 767 メニュー | <マニュアル目次 | <前のページ | >次のページへ |