FOR FLIGHT SIMULATOR USE ONLY. NOT FOR USE
IN REAL AVIATION. Level-D Simulations 767-300...........Page
89
FLIGHT MANAGEMENT SYSTEM (FMS)
| ����TOP�y�[�W | ��Level-D 767 ���j���[ | ���}�j���A���ڎ� | ���O�̃y�[�W | �����̃y�[�W�� |
LEGS Page Waypoint Management (LNAV)
LEGS�y�[�W�̃E�G�C�|�C���g�Ǘ�(LNAV)
Waypoint modifications made on the LEGS page
allow LNAV to properly track the intended
route of flight.
LEGS �y�[�W�ŃE�G�C�|�C���g���C������ƁALNAV
�͈Ӑ}�����t���C�g���[�g��K�ɒǐՂł��܂��B
Waypoints can be added and deleted from the
LEGS page as changes to the flight plan are
made.
�t���C�g�v�����ύX���ɂ� LEGS �y�[�W����E�G�C�|�C���g�̒lj���폜���o���܂��B
Additionally, the active waypoint can be
changed to permit specific inbound and outbound
course intercepts.
����ɁA����̃C���o�E���h��A�E�g�o�E���h�R�[�X�ɑ���C���^�[�Z�v�g���\�ɂ��邽�߂ɁA�A�N�e�B�u�E�G�C�|�C���g��ύX�ł��܂��B
Discontinuities in the route can also be
connected from the LEGS page when working
with pre-programmed departure, arrival and
approach procedures.
�\�߃v���O�������ꂽ�o���^�����^�A�v���[�`�菇�̍�ƒ���
LEGS �y�[�W�Ń��[�g�̕s�A����ڑ����邱�Ƃ��o���܂��B
If the aircraft is within 2.5 miles of the
active route, LNAV mode will engage and track
the route when selected on the MCP.
�q��@���A�N�e�B�u���[�g���� 2.5NM �ȓ��ł���ALNAV
���[�h�� MCP �őI������Ă�����[�g���G���Q�[�W���A�ǐՂ��܂��B
If the aircraft is not in a position to join
the active route, the active waypoint must
be modified on the LEGS page for LNAV to
navigate toward it.
�����A�q��@���A�N�e�B�u���[�g�ɍ�������ꏊ�ɂ��Ȃ��ꍇ�́ALNAV
���������ăi�r�Q�[�g����悤�ɁA�A�N�e�B�u�E�G�C�|�C���g��
LNAV �y�[�W�ŕύX���Ȃ���Ȃ�܂���B
This is done one of two ways: Direct to a
waypoint, or HDG SEL to intercept a course
toward a waypoint.
���̕��@�͂Q�ʂ肠��܂��@�F�@�E�G�C�|�C���g�Ƀ_�C���N�g�Ō��������AHDG
SEL �ŃE�G�C�|�C���g�Ɍ������R�[�X���C���^�[�Z�v�g���܂��B
The following examples discuss the methods
used to make LEGS page modifications.
�ȉ��̗�ł� LEGS �y�[�W�ɕύX�������邽�߂Ɏg�p�������@�ɂ��ċc�_���܂��B
The methods used to engage LNAV to follow
a route are also discussed and demonstrated.
���[�g���t�H���[���邽�߂�L NAV ���G���Q�[�W������@�����Ă��c�_���A����Ő������܂��B
The term "line select" in these
explanations refers to pressing the LSK abeam
a waypoint.
�������� "���C���@�Z���N�g" �Ƃ����p��̓E�G�C�|�C���g����
LSK ���������Ƃ��w���܂��B
Direct to Waypoint
�E�G�C�|�C���g�ɒ��s
The easiest way for LNAV to join a route
is to fly directly to a waypoint in the LEGS
page.
LNAV�����[�g�ɍ������邽�߂ɍł��ȒP�ȕ��@�́ALEGS�y�[�W�ŃE�G�C�|�C���g�ɒ��s���Ĕ�s���邱�Ƃł��B
This is done by line selecting a waypoint
into the active waypoint position (1L LSK
of LEGS page 1).
����́A�E�G�C�|�C���g�����C���Z���N�g���āA�A�N�e�B�u�E�G�C�|�C���g�̈ʒu�iLEGS�y�[�W�P��1L�@LSK�j�Ɏ����Ă���Ƃ������Ƃł��B
The FMC calculates a direct course to the
waypoint and displays the modification on
the EHSI with blue dashes.
FMC�̓E�G�C�|�C���g�ɒ��s����R�[�X���v�Z���A�ύX��EHSI��ɐ��j���ŕ\�����܂��B
Pressing the EXEC function key and the LNAV
button on the MCP causes the AFDS to fly
directly to the waypoint.
EXEC�t�@���N�V�����L�[��MCP��LNAV�{�^���������ƁAAFDS�̓E�G�C�|�C���g�ɒ��s���܂��B
If the active waypoint is the desired Direct
To Waypoint, press the 1L LSK one time to
place the waypoint name in the scratchpad.
�A�N�e�B�u�E�G�C�|�C���g�ɒ��s����]����ꍇ�́A1L�@LSK��1�x�����ăE�G�C�|�C���g�����X�N���b�`�p�b�h�ɓ���܂��B
Then press the 1L LSK a second time to have
the FMC draw the new course line direct to
the waypoint.
�����āA�Ă�1L�@LSK�������ƁAFMC���E�G�C�|�C���g�ɒ��s����V�����R�[�X���C����`���܂��B
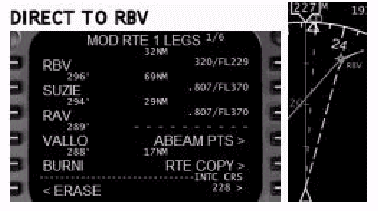
Consider the following example: RBV is the
active waypoint and has been line selected
twice to redraw a direct course line.
�ȉ��̗�ōl���܂��@�F�@RBV���A�N�e�B�u�E�G�C�|�C���g�ŁA���C���Z���N�g��2��s���A���s�R�[�X���C�������������Ă��܂��B

Notice that the RBV waypoint is both the
active waypoint and the modified waypoint
with a new course line drawn direct. .
RBV�E�G�C�|�C���g�̓A�N�e�B�u�E�G�C�|�C���g�ƁA���s���邽�߂Ɉ����������V�����R�[�X���C���ɕt������ύX���ꂽ�E�G�C�|�C���g�̗����ł��邱�Ƃɒ��ӂ��ĉ������B
To complete the change and navigate direct
to RBV, press the EXEC function key and the
LNAV button on the MCP.
�ύX���������ARBV�ւ̒��s���i�r�Q�[�V�������邽�߂ɁAEXEC�t�@���N�V�����L�[��MCP��LNAV�{�^���������܂��B
If the Direct To waypoint is further down
in the LEGS listing, press the LSK next to
the desired waypoint to transfer it to the
scratchpad.
���s����E�G�C�|�C���g��LEGS���X�g�̂���ɉ��̂ق��ɂ���ꍇ�́A��]����E�G�C�|�C���g�ɋ߂�LSK�������ăX�N���b�`�p�b�h�ɓ]�����܂��B
Then press the 1L LSK of page 1 to make the
modification.
���Ƀy�[�W1��1L�@LSK�������ĕύX���s���܂��B
It is important to use page 1 of the LEGS
page because the active waypoint position
is the 1L LSK on that page.
LEGS�y�[�W�̃y�[�W�P���g�����Ƃ͏d�v�ł��B�Ƃ����̂��A�A�N�e�B�u�E�G�C�|�C���g�̈ʒu�����̃y�[�W��1L
LSK�ɂ��邩��ł��B
All waypoints between the currently active
waypoint and the newly selected down track
waypoint are removed upon execution.
���݃A�N�e�B�u�ȃE�G�C�|�C���g�ƐV�����I�����ꂽ�g���b�N�̃E�G�C�|�C���g�̊Ԃ̑S�ẴE�G�C�|�C���g�̓G�O�[�L���[�g�ɔ����č폜����܂��B
Consider the following example: The LEGS
page from the previous example is still in
use and our clearance is now to fly direct
to RAV.
�ȉ��̗�ɂ��čl���܂��@�F�@�O�̗��LEGS�y�[�W�������ł��g�p���܂��BRAV�ɒ��s����N���A�����X���o�Ă��܂��B
Press the 3L LSK to place RAV in the scratchpad
followed by pressing the 1L LSK.
�i�O�y�[�W�̏�Ԃ�)3L�@LSK�������āARAV���X�N���b�`�p�b�h�ɂ���āA������1L�@LSK�������܂��B
The result is shown below:
���ʂ͉��̂悤�ɂȂ�܂��B
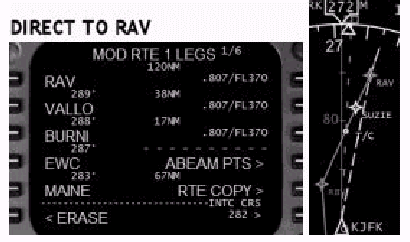
Notice that both SUZIE and RBV waypoints
have been removed and a new course line has
been drawn direct to RAV.
SUZIE��RBV�E�G�C�|�C���g�̗�������菜����ARAV�ɒ��s����V�����R�[�X���C�����`����Ă��邱�Ƃɒ��ӂ��Ă��������B
To complete the change and navigate direct
to RAV, press the EXEC function key and the
LNAV button on the MCP.
�ύX���������ARAV�ɒ��s����i�r�Q�[�V�����̂��߂ɁAEXEC�t�@���N�V�����L�[��MCP��LNAV�{�^���������܂��B
A new waypoint can be designated as the Direct
To waypoint.
�V�����E�G�C�|�C���g�s����E�G�C�|�C���g�Ƃ��Đݒ�ł��܂��B
Type the name of the waypoint into the scratchpad
and press the 1L LSK on LEGS page 1.
�E�G�C�|�C���g�����X�N���b�`�p�b�h�ɓ��͂��āALEGS�y�[�W�P��1L�@LSK�������܂��B
The FMC draws a course line direct to the
newly entered waypoint.
FMC�͐V���ɓ��͂��ꂽ�E�G�C�|�C���g�ɒ��s����R�[�X��`���܂��B
A route discontinuity is placed between the
previously active waypoint and the new waypoint
since the FMC makes no assumptions on where
to go after reaching a waypoint that was
not on the original route.
�ȑO�̃A�N�e�B�u�E�G�C�|�C���g�ƐV�����E�G�C�|�C���g�̊Ԃ̃��[�g�͕s�A���ƂȂ�܂��B�Ƃ����̂��A�I���W�i���̃��[�g�ɖ����E�G�C�|�C���g�ɓ��B������ǂ��ɍs�����ɂ��āAFMC�͑z�肵�Ȃ�����ł��B
Consider the following example: The LEGS
page from the previous example is still in
use and our clearance is now to fly direct
to ETX..RAV.
�ȉ��̗�ɂ��čl���܂��F��̗��LEGS�y�[�W�������ł��g�p���܂��B�����āA��X��ETX..RAV�ɒ��s����N���A�����X�Ă��܂��B
Type ETX into the scratchpad and press the
1L LSK on LEGS page 1.
ETX���X�N���b�`�p�b�h�ɓ��͂��ALEGS�y�[�W1��1L�@LSK�������܂��B
The result is shown below:
���ʂ͉��L�̂悤�ɂȂ�܂��@�F
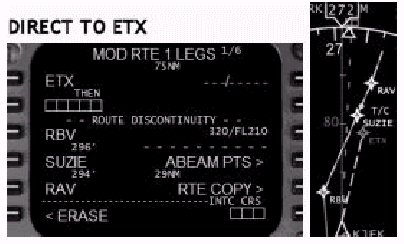
Notice that a route discontinuity is placed
between the new waypoint and the existing
route.
�V�����E�G�C�|�C���g�Ɗ����̃��[�g�̊Ԃ͕s�A���ɂȂ邱�Ƃɒ��ӂ��ĉ������B
How to close the discontinuity is discussed
below.
�s�A���������@�ɂ��āA�ȉ��ɐ������܂��B
Also, a course line direct to ETX has been
drawn.
�܂��AETX�ɒ��s����R�[�X���C�����`����Ă��܂��B
To complete this part of the clearance and
navigate direct to ETX, press the EXEC function
key and the LNAV button on the MCP.
�N���A�����X�̂��̃p�[�g��������ETX�ɒ��s����i�r�Q�[�V�����̂��߂ɁAEXEC�t�@���N�V�����L�[��MCP��LNAV�{�^���������܂��B
Clearing a Route Discontinuity
���[�g�s�A���̃N���A
To clear a route discontinuity, line select
a waypoint from below the discontinuity and
line select it to the discontinuity boxes.
���[�g�̕s�A�����N���A���邽�߂ɁA�s�A���̉��̃E�G�C�|�C���g�����C���Z���N�g���A�����s�A��BOX�Ƀ��C���Z���N�g���܂��B
Consider the following example: The LEGS
page from the above example is still in use.
�ȉ��̗�ɂ��čl���܂��@�F�@��̗��LEGS�y�[�W�������ł��g�p���܂��B
The previous clearance example is to fly
to ETX (shown above) and then to RAV.
��̃N���A�����X�̗��ETX(��L)�ɔ�s���A����RAV�ɔ�s���܂��B
Press the 5L LSK to put RAV in the scratchpad
followed by pressing the 2L LSK.
5L�@LSK��������RAV���X�N���b�`�p�b�h�ɓ���܂��B����������2L�@LSK�������܂��B
The result is shown below:
���ʂ͉��Ɏ�����܂��@�F
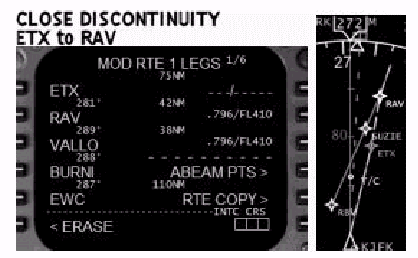
Notice that ETX is now connected to RAV on
the EHSI.
EHSI���ETX����RAV�ɐڑ�����Ă��邱�Ƃɒ��ӂ��ĉ������B
Also, the RBV and SUZIE waypoints have been
removed.
�����āARBV��SUZIE�E�G�C�|�C���g�͍폜����Ă��܂��B
To complete the change and remove the discontinuity,
press the EXEC function key and the LNAV
button on the MCP.
�ύX�ƕs�A���̍폜���������邽�߂ɁAEXEC�t�@���N�V�����L�[��MCP��LNAV�{�^���������܂��B
Abeam Points (ABEAM PTS)
�A�r�[��(�^����)�|�C���g(ABEAM PTS)
Many clearances result in the elimination
of waypoints from the LEGS page.
�����̃N���A�����X�ł�LEGS�y�[�W����E�G�C�|�C���g���폜���邱�ƂɂȂ�܂��B
It is beneficial for situational awareness
to know when the aircraft is abeam these
eliminated waypoints when navigating on long
direct route clearances.
�������s���[�g�̃N���A�����X���i�r�Q�[�V��������Ƃ��ɁA�q��@�������̍폜���ꂽ�E�G�C�|�C���g�̐^���ɗ������ƂɋC�Â����Ƃ͗L�v�ł��B
Anytime a route modification is made, an
"ABEAM PTS>" prompt is presented
at the 4R LSK.
���[�g�̏C��������Ƃ����A4R LSK��"ABEAM
PTS>"�v�����v�g���\������܂��B
Pressing the 4R LSK arms the abeam points
feature.
4R LSK�������ƁA�A�r�[���|�C���g�@�\���A�[������܂��B
When the route modifications are executed,
the FMC creates abeam points on the new route
to indicate where the bypassed waypoints
would have been.
���[�g�̏C�����G�O�[�L���[�g�����ƁAFMC�͉I�ꂽ�E�G�C�|�C���g���ǂ��ɂ����������������߂ɁA�V�������[�g���(���E�G�C�|�C���g����́j�^���̃|�C���g�i�A�r�[���|�C���g�j�����܂��B
The abeam points created are perpendicular
to the bypassed waypoints.
�������ꂽ�A�r�[���|�C���g�͉I�ꂽ�E�G�C�|�C���g���琂���̈ʒu�ɂ���܂��B
Consider the following example: The LEGS
page from the previous example is still in
use.
�ȉ��̗�ɂ��Č������܂��@�F�@�O�̗��LEGS�y�[�W�������ł��g�p���܂��B
The new clearance is to fly direct to the
EWC waypoint.
�V�����N���A�����X�ł́AEWC�E�G�C�|�C���g�ɒ��s���Ĕ�s���܂��B
Press the 5L LSK to put EWC in the scratchpad.
5L LSK��������EWC���X�N���b�`�p�b�h�ɓ��͂��܂��B
Pressing the 1L LSK to go direct to EWC causes
the "ABEAM PTS>" prompt to display
at the 4R LSK.
1L LSK��������EWC�ɒ��s���܂��B����ƁA"ABEAM
PTS>"�v�����v�g��4R�@LSK�ɕ\������܂��B
Press the 4R LSK to select the abeam points
feature.
4R LSK�������ăA�r�[���|�C���g�@�\��I�����܂��B
Press EXEC to make the modifications active.
EXEC�������ďC�����A�N�e�B�u�ɂ��܂��B
The results are shown below:
���ʂ͉��L�̂悤�ɂȂ�܂��@�F
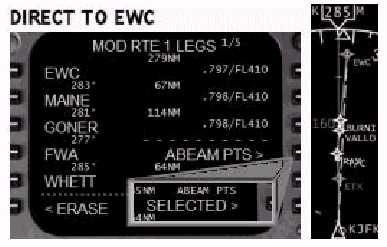
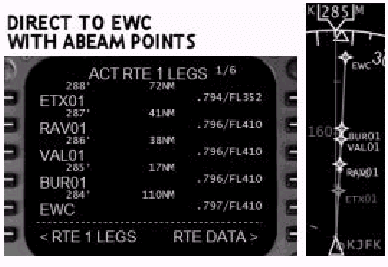
Notice that when the ABEAM PTS> prompt
is pressed, the word SELECTED appears.
"ABEAM PTS>"�v�����v�g�������ƁASELECTED�ƕ\������邱�ƂɋC�Â��Ă��������B
This indicates that abeam points will be
created upon executing the modifications.
����́A�C�����G�O�[�L���[�g����Ƃ��ɃA�r�[���|�C���g����������邱�Ƃ������܂��B
Also notice that the FMC has created custom
named waypoints for each waypoint bypassed
by the direct to EWC modification.
�����EWC�ɒ��s����C���ɂ���ăo�C�p�X���ꂽ�e�E�G�C�|�C���g�ɂ��āA�e�l�b�͓��ʂɖ��t����ꂽ�E�G�C�|�C���g�i�A�r�[���|�C���g�j�����Ă��邱�ƂɋC�Â��ĉ������B
Route Copy (RTE COPY)
���[�g�R�s�[(RTE COPY)
Anytime a modification is made on the legs
page, the "RTE COPY>" prompt
is presented at the 5R LSK.
LEGS�y�[�W�ɏC�����������Ƃ��́A����"RTE
COPY>"�v�����v�g��5R LSK�ɕ\������܂��B
Pressing the 5R LSK prior to executing the
modification places a copy of the currently
active route into the inactive route page.
�C�����G�O�[�L���[�g����O��5R LSK�������ƁA���݃A�N�e�B�u�ȃ��[�g�̃R�s�[���A�C���A�N�e�B�u���[�g�y�[�W�ɃR�s�[����܂��B
The contents of the inactive route page are
automatically updated with the current route
waypoints.
�C���A�N�e�B�u���[�g�y�[�W�̓��e�́A�����I�Ɍ��[�g�̃E�G�C�|�C���g�ŃA�b�v�f�[�g����܂��B
The use of the Route Copy feature is helpful
when making major changes to the currently
active route.
���[�g�R�s�[�@�\�́A���݃A�N�e�B�u�ȃ��[�g�ɑ��đ傫�ȕύX���s���Ƃ��ɖ𗧂��܂��B
If the previous route needs to be restored
after executing the route modifications,
switch to the inactive route page and re-activate
the previous route.
���[�g�̏C�����G�O�[�L���[�g������ŁA�ȑO�̃��[�g������K�v������Ƃ��ɁA�C���A�N�e�B�u���[�g�y�[�W�ɐ�ւ��āA�ȑO�̃��[�g���ēx�A�N�e�B�u�ɂ��܂��B
Consider the following example: The LEGS page from the previous example
is still in use.
�ȉ��̗�ɂ��Č������܂��@�F�@�O�̗��LEGS�y�[�W�������ł��g�p���܂��B
The EWC waypoint has been line selected to
the 1L position.
EWC�E�G�C�|�C���g�����C���Z���N�g�����1L�|�W�V�����ɂ���܂��B
Press the 5R LSK to place a copy of the currently
active route into the RTE 2 pages.
5R�@LSK�������āA���݃A�N�e�B�u�ȃ��[�g��RTE2�y�[�W�ɃR�s�[���܂��B
Press EXEC to make the changes and then press
the 6L LSK to switch to the RTE 2 LEGS display.
EXEC�������ĕύX�����{���܂��B������6L�@LSK��������RTE2�@LEGS�\���ɐ�ւ��܂��B
The results are shown below:
���ʂ����ɕ\�����܂��B
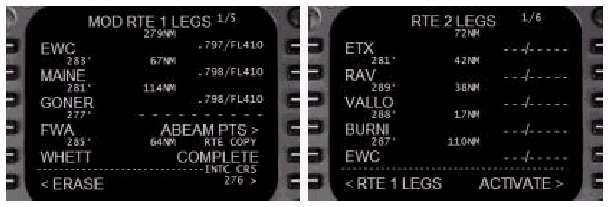
Notice how the "RTE COPY>" prompt
changes to "COMPLETE" when the
5R LSK is pressed.
5R LSK����������"RTE COPY>"�v�����v�g��"COMPLETE"�ɕς�邱�Ƃɒ��ӂ��Ă��������B
This indicates that the route copy has been
successful.
����́A���[�g�R�s�[�������������Ƃ������Ă��܂��B
Switching to the RTE 2 LEGS page after executing
the changes reveals that the previously active
route is now stored in RTE 2.
�ύX���G�O�[�L���[�g������ŁARTE 2 LEGS�y�[�W�ɐ�ւ���ƁA�ȑO�A�N�e�B�u���������[�g��RTE
2�ɕۑ�����Ă��邱�Ƃ����炩�ɂȂ�܂��B
Intercept Course To
�`�ւ̃C���^�[�Z�v�g�E�R�[�X
This feature is used to create a specific
inbound course to a waypoint for LNAV to
follow.
���̋@�\�́ALNAV���t�H���[����A�E�G�C�|�C���g�Ɍ���������̃C���o�E���h�R�[�X���쐬���邽�߂Ɏg�p���܂��B
The steps for waypoint selection are the
same as those for creating a Direct To waypoint.
�E�G�C�|�C���g��I������X�e�b�v�́A�E�G�C�|�C���g�ւ̒��s�R�[�X���쐬����ꍇ�Ɠ����ł��B
The specific intercept course is entered
at the 6R LSK INTC CRS prompt.
����̃C���^�[�Z�v�g�R�[�X��6R LSK��INTC
CRS�v�����v�g������͂��܂��B
Pressing the EXEC key creates the specific
inbound radial on the EHSI and HDG SEL is
used to fly toward the inbound course.
EXEC�L�[�������Ɠ���̃C���o�E���h���W�A���R�[�X��EHSI��ɐ�������܂��B������HDG
SEL��p���Ă��̃C���o�E���h�R�[�X�Ɍ������Ĕ�s���܂��B
When the LNAV button is pressed, LNAV is
armed for course interception upon reaching
the specified inbound course line.
LNAV�{�^���������ƁA����̃C���o�E���h�R�[�X���C���^�[�Z�v�g����R�[�X��LNAV���A�[������܂��B
Consider the following example: Using the LEGS page from a previous example,
the clearance is to fly a 270 � heading to
intercept the RAV 110 � radial (290 � inbound
course) and track it inbound.
�ȉ��̗�ɂ��čl���܂��@�F�@�O�̗��LEGS�y�[�W���g���܂��B�N���A�����X�́A�j�H270�Ŕ�s���ARAV��110���W�A��(290�C���o�E���h�R�[�X)���C���^�[�Z�v�g���A���̃R�[�X��RAV�Ɍ��������̂ł��B
The first step is to put the AFDS in HDG
SEL mode on a 270 � heading.
�ŏ��̃X�e�b�v�́AAFDS��HDG SEL���[�h�Őj�H270�ɃZ�b�g���܂��B
Then line select RAV to the 1L position to
make it the active waypoint.
���ɁARAV��1L�̈ʒu�Ƀ��C���Z���N�g��������A�N�e�B�u�E�G�C�|�C���g�ɂ��܂��B
Then, type 290 into the scratchpad and press
the 6R LSK to specify the INTC CRS.
�����ăX�N���b�`�p�b�h��290�ƃ^�C�v��6R LSK�������ăC���^�[�Z�v�g�E�R�[�X(INTC
CRS)����肵�܂��B
Press EXEC to make the modification active
and PRESS LNAV on the MCP to arm it for course
capture.
EXEC�������ďC�����A�N�e�B�u�ɂ��܂��BMCP���LNAV�������āA�R�[�X���L���v�`���[����悤�ɃA�[�����܂��B
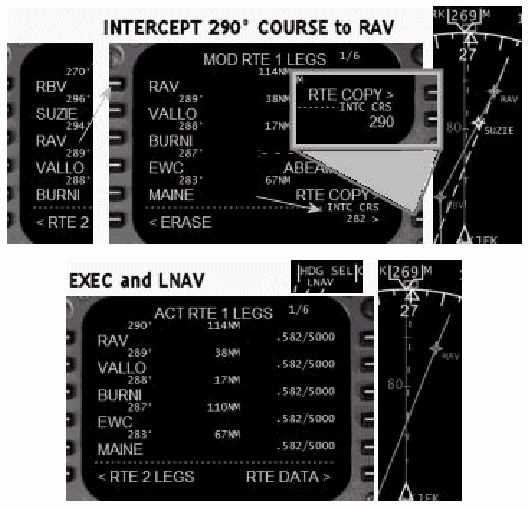
Notice that when the RAV waypoint is line
selected to the 1L LSK that the INTC CRS
prompt displays 282 in small type.
RAV�E�G�C�|�C���g��1L LSK�Ƀ��C���Z���N�g�����ƁAINTC
CRS�v�����v�g��282�Ə����������Ń^�C�v����邱�Ƃɒ��ӂ��ĉ������B
This is the FMC calculated direct course
to RAV.
����́AFMC���v�Z����RAV�ւ̒��s�R�[�X�ł��B
When 290 is entered, it appears in large
type since it is a manually entered intercept
course.
290�����͂����ƁA�}�j���A�����͂��ꂽ�C���^�[�Z�v�g�R�[�X�̂��ߑ傫�������ŕ\������܂��B
When the modifications are executed, the
course listed for RAV shows as 290 � and
the course line is drawn on the EHSI.
�C�����G�O�[�L���[�g�����ƁARAV�Ɍ��������߂Ƀ��X�g�A�b�v���ꂽ�R�[�X��290�ƕ\������܂��B���̃R�[�X��EHSI��ɕ`����܂��B
An intercept course may also be specified
for a waypoint that is not on the active
route.
�C���^�[�Z�v�g�R�[�X�́A�A�N�e�B�u���[�g��ɖ����E�G�C�|�C���g�ɑ��Ă��ݒ肳��܂��B
When the new waypoint is line selected to
1L, the INTC CRS prompt displays with boxes
for the entry of a specific inbound course.
�V�����E�G�C�|�C���g��1L�Ƀ��C���Z���N�g�����ƁA����̃C���o�E���h�R�[�X����͂��邽�߂�INTC
CRS�v�����v�g�����^�ɕ\������܂��B
If no course entry is made, the FMC assumes
a direct course as was demonstrated in a
previous example using the ETX waypoint.
�R�[�X���͂��Ȃ��ƁA(�O�̗�ŏq�ׂ�ETX�E�G�C�|�C���g�g�p���̂悤��)FMC�͒��s�R�[�X�����肵�܂��B
Waypoint Deletion
�E�G�C�|�C���g�̍폜
There are two methods to delete waypoints
from the route.
���[�g����E�G�C�|�C���g���폜���邽�߂ɓ�̕��@������܂��B
The first involves the use of the DEL key
to delete individual waypoints from the route.
���́ADEL�L�[���g�p���āA����̃E�G�C�|�C���g�����[�g����폜���܂��B
When this method is used, a route discontinuity
is presented in place of the deleted waypoint.
���̕��@�ł́A�폜���ꂽ�E�G�C�|�C���g�̏ꏊ�Ƀ��[�g�̕s�A��(�f�B�X�R��)������܂��B
The second involves changing the waypoint
sequence within the LEGS pages.
��Q�́ALEGS�y�[�W���ŃE�G�C�|�C���g�E�V�[�P���X��ύX���܂��B
All bypassed waypoints from the re-sequencing
are deleted upon execution without causing
a route discontinuity.
�Ĕz��ɔ����o�C�p�X���ꂽ�S�ẴE�G�C�|�C���g�̓G�O�[�L���[�g�ɂ��폜����A���[�g�f�B�X�R���͔������܂���B
The only waypoint on the LEGS page that cannot
be deleted is the active waypoint.
LEGS�y�[�W��ō폜����Ȃ��B��̃E�G�C�|�C���g�̓A�N�e�B�u�E�G�C�|�C���g�ł��B
Consider the following example using the
DEL key: Delete the RBV waypoint.
DEL�L�[�̎g�p�Ɋւ��Ĉȉ��̗���l���܂��FRBV�E�G�C�|�C���g���폜���܂��B
Start by pressing the DEL data entry key.
�ŏ���DEL�f�[�^�G���g���[�L�[�������܂��B
This places the word DELETE in the scratchpad.
����ɂ��X�N���b�`�p�b�h��"DELETE"�̕������\������܂��B
Now press the 2L LSK abeam the RBV waypoint
to delete it.
������RBV�E�G�C�|�C���g�̐^���̂QL LSK�������č폜���܂��B
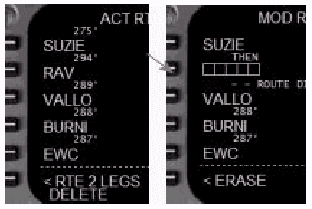
Notice that a route discontinuity has taken
the place of the RBV waypoint.
RBV�E�G�C�|�C���g�̈ʒu�Ƀ��[�g�s�A��(�f�B�X�R��)���������邱�Ƃɒ��ӂ��Ă��������B
The discontinuity can be closed by line selecting
a waypoint from below the discontinuity line
into the discontinuity boxes.
�f�B�X�R���́A�f�B�X�R�����̃E�G�C�|�C���g�����C���Z���N�g���A������f�B�X�R���̔��̒��ɓ���邱�ƂŌq�����Ƃ��o���܂��B
Consider the following example of re-sequencing
waypoints: After SUZIE fly direct to ESL.
�E�G�C�|�C���g�̍Ĕz��ɂ��Ĉȉ��̗�Ő������܂��B�FSUZIE�̂���ESL�ɒ��s���܂��B
This problem involves the deletion of three
waypoints between SUZIE and ESL.
���̗�ł�SUZIE��ESL�̊Ԃ̂R�̃E�G�C�|�C���g���폜���܂��B
The easiest way to accomplish this is to
line select ESL and place it below SUZIE.
�����B�����邽�߂̍ł��ȒP�ȕ��@�́AESL�����C���Z���N�g���ASUZIE�̉��ɋN���܂��B
To do this, press the 5L LSK to place ESL
in the scratchpad.
���̂��߂ɁA5L LSK�������āAESL���X�N���b�`�p�b�h�ɓ���܂��B
Press the 2L LSK to place ESL below SUZIE
in the route.
2L LSK��������ESL�����[�g����SUZIE�̉��ɒu���܂��B
Now press EXEC to make the modification active.
������EXEC�������ďC�����A�N�e�B�u�ɂ��܂��B
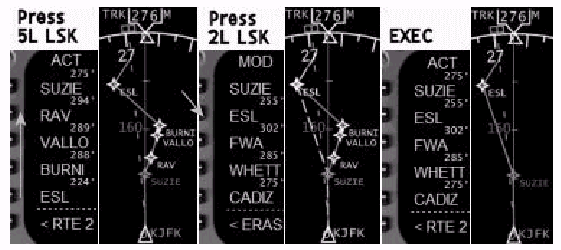
Notice that three waypoints were deleted
with one action.
3�̃E�G�C�|�C���g����̃A�N�V�����ō폜���ꂽ���Ƃ�������܂��B
Also, the modifications executed had no affect
on the active waypoint.
�����ďC�����G�O�[�L���[�g���Ă��A�N�e�B�u�E�E�G�C�|�C���g�ɂ͉��̉e��������܂���B
This example could have been done using the
DEL key method, but that would require three
separate deletions and a closing of the resulting
discontinuity.
���̗��DEL�L�[���g�p���Ă��\�ł��B������3�̈قȂ�폜��K�v�Ƃ��A��������f�B�X�R������������K�v������܂��B
Moving waypoints within a route is not limited
to only those found on LEGS page 1.
�E�G�C�|�C���g�̃��[�g���̈ړ��́ALEGS�y�[�W1��݂̂Ɍ��肳��܂���B
A Waypoint may be line selected from any
LEGS page and then line selected onto a different
LEGS page.
�E�G�C�|�C���g�͂ǂ�LEGS�y�[�W����ł����C���Z���N�g����܂��B�����āA�قȂ�LEGS�y�[�W��Ƀ��C���Z���N�g�ł��܂��B
Use the NEXT and PREV PAGE keys to move between
LEGS pages.
LEGS�y�[�W�Ԃ̈ٓ��̂��߂�NEXT��PREV PAGE�L�[���g�p���܂��B
All bypassed waypoints, including those on
any skipped pages, are automatically deleted
upon execution.
�S�Ẵo�C�p�X���ꂽ�E�G�C�|�C���g(�X�L�b�v���ꂽ�y�[�W����܂�)�̓G�O�[�L���[�g�ɔ��������I�ɍ폜����܂��B
Waypoint Addition
�E�F�C�|�C���g�̒lj�
Adding waypoints is accomplished by typing
the name of the waypoint into the scratchpad
and then line selecting it into the desired
position on the LEGS page.
�E�G�C�|�C���g�̒lj��́A�E�G�C�|�C���g�����X�N���b�`�p�b�h�Ƀ^�C�v���A�����LEGS�y�[�W��̏��]�̈ʒu�Ƀ��C���Z���N�g���邱�ƂŒB�����܂��B
A route discontinuity is placed after the
added waypoint since the FMC does not make
course assumptions after the addition of
a new waypoint.
�lj������E�G�C�|�C���g�̌��Ƀ��[�g�E�f�B�X�R�����������܂��B�����FMC���lj����ꂽ�V�����E�G�C�|�C���g�ȍ~�̃R�[�X��z�肵�č쐬�ł��Ȃ�����ł��B
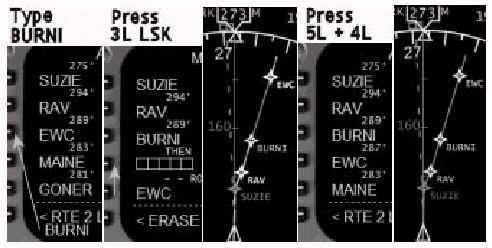
Consider the following example: Add the waypoint BURNI into the route after
RAV.
�ȉ��̗�ɂ��čl���܂��@�F�@RAV��̃��[�g��BURNI�E�G�C�|�C���g��lj����܂��B
Type BURNI into the scratchpad followed by
the 3L LSK to place it into the LEGS page
below RAV.
�X�N���b�`�p�b�h��BURNI�ƃ^�C�v���A����3L�@LSK��������LEGS�y�[�W��RAV�̉��ɒu���܂��B
Then line select EWC to the 4L position to
close the resulting route discontinuity.
����EWC��4L�ʒu�Ƀ��C���Z���N�g�����[�g�f�B�X�R�����q���܂��B
Press EXEC to make the modifications active.
EXEC�������ďC�����A�N�e�B�u�ɂ��܂��B
Route Data Page (RTE DATA)
���[�g�E�f�[�^�E�y�[�W
The route data page displays progress data
for individual waypoints in the active route.
���[�g�f�[�^�y�[�W�̓A�N�e�B�u���[�g���̌X�̂̃E�G�C�|�C���g�ɂ��Đi�s���̃f�[�^��\�����܂��B
The page is accessed by pressing the "RTE
DATA>" prompt at the 6R LSK of the
LEGS page.
LEGS�y�[�W��6R LSK��"RTE DATA>"�v�����v�g�������Ƃ��̃y�[�W�ɃA�N�Z�X�ł��܂��B
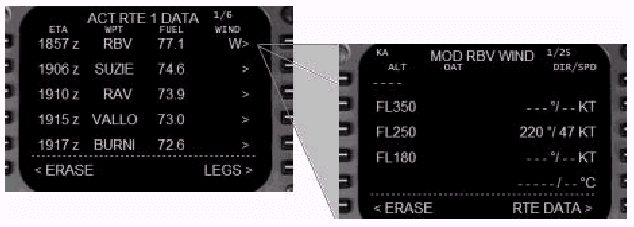
The Estimated Time of Arrival (ETA) and estimated
fuel for each fix is displayed.
�eFIX�ɂ��āA�����\�莞��(ETA)�ƔR���̌��ς��肪�\������܂��B
In the WIND column, a "W" indicates
waypoint wind data has been entered for the
respective waypoint.
WIND(��)���"W"�͑Ή�����E�G�C�|�C���g�ł̕��Ɋւ���f�[�^�����͂���Ă��邱�Ƃ������܂��B
The absence of a "W" indicates
that no wind data has been entered for the
respective waypoint.
"W"���������Ƃ́A�Ή�����E�G�C�|�C���g�ɂ��ĕ��̃f�[�^�����͂���Ă��Ȃ����Ƃ������܂��B
Wind page data helps enhance the performance
of VNAV.
���̃y�[�W�E�f�[�^��VNAV�̐��\�����߂܂��B
Pressing the right side LSK of any waypoint
calls up the waypoint wind data page.
�ǂ̃E�G�C�|�C���g�ł��E����LSK�������ƃE�G�C�|�C���g�E�E�C���h�E�f�[�^�E�y�[�W���Ăяo����܂��B
Wind data can be entered for up to three
altitudes.
�R��ނ̍��x�܂ŕ��̃f�[�^����͂��邱�Ƃ��o���܂��B
To enter wind data on the page, type an altitude
into the scratchpad and line select it to
the 1L LSK.
���̃y�[�W�ɕ��̃f�[�^����͂��邽�߂ɂ́A���x���X�N���b�`�p�b�h�ɂ����1L�@LSK�Ƀ��C���Z���N�g���܂��B
This drops the altitude into a list on the
left side of the page along with a DIR/SPD
dashed prompt along the right side.
����ŁA���x�����x�����X�g�̍����ɋL�ڂ���܂��B�����ĉE���ɂ�DIR/SPD(����/����)�̓��̓v�����v�g���j���ŕ\������܂��B
Enter the wind speed and direction for the
altitude and line select it into the dashed
prompts.
���x�ɉ����������ƕ�������͂��A�j���̓��̓v�����v�g�Ƀ��C���Z���N�g���܂��B
Wind page data entry has to be executed with
the EXEC key to become active.
�E�C���h�y�[�W�̃f�[�^���͂��A�N�e�B�u�ɂ��邽�߂ɂ́AEXEC�L�[�������ăG�O�[�L���[�g���Ȃ���Ȃ�܂���B
The dashed prompts at the 5R LSK of the wind
page are for altitude/temperature information.
�E�C���h�y�[�W��5R LSK�̓��̓v�����v�g�͍��x/���x���ׂ̈ɂ���܂��B
The known OAT for any altitude may be entered
on this line.
���̗�ɂ͔C�ӂ̍��x�ɑ�����m��OAT����͂��܂��B
The FMC calculates the temperature for the
remaining altitudes based on a standard lapse
rate.
FMC�͎c��̍��x�ɑ��鉷�x��W���ω����Ɋ�Â��Čv�Z���܂��B
Progress Page (PROG)
�v���O���X(�o��/�i�s)�y�[�W(PROG)
The progress page summarizes flight progress
data for the active route.
�v���O���X�E�y�[�W�ł̓A�N�e�B�u���[�g�Ɋւ���t���C�g�i�s�f�[�^��v�Ă���܂��B
To access the progress page, press the PROG
function key on the CDU.
�v���O���X�E�y�[�W�ɃA�N�Z�X����ɂ́ACDU��PROG�t�@���N�V�����L�[�������܂��B
The flight number (if entered) on the RTE
page is displayed in the title.
RTE�y�[�W�̃t���C�g�ԍ���(�������͂���Ă����)�^�C�g���ɕ\������܂��B
Progress Page 1
�v���O���X�E�y�[�W�P
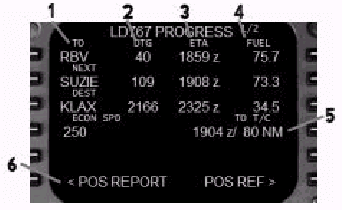
1- Waypoint: TO = Active waypoint, NEXT = Next route
waypoint, DEST = Destination airport entered
in route page.
�E�G�C�|�C���g�@�F�@TO=�A�N�e�B�u�E�E�G�C�|�C���g�ANEXT=���[�g�̎��̃E�G�C�|�C���g�ADEST=���[�g�y�[�W�ɓ��͂��ꂽ������`
2- Distance To Go (DTG): Displays the distance to the active waypoint,
between the active and the next waypoint,
and to the destination.
���B�܂ł̋���(DTG)�@�F�@�A�N�e�B�u�E�E�G�C�|�C���g�܂ł̋����A�A�N�e�B�u�Ƃ��̎��̃E�G�C�|�C���g�Ԃ̋����A������`�܂ł̋�����\�����܂��B
3- Estimated Time of Arrival (ETA): Displays the ETA for the respective waypoint
and the destination.
�����\�莞��(ETA)�@�F�@�e�E�G�C�|�C���g�Ɠ�����`�ւ̓����\�莞����\�����܂��B
4- Fuel: Displays the estimated amount of fuel when
arriving at each point.
�R���@�F�@�v�Z���ꂽ�A�e�n�_�ɓ������̔R���̗ʂ�\�����܂��B
5- VNAV Information: Displays the following information regarding
VNAV status when applicable:
VNAV���@�F�@VNAV�̏�ԂɊւ���ȉ��̏���(�\�ł����)�\�����܂��B
6- Position Report Prompt: Pressing the 6L LSK displays the position
report page.
�ʒu�ʕ�v�����v�g�@�F�@6L LSK�������ƈʒu�ʕ�y�[�W��\�����܂��B
This page presents progress page data organized
in a standard format for ATC reports.
���̃y�[�W�̓v���O���X�E�y�[�W�̃f�[�^��ATC�p�̕W���t�H�[�}�b�g�ɐ������ĕ\�����܂��B
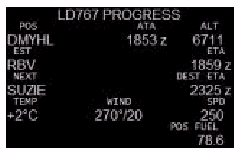
Progress Page 2
�v���O���X�E�y�[�W2
Press the NEXT PAGE function key to access
this page.
NEXT PAGE�t�@���N�V�����L�[�������Ƃ��̃y�[�W�ɃA�N�Z�X���܂��B
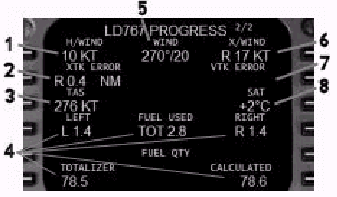
1- Headwind/Tailwind: Displays the current headwind (H/) or tailwind
(T/) component relative to aircraft heading.
��������/�ǂ����@�F�@�q��@�̐j�H�ɑΉ��������݂̌�������(H/)�܂��͒ǂ���(T/)������\�����܂��B
2- Crosstrack Error: Displays aircraft distance from the active
route.
�N���X�E�g���b�N�E�G���[�@�F�@�q��@�̃A�N�e�B�u���[�g����̋�����\�����܂��B
In this example, the aircraft is 0.4 nautical
miles to the right of the FMC leg track.
��ł́A�q��@��FMC�g���b�N�ɑ���0.4nm�E���ɂ��܂��B
3- True Airspeed: Aircraft true airspeed.
�^�C���x�@�F�@�q��@�̐^�C���x(TAS)
4- Fuel Data: Displays fuel used and fuel quantity information.
�R���f�[�^�@�F�@����ꂽ�R���ƔR���ʂɊւ������\�����܂��B
5- Wind: Actual wind at the aircrafts present position.
���@�F�@�q��@�̌��݈ʒu�ł̎��ۂ̕���\�����܂��B
6- Crosswind: Displays the crosswind (Left or Right) component
relative to the aircrafts heading.
�����@�F�@�q��@�̐j�H�ɑΉ�������������(�����E)��\�����܂��B
7- Vertical Track Error (VTK): Data is only displayed while on a VNAV descent.
���������̃g���b�N�E�G���[(VTK)�@�F�@�f�[�^��VNAV�~�����̂ݕ\������܂��B
Deviations from the calculated vertical path
are registered here as above (+) and below
(-) the path in feet.
�v�Z���ꂽ���������̌o�H����̕Έʂ���(+)����(-)�Ƀt�B�[�g(ft)�P�ʂŕ\������܂��B
8- Static Air Temperature: Displays the static air temperature outside
the aircraft.
�ÓI��C���x�@�F�@�q��@�̊O���̐ÓI�ȑ�C���x��\�����܂��B
FIX Page (FIX)
FIX�y�[�W(FIX)
The fix page allows for the lookup and display
of any waypoint, navaid, or airport in the
FMC database.
FIX�y�[�W�ł́AFMC�f�[�^�x�[�X���̔C�ӂ̃E�G�C�|�C���g�ANAVAID�A��`�ׂĕ\�����邱�Ƃ��o���܂��B
It is most often used to display a waypoint
that is not on the active route.
���݃A�N�e�B�u�ȃ��[�g��ɂȂ��E�G�C�|�C���g��\�������邽�߂ɁA�����Ύg���܂��B
The entered waypoint is displayed on the
EHSI and the fix distance and relative bearing
to the aircrafts current position is displayed
on the fix page.
���͂��ꂽ�E�G�C�|�C���g��EHSI��ɕ\������܂��B������FIX�̋����ƌ��݂̍q��@�ʒu����̑��ΓI�ȕ��ʂ�FIX�y�[�W��ɕ\������܂��B
The fix page can also be used to enter abeam
waypoints into the active route.
�܂��AFIX�y�[�W�̓A�N�e�B�u�E���[�g���ɃA�r�[���E�E�G�C�|�C���g����͂��邽�߂ɂ��g�p����܂��B
Pressing the FIX function key displays the
FIX page.
FIX�t�@���N�V�����E�L�[��������FIX�y�[�W���\������܂��B
There are two fix pages available for the
entry of two different fixes for display.
�Q�̈قȂ�FIX��\�����邽�߂ɁA�Q��fix�y�[�W�����p�\�ł��B
If no fix is entered into the page, the 1L
position displays box prompts for the entry
of data.
�������̃y�[�W��FIX�����͂���Ȃ��ꍇ�A1L�ʒu�Ƀ{�b�N�X�v�����v�g���\������A���͂�v�����܂��B
Enter the fix name into the scratchpad and
press the 1L LSK to enter it into the fix
page.
�X�N���b�`�p�b�h��FIX������͂��A1L LSK��������FIX�y�[�W�ɓ��͂��܂��B
The following example shows the FJC navaid
entered into the FIX page.
�ȉ��̗�ł�FJC NAVAID��FIX�y�[�W�ɓ��͂���邱�Ƃ������܂��B
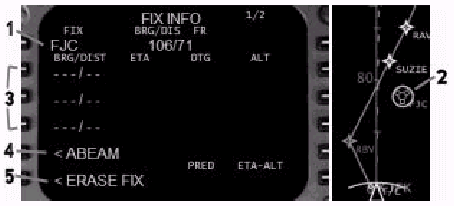
1- Fix Entry Box: Enter a waypoint, navaid, or airport name
into the scratchpad and line select it to
the 1L position.
FIX���̓{�b�N�X�@�F�@�X�N���b�`�p�b�h�ɃE�G�C�|�C���g�ANAVAID�A��`������͂��A�����1L�ʒu�Ƀ��C���Z���N�g���܂��B
2- Fix EHSI Display: Fixes entered in the fix page are displayed
on the EHSI with a green circle around the
fix symbol.
FIX EHSI�f�B�X�v���C�@�F�@FIX�y�[�W�ɓ��͂��ꂽFIX��FIX�V���{���̎���ɗΐF�̉~�Ƌ���EHSI��ɕ\������܂��B
3- Bearing/Distance: Enter radials or distances from the fix
to be shown on the EHSI.
����/�����@�F�@FIX����̃��W�A���Ƌ�������͂���ƁAEHSI��ɕ\������܂��B
The format is XXX/xx where XXX is a radial
and xx is a DME.
�t�H�[�}�b�g��XXX/xx��XXX�����W�A���Axx��DME�ł��B
If only a distance is desired, enter "/xx"
and press the LSK abeam an empty data box.
����������]�ނƂ��́A"/xx"�Ɠ��͂��A�f�[�^BOX�����LSK�������܂��B
Examples of bearing and distance entries
for the FJC fix are shown below:
FJC FIX�ɑ�����ʂƋ����̓��͗�����ɕ\�����܂��B
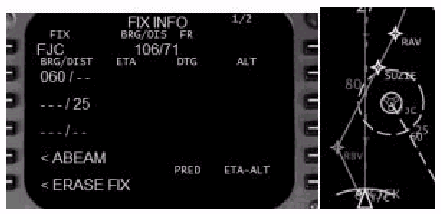
The 060 entry draws the 060 � radial from
the FJC fix.
060���͂�FJC FIX�����060���W�A����`���܂��B
The "/25" entry draws a dashed
circle that represents 25 miles from the
FJC fix.
"/25"�Ɠ��͂���ƁAFJC FIX ���甼�a25nm�̉~(�j��)��`���܂��B
This example shows these entries on two separate
lines, but they could have been entered onto
one line as "060/25". Up to three
radials and three distances can be entered
for each fix.
���̗�ł́A�������̕ʂ̍s�ɓ��͂��܂����B�������A�����"060/25"�̂悤��1�s�ɓ��͂��邱�Ƃ��o���܂��B�eFIX�ɑ��ĂR�̂܂ł̃��W�A���ƂR�܂ł̋�������͉\�ł��B
4- ABEAM Prompt: Pressing the 5L LSK displays prediction
data (radial/DME, time, distance, altitude)
for when the aircraft will pass abeam the
entered fix while flying on the current route.
ABEAM(�^����)�v�����v�g�@�F�@5L LSK�������ƁA�q��@�����݂̃��[�g���s���ɓ��͂��ꂽFIX�̃A�r�[����ʉ߂��鎞�̗\���f�[�^(���W�A��/DME�A���ԁA�����A���x)��\�����܂��B
Pressing the 5L LSK a second time (with prediction
data displayed) places the abeam point coordinates
into the scratchpad.
5L LSK��������x������(�\���f�[�^���\������Ă���ꍇ)�A�r�[���|�C���g�̍��W���X�N���b�`�p�b�h�ɓ]������܂��B
These coordinates can be added to the route
as an abeam point reminder.
�A�r�[���|�C���g��Y��Ȃ��悤�ɁA�����̍��W�����[�g�ɒlj����邱�Ƃ��o���܂��B
The example below creates an abeam point
on the displayed route for the FJC fix:
���̗�ł�FJC FIX�ɑ���\�����ꂽ���[�g�̃A�r�[���|�C���g�����܂��B

The 5L data line displays the abeam point
predictions.
5L�f�[�^���C���ɂ̓A�r�[���|�C���g�̗\���l���\������Ă��܂��B
206/21 is the radial and DME from the fix
that intersects with the current route.
206/21�͌��݂̃��[�g������AFIX����̃��W�A����DME�ł��B
1908Z is the predicted abeam point crossing
time.
1908Z�̓A�r�[���|�C���g��ʉ߂���\�莞���ł��B
71 is the distance to the abeam point from
the aircrafts present position.
71�͍q��@�̌��݂̈ʒu����A�r�[���|�C���g�܂ł̋����ł��B
10000 is the predicted crossing altitude.
10000�͒ʉߎ��̍��x�̗\���l�ł��B
Pressing the 5L LSK a second time transfers
the coordinates for the abeam point into
the scratchpad.
5L LSK��������x�����ƁA�A�r�[���|�C���g�̍��W���X�N���b�`�p�b�h�ɓ]������܂��B
The example above shows how these coordinates
have been inserted into the route after the
RBV waypoint.
��̗�ł́A���W�����[�g����RBV�E�G�C�|�C���g�̌�ɂǂ̂悤�ɑ}�����ꂽ���������Ă��܂��B
HOLD Page (HOLD)
�z�[���h�y�[�W(HOLD)
Pressing the HOLD key permits the programming
of a holding pattern into the current route.
HOLD�L�[�������ƁA���݂̃��[�g�̒��Ƀz�[���f�B���O�p�^�[�����v���O�������邱�Ƃ��o���܂��B
If a holding pattern is already programmed,
pressing the HOLD key displays the holding
page for the first programmed holding pattern.
�z�[���f�B���O�p�^�[�������łɃv���O��������Ă���AHOLD�L�[�������ƁA�ŏ��Ƀv���O�������ꂽ�z�[���f�B���O�p�^�[���̃z�[���f�B���O�y�[�W���\������܂��B
When the HOLD key is pressed and no holding
pattern exists, the following is displayed:
HOLD�L�[�������ꂽ�Ƃ��ɁA�z�[���f�B���O�p�^�[���������ꍇ�́A�ȉ��̂悤�ɕ\������܂��F

1- HOLD AT data box: The name of the holding fix gets entered
into these boxes.
HOLD AT(�����Ńz�[���h)�f�[�^�{�b�N�X�@�F�@�z�[���f�B���OFIX���������ɓ��͂��܂��B
A waypoint from the active route or a new
waypoint may be entered into the data boxes.
�A�N�e�B�u���[�g�̃E�G�C�|�C���g���V�����E�G�C�|�C���g���f�[�^�{�b�N�X�ɓ��͂��܂��B
Line selecting a waypoint in the active route
and pressing the 6L LSK creates a holding
pattern at the waypoint and displays the
holding page.
�A�N�e�B�u���[�g�̃E�G�C�|�C���g�����C���Z���N�g���A6L
LSK�������ƁA�E�G�C�|�C���g�Ƀz�[���f�B���O�p�^�[�������A�z�[���f�B���O�y�[�W��\�����܂��B
The holding pattern is placed into the active
route in sequence with no route discontinuity.
�z�[���f�B���O�p�^�[���̓A�N�e�B�u���[�g���ɁA���[�g�̃f�B�X�R�����o���Ȃ��悤�ɑ}������܂��B
If a new waypoint is entered into the HOLD
AT data boxes, a scratchpad message �HOLD
AT XXXXX� is displayed (where XXXXX is waypoint).
HOLD AT�f�[�^�{�b�N�X�ɐV�����E�G�C�|�C���g����͂���ƁA"HOLD
AT XXXXX"�Ƃ����X�N���b�`�p�b�h���b�Z�[�W���\������܂��B(XXXXX���E�G�C�|�C���g)
To place the holding pattern into the route,
press an LSK on the LEGS page abeam where
the holding pattern should be placed.
���[�g���Ƀz�[���f�B���O�p�^�[����ݒu���邽�߂ɂ́ALEGS�y�[�W�Ńz�[���f�B���O�p�^�[����ݒu�������n�_�̐^����LSK�������܂��B
This action displays the holding page for
the waypoint and places the new waypoint
into the route along with a route discontinuity.
����ɂ��A���̃E�G�C�|�C���g�ł̃z�[���f�B���O�y�[�W���\������A�V�����E�G�C�|�C���g�����[�g�f�B�X�R���ƂƂ��ɁA���[�g���ɐݒu����܂��B
2- Present Position Prompt: Pressing the 6R LSK defines a hold at the
aircrafts present position and inserts it
into the active route with a route discontinuity.
���݈ʒu�v�����v�g�@�F�@6R LSK�������ƁA�q��@�̌��݈ʒu���z�[���h�n�_�Ƃ��Đݒ肵�܂��B���̒n�_���A�N�e�B�u���[�g����(���[�g�f�B�X�R���ƂƂ���)�}�����܂��B
Defining the holding pattern
�z�[���f�B���O�p�^�[���̒�`
The HOLD page is where the holding pattern
is described and modified.
HOLD�y�[�W�ł́A�z�[���f�B���O�p�^�[�����L�q����A�C������܂��B
The holding pattern is drawn on the EHSI
and is followed by LNAV based on entries
in this page.
���̃y�[�W�ł̓��͓��e�Ɋ�Â��āA�z�[���f�B���O�p�^�[����EHSI��ɕ`����ALNAV��������t�H���[���܂��B
The HOLD page is displayed when a holding
waypoint is initially defined, or when the
HOLD key is pressed with a holding waypoint
already defined.
�z�[���h�y�[�W�́A�ŏ��Ƀz�[���f�B���O�E�G�C�|�C���g����`���ꂽ�Ƃ����A�z�[���f�B���O�E�G�C�|�C���g�����łɒ�`����Ă���HOLD�L�[�������ꂽ�Ƃ��ɕ\������܂��B
Since modifications to the HOLD page can
affect the aircrafts flight path, all modifications
made must be executed by pressing the EXEC
function key.
HOLD�y�[�W�̏C���́A�q��@�̃t���C�g�o�H�ɉe������̂ŁA�S�Ă̏C����EXEC�t�@���N�V�����L�[�������ăG�O�[�L���[�g����Ȃ���Ȃ�܂���B
The following is a description of the holding
page:
�ȉ����z�[���f�B���O�y�[�W�̋L�q���e�ł��@�F
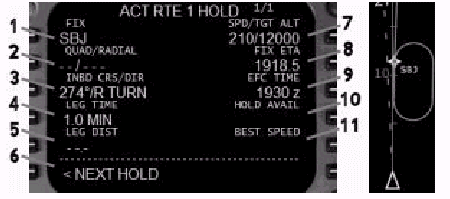
1- FIX: Displays the name of the holding fix.
FIX:�z�[���f�B���OFIX����\�����܂��B
2- Quadrant/Radial: Used as an alternate method to describe
the holding radial on which the holding pattern
is based.
�l���~/���ʁF�z�[���f�B���O�p�^�[������Â��Ă���z�[���f�B���O���W�A�����L�q���邽�߂̑���̕��@�Ƃ��Ďg�p���܂��B
Enter the desired holding radial into the
scratchpad and press the 2L LSK to re-define
the holding pattern based on the entered
radial.
��]�̃��W�A�����X�N���b�`�o�b�h�ɓ��͂��A2L
LSK�������ƁA���͂��ꂽ���W�A���Ɋ�Â��ăz�[���f�B���O�p�^�[�����Ē�`����܂��B
The quadrant, expressed as a reference to
a compass point, is automatically filled
in with the entry of a radial.
�l���~(�Q�l�ׂ̈�32���ʂŕ\�L�����)�́A���W�A���̓��͂ɔ��������I�ɐݒ肳��܂��B
For example, entering 160 into the scratchpad
and pressing the 2L LSK displays �SE/160�
in the data line.
��Ƃ��āA�X�N���b�`�p�b�h��160����͂��A2L
LSK�������ƁA�f�[�^���C����"SE/160"�ƕ\������܂��B
3- Inbound Course/Direction: This field automatically fills in with a
direct entry holding course and right hand
turns when a holding waypoint is defined.
�C���o�E���h�R�[�X/�����F�z�[���f�B���O�E�G�C�|�C���g����`�����ƁA�_�C���N�g�G���g���[�z�[���f�B���O�R�[�X�ƉE���̐������I�ɓ���܂��B
If the waypoint is on the current route,
the inbound holding course is the inbound
course to the waypoint along the route.
�E�G�C�|�C���g�����݂̃��[�g��̏ꍇ�́A�C���o�E���h�z�[���f�B���O�R�[�X�́A���[�g��ŃE�G�C�|�C���g�Ɍ������C���o�E���h�R�[�X�ɂȂ�܂��B
To change the inbound course, enter the new
course into the scratchpad and press the
3L LSK.
�C���o�E���h�R�[�X(�F�E�G�C�|�C���g�Ɍ������R�[�X)��ς���ɂ́A�V�����R�[�X���X�N���b�`�p�b�h�ɓ��͂��A3L
LSK�������܂��B
To change the holding pattern direction,
type "L" or "R" into
the scratchpad and press the 3L LSK.
�z�[���f�B���O�p�^�[���̕�����ς���ɂ́A"L"��"R"���X�N���b�`�p�b�h�ɓ��͂���3L
LSK�������܂��B
4- Leg Time: Displays the length in minutes of the holding
patterns inbound leg.
���O���ԁF�z�[���f�B���O�p�^�[���̃C���o�E���h���O���ԂP�ʂŕ\�����܂��B
The default value is 1.0 at or below 14,000
and 1.5 above 14,000 when the holding fix
is initially defined.
�z�[���f�B���OFIX���ŏ��ɒ�`���ꂽ���̏����ݒ�l��14000ft�ȉ��ł�1.0�ŁA14000�ȏ�ł�1.5�ł��B
To redefine the leg time, type the desired
time into the scratchpad and press the 4L
LSK.
���O���Ԃ��Ē�`����ɂ́A��]�̎��Ԃ��X�N���b�`�p�b�h�ɓ��͂��A4L
LSK�������܂��B
5- Leg Distance: Used as an alternate method to describe
the size of the holding patterns inbound
leg.
���O�����F�z�[���f�B���O�p�^�[���̃C���o�E���h���O�̑傫�����`����ʂ̕��@�ł��B
To redefine the inbound holding pattern leg
using distance, type the desired length in
miles of the inbound holding leg and press
the 5L LSK.
�C���o�E���h�z�[���f�B���O�p�^�[�����O��������p���čĒ�`����ɂ́A��]�̃C���o�E���h�z�[���f�B���O���O�̒������}�C���P�ʂœ��͂��A5L�@LSK�������܂��B
6- NEXT HOLD Prompt: Permits for the definition of a holding
pattern at another holding waypoint.
���̃z�[���h�v�����v�g�@�F�@���̃z�[���f�B���O�E�E�G�C�|�C���g�ł̃z�[���f�B���O�p�^�[�����`���邱�Ƃ��o���܂��B
The HOLD AT data box is displayed at the
6L LSK when pressed.
�������ƁA"HOLD AT"�f�[�^�{�b�N�X��6L
LSK�ɕ\������܂��B
A new HOLD page is created when additional
holding waypoints are defined.
�lj��̃z�[���f�B���O�E�E�G�C�|�C���g����`�����ƁA�V����HOLD�y�[�W����������܂��B
7- Speed/Target Altitude: Defines the speed and altitude for the holding
pattern.
���x�ƖڕW���x�@�F�@�z�[���f�B���O�p�^�[���̑��x�ƍ��x���`���܂��B
This data is used by the FMC to update performance
data and to redraw the holding pattern accurately
on the EHSI.
���̃f�[�^��FMC�����\�f�[�^���A�b�v�f�[�g����̂Ɏg���܂��B������EHSI��ɐ��m�ȃz�[���f�B���O�p�^�[�����ĕ`�悵�܂��B
When the hold is initially defined, this
field automatically fills with either prediction
data (small type) or waypoint speed and altitude
constraints from the LEGS page (large type).
�ŏ��Ƀz�[���h����`���ꂽ���A���̗̈�ɂ͗\���l(����������)��LEGS�y�[�W�Ɋ�Â����x�^���x�̐����l�������I�ɓ��͂���܂��B
Manually entered data redefines the holding
pattern and is displayed in large type.
�}�j���A�����͂��ꂽ�f�[�^�̓z�[���f�B���O�p�^�[�����Ē�`���A�傫�������ŕ\������܂��B
A valid entry is XXX/xxxxx, where XXX is
a speed and xxxxx is an altitude.
�L���ȓ��͂� XXX/xxxxx�ŁA���̒���XXX�����x�ŁAxxxxx�����x�ł��B
8- FIX Estimated Time of Arrival: The estimated time of arrival at the holding
fix is displayed.
FIX�����\�莞���@�F�@�z�[���f�B���OFIX�ւ̓����\�莞�����\������܂��B
9- Expect Further Clearance Time: A manually entered time that is used by
the FMC for fuel and time predictions.
�\�z�����V���ȏ��F(�N���A�����X)�����@�F�@�}�j���A�����͂��܂��B���̎��Ԃ�FMC���R���Ǝ��Ԃ�\�����邽�߂Ɏg�p����܂��B
10 - Hold Available: Displays the amount of holding time available
before the reserve fuel amount is reached.
HOLD�\���ԁ@�F�@���U�[�u�R���̗ʂɒB����܂łɉ\�ȃz�[���h���Ԃ�\�����܂��B
11- Best Hold Speed: Displays the recommended best holding speed
based on aircraft weight and altitude.
�œK�z�[���h���x�@�F�@�q��@�̔R���ƍ��x�Ɋ�Â��A�z�[���f�B���O�X�s�[�h�̍œK�l��\�����܂��B
Exiting or deleting a holding pattern
�z�[���f�B���O�p�^�[������o�邱�Ƃ�폜
To delete a holding pattern before reaching
it in the route, simply delete the holding
pattern entry from the LEGS page in the same
way described for waypoint deletion.
�z�[���f�B���O�p�^�[�����B�O�ɂ��̃z�[���f�B���O�p�^�[�����폜���邽�߂ɂ́A�E�G�C�|�C���g�̍폜�Ɠ��l�ɁA�P����LEGS�y�[�W�Ńz�[���f�B���O�p�^�[�����͂��폜���܂��B
If already in the holding pattern, there
are two methods available to exit the hold.
���łɃz�[���f�B���O�p�^�[���ɓ����Ă���ꍇ�A�z�[���h���甲���o�邽�߂ɂQ�ʂ�̕��@������܂��B
Pressing the EXIT HOLD Prompt at the 6R LSK
arms the FMC to exit the hold.
6R�@LSK��EXIT HOLD�v�����v�g�������ƁAFMC�Ƀz�[���h���甲���o�邱�Ƃ��A�[�����܂��B
The holding pattern continues normally until
the holding waypoint is reached, at which
time the hold is deleted and the active waypoint
changes to the next route waypoint.
�z�[���h���폜����A�z�[���f�B���O�E�G�C�|�C���g�ɒB���A�A�N�e�B�u�E�G�C�|�C���g�����̃��[�g�E�G�C�|�C���g�ɕω�����܂ŁA�ʏ�̃z�[���f�B���O�p�^�[�����p�����܂��B
A more direct method to exit the hold is
to go direct to another waypoint.
�z�[���h����o�������̒��ړI�ȕ��@�́A�ʂ̃E�G�C�|�C���g�ɒ��s���邱�Ƃł��B
Line selecting a down track waypoint from
the current route into the 1L LSK redirects
LNAV to navigate to that waypoint and deletes
the holding pattern.
���݂̃��[�g�̉��̃E�G�C�|�C���g��1L LSK�Ƀ��C���Z���N�g����ƁA�z�[���f�B���O�p�^�[���͍폜����A���̃E�G�C�|�C���g�ɒ��s����悤��LNAV���i�r�Q�[�g���܂��B
Navigation Radio (NAV RAD) Page
�q�@����(NAV RAD)�y�[�W
Pressing the NAV RAD function key displays
the navigation radio page.
NAV RAD�t�@���N�V�����L�[�������ƁA�q�@�����̃y�[�W���\������܂��B
This page displays information about each
tuned radio and allows for control over frequency
tuning.
���̃y�[�W�ł͂��ꂼ��`���[�j���O���ꂽ�����Ɋւ�����������A���g���̃`���[�j���O���s���܂��B

1- VOR Tuning: The tuned frequency and status of the left
and right VOR receivers is shown at the 1L
and 1R positions.
VOR �`���[�j���O�@�F�@���E��VOR��M�@�̃`���[�j���O���ꂽ���g���Ə�Ԃ�1L��1R�ɕ\������܂��B
Displayed for each radio are the frequency,
tuning status, and navaid identification.
���ꂼ��̎�M�@�ɑ��Ď��g���ƃ`���[�j���O��Ԃ�NAVAID
ID���\������܂��B
The tuning status indicates the following:
�`���[�j���O��Ԃ��ȉ��Ɏ����܂��B
To remotely tune the VOR, type the frequency
or identifier for a navaid into the scratchpad
and press the 1L or 1R LSK to tune it.
VOR�������[�g�`���[�����邽�߂ɂ́ANAVAID�̎��g����ID���X�N���b�`�p�b�h�ɓ���āA1L��1R�������ă`���[�j���O���܂��B
To cancel a remotely tuned selection, press
DELETE followed by the respective LSK.
�����[�g�`���[�j���O�����ǂ��L�����Z������ɂ́ADELETE�������āA�����đΉ�����LSK�������܂��B
Alternatively, type A into the scratchpad
and press the respective LSK.
�ʂ̕��@�ł́A�X�N���b�`�p�b�h��"A"�Ɠ��͂��āA�Ή�����LSK�������܂��B
In the example above, VOR L is tuned to 108.8,
the radio is set to AUTO, and the VOR identifier
is BDR.
��̗�ł́AVOR L��108.8�Ƀ`���[�j���O����Ă���A��M�@�̓I�[�g�ɃZ�b�g����Ă��܂��BVOR��ID��BDR�ł��B
VOR R is tuned to 117.7, the radio is set
to AUTO, and the VOR identifier is CRI.
VOR R��117.7�Ƀ`���[�j���O����A��M�@�̓I�[�g�ɃZ�b�g����āAVOR
ID��CRI�ł��B
2 - Radial: Displays the current radial to the aircraft
from the respective VOR station.
���W�A���@�F�@�Ή�����VOR����q��@�ւ̌��݂̃��W�A����\�����܂��B
3- ADF Tuning: Displays the currently tuned ADF frequency.
ADF �`���[�j���O�@�F�@���݃`���[�j���O����Ă���ADF���g����\�����܂��B
This frequency can be tuned remotely by typing
the frequency into the scratchpad followed
by the 3L or 3R LSK.
���̎��g���̓����[�g�`���[�j���O�\�ł��B���g�����X�N���b�`�p�b�h�ɓ��͂��āA����3L��3R�@LSK�������܂��B
4- ILS Tuning: Displays the currently tuned ILS frequency
and course.
ILS�`���[�j���O�@�F�@���݃`���[�j���O����Ă���ILS���g���ƃR�[�X��\�����܂��B
PARK indicates that the ILS tuner has no
frequency tuned (displays ------ in the window).
"PARK"��ILS�`���[�i�[���ǂ̎��g���ɂ��`���[�j���O����Ă��Ȃ����Ƃ������Ă��܂��B(�E�C���h�E�ɂ�------�ƕ\������܂�)
The frequency and course can be tuned remotely
by typing the frequency/course into the scratchpad
followed by the 4L LSK.
���g���ƃR�[�X�̓����[�g�`���[�j���O�o���܂��B���g���^�R�[�X���X�N���b�`�p�b�h�ɓ��͂��A����4L
LSK�������܂��B
The format is XXX.XX/xxx where XXX.XX is
the frequency and xxx is the course.
�t�H�[�}�b�g��XXX.XX/xxx�ŁAXXX.XX�����g���������Axxx���R�[�X�������܂��B
| ����TOP�y�[�W | ��Level-D 767 ���j���[ | ���}�j���A���ڎ� | ���O�̃y�[�W | �����̃y�[�W�� |