
FOR FLIGHT SIMULATOR USE ONLY. NOT FOR USE
IN REAL AVIATION. Level-D Simulations 767-300...........Page
115
FLIGHT MANAGEMENT SYSTEM (FMS)
| <<TOPページ | <Level-D 767 メニュー | <マニュアル目次 | <前のページ | >次のページへ |
FMC Database Programming Examples
FMCデータベースプログラミング例
The following examples show the steps involved
in programming SIDs, STARs, and approaches
into the FMC database.
次の例は FMC データベースに SID、STAR もしくはアプローチをプログラミングする手順を示しています。
The examples are made up from actual waypoints
in and around KLAS.
例は KLAS周辺の実際のウエイポイントで構成されています。
It is recommended that a backup copy of the
file "ProceduresDB.xml" be made
so that the example programming may be deleted
easily by restoring the backup copy.
バックアップコピーから戻すことでプログラム例を簡単に削除できるよう
"ProceduresDB.xml" ファイルのバックアップコピーを作成することをお奨めします。

The FMC database procedures are stored in
*.xml format.
FMC データベースのプロシージャは *.xml フォーマットで格納されています。
Those familiar with the xml format can manipulate
the data manually by opening this file in
WordPad, Notepad, or any suitable xml editor.
xml フォーマットに精通している人はワードパッドやノートパッド(メモ帳)、もしくは適当な
xml エディタでこのファイルを開き手動でデータを操作できます。
SID Programming Example
SID プログラミング例
The following example shows how to program
a SID.
次の例は SID をプログラムするための方法を示しています。
SIDs can be as simple as a single waypoint
with no transitions, or a more comprehensive
procedure with multiple transitions.
SID はトランジションのない1つのウェイポイントのようなシンプルなものはもちろん、さらに複数のトランジションをもつようなより広範囲にわたるプロシージャも作成することができます。
The example below is a made up procedure
called the JEBBB1 departure at KLAS.
例は KLAS の JEBBB1 ディパーチャと呼ばれるプロシージャを取り上げています。
This is a comprehensive SID with multiple
transition elements.
これは複数のトランジジョン要素をもつ広範囲にわたる
SID です。

All SIDs consist of one or more "main"
procedure waypoints.
すべての SID は 1つもしくは 1つ以上の "メイン"
プロシージャウェイポイントで構成されます。
In this example, the JEBBB and ROPPR waypoints
are the main procedure since they are common
to all transitions.
この例では JEBBB と ROPPR ウェイポイントが全てのトランジションに共通したメインプロシージャです。
Program the main part of the SID as follows:
SID のメイン部分は次のようにプログラミングしてください :
The JEBBB1 SID is now part of the KLAS departure
database.
JEBBB1 SID は KLAS デパーチャーデータベースの1つになりました。
If these were the only two waypoints for
the SID, the programming would be complete.
もし SID がウエイポイント2つだけであればプログラミングは完了です。
This is how a simple SIDs with no transitions
would be programmed.
これはトランジションのない簡単な SID のプログラミング方法です。
Once the main SID waypoints are programmed,
any existing transition procedures can be
programmed.
1度メイン SID ウェイポイントをプログラムすると他のトランジションプロシージャがプログラムできます。
This example has runway specific transitions
used to join the main SID.
この例にはメイン SID につながる特定のトランジションを使う滑走路があります。
Runway specific procedures are not found
at all airports.
滑走路限定プロシージャは全ての空港で見つかるわけではありません。
When they do exist, such as in our example,
they are programmed as follows:
例のような滑走路限定プロシージャが存在するときは次のようにプログラムします。
To program the 25L runway transition, modify
steps 1 and 2 to reflect runway 25L and PIRMD (ミスプリント注意) for that transition.
25L ランウェイトランジションのプログラムでは滑走路
25L と PIRMO を反映するため手順 1 と
2 を修正します。
All remaining steps are the same.
残りの手順は全て同じです。
A more common type of transition is an enroute
SID transition that follows the main SID
waypoints.
より一般的なトランジションはメイン SID ウェイポイントに続くエンルート
SID トランジションです。
This example has two enroute SID transitions
that occur after JEBBB.
この例では JEBBB の後に2つのエンルート SID
トランジションがあります。
These transitions are programmed as follows:
それらのトランジションは次のようにプログラムします :
To program the remaining SID transition,
substitute TNP for HEC in step 2. All remaining
steps are the same.
残りの SID トランジションをプログラムするため手順
2 の HEC を TNP に置き換えます。残りの手順は全て同じです。
With the programming complete, the JEBBB1
SID can now be selected from the DEP screen
for KLAS.
プログラミングが完了すると JEBBB1 SID が
KLAS の DEP 画面から選択できるようになります。
When the SID is selected, the main waypoints
of ROPPR and JEBBB are added to the LEGS
page.
SID を選択すると ROPPR と JEBBB のメインウェイポイントが
LEGS ページに追加されます。
If runway 25L or 25R is selected, the appropriate
runway transition waypoint is automatically
added to the LEGS page.
もし滑走路 25L もしくは 25R を選択すると適切なランウェイトランジションが自動的に
LEGS ページに追加されます。
The optional HEC and TNP enroute transitions
are offered in the SID TRANS column.
オプションの HEC と TNP エンルートトランジションは
SID TRANS の列に現れます。
When selected, the appropriate enroute transition
waypoint is added to the LEGS page.
選択すると適切なエンルートトランジションウェイポイントが
LEGS ページに追加されます。
STAR Programming Example
STAR プログラミング例
The following example shows how to program
a STAR.
次の例は STAR をプログラムするための方法を示しています。
A STAR is broken down into the main procedure
waypoints and the optional transition waypoints.
STAR はメインプロシージャウェイポイントとオプションのトランジションウェイポイントに分類されます。
The example below is a made up procedure
called the CRESO1 arrival at KLAS.
例では KLAS での CRESO1 アライバルと呼ばれるプロシージャを取り上げています。
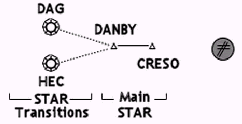
All STARs consist of one or more "main"
procedure waypoints.
全ての STAR は1つもしくはそれ以上の "メイン"
プロシージャウェイポイントで構成されます。
In this example, the DANBY and CRESO waypoints
are the main procedure since they are common
to all transitions.
この例では DANBY と CRESO ウェイポイントが全てのトランジションに共通したメインプロシージャです。
Program the main part of the STAR as follows:
STARのメイン部分は次のようにプログラムしてください :
The CRESO1 STAR is now part of the KLAS arrival
database.
これで CRESO1 STAR が KLAS アライバルデータベースの1つになりました。
If these were the only two waypoints for
the STAR, the programming would be complete.
もし STAR がウェイポイント 2 つだけであればプログラミングは完了です。
This is how a simple STAR with no transitions
would be programmed.
これはトランジションのない簡単な STAR のプログラミング方法です。
Once the main STAR waypoints are programmed,
any existing transition procedures can be
programmed.
1度メイン STAR ウェイポイントをプログラムすると他のトランジションプロシージャがプログラムできます。
This example has two enroute STAR transitions
used to join the main STAR waypoints.
この例ではメイン STAR ウェイポイントにつながる
2 つのエンルート STAR トランジションがあります。
These transitions are programmed as follows:
それらのトランジションは次のようにプログラムします :
To program the remaining STAR transition,
substitute DAG for HEC in step 2. All remaining
steps are the same.
残りの STAR トランジションをプログラムでは手順
2 の HEC を DAG に置き換えます。残りの手順は全て同じです。
With the programming complete, the CRESO1
STAR can now be selected from the ARR screen
for KLAS.
プログラミングが完了すると CRESO1 STAR が
KLAS の ARR 画面から選択できるようになります。
When the STAR is selected, the main waypoints
of DANBY and CRESO are added to the LEGS
page.
STAR を選択すると DANBY と CRESO のメインウェイポイントが
LEGS ページに追加されます。
The optional HEC and DAG transitions are
offered in the STAR TRANS column.
オプションの HEC と DAG トランジションは
STAR TRANS の列に現れます。
When selected, the appropriate transition
waypoint is added to the LEGS page.
選択すると適切なトランジションウェイポイントが
LEGS ページに追加されます。
Approach Programming Example
アプローチプログラミング例
The following example shows how to program
an approach procedure.
次の例はアプローチプロシージャをプログラムする方法を示しています。
Approach procedures are broken down into
the main approach, missed approach, and optional
transitions.
アプローチプロシージャはメインアプローチ、ミスドアプローチ、オプションのトランジションに分類されます。
The main and missed approaches are programmed
together in one procedure.
メインアプローチとミスドアプローチは 1 つのプロシージャとして一緒にプログラムします。
The optional transitions are programmed separately.
オプションのトランジションは分けてプログラムします。
The following example is the ILS to runway
25R at KLAS.
次の例は KLAS での滑走路 25R への ILS (アプローチ)です。

The main part of the approach procedure consists
of the two waypoints leading up to the runway,
the runway, and the missed approach procedure.
アプローチプロシージャのメイン部分は滑走路へ続く
2 つのウェイポイント、滑走路、ミスドアプローチプロシージャで構成されています。
Program the main part of the approach as
follows:
アプローチのメイン部分は次のようにプログラムしてください :
The ILS25R is now part of the KLAS arrival
database.
ILS25R が KLAS アライバルデータベースの一部になりました。
To program a LOC, VOR, RNAV or NDB approach,
follow the same steps as shown here except
name the approach appropriately.
LOC、VOR、RNAVやNDB アプローチのプログラムではアプローチに適した名前を付ける以外ここに示した手順と同じになります。
Once the approach is programmed, any existing
transition procedures can be programmed.
一度アプローチをプログラムすると他のトランジションプロシージャがプログラムできます。
This example has one approach transition
that can be programmed as follows:
この例には 1 つアプローチトランジションがあり、次のようにプログラムします :
With the programming complete, the ILS25R
approach can now be selected from the ARR
screen for KLAS.
プログラミングが完了すると ILS25R アプローチが
KLAS の ARR 画面から選択できるようになります。
When the approach is selected, the approach
waypoints starting at HAWKO are added to
the LEGS page.
アプローチを選択すると HAWKO で始まるアプローチウェイポイントが
LEGS ページに追加されます。
The optional CRESO transition is offered
in the APPCH TRANS column.
オプションの CRESO トランジションは APPCH
TRANS 列に現れます。
When selected, the appropriate transition
waypoints are added to the LEGS page.
選択すると適切なトランジションウェイポイントが
LEGS ページに追加されます。
Conditional Waypoint Programming
条件付ウェイポイントプログラミング
Special waypoints can be programmed into
the FMC to handle SID, STAR and approach
conditional waypoints.
SID、STAR やアプローチの条件付ウェイポイントを扱うため
FMC に特別なウエイポイントをプログラミングすることができます。
The following types of conditional waypoints
can be programmed:
次の形式の条件付ウェイポイントがプログラミングできます。
Heading to altitude , Heading to radial crossing,
Heading to distance, Vectors, and Radial
intercept.
ある高度まで針路を維持、あるラジアルを通過するまで針路を維持、ある距離まで針路を維持、誘導、ラジアルインターセプト。
These waypoints are programmed using the
LEGS page.
それらのウェイポイントは LEGS ページを使いプログラミングします。
Heading to Altitude
ある高度まで針路を維持
This type of waypoint can be used for a procedure
that requires a constant heading until reaching
a specified altitude.
このウェイポイントの形式は指定した高度に到達するまで針路を維持するようなプロシージャで使われます。
An arbitrary anchor waypoint is used to start
the programming.
任意のアンカーウェイポイントはプログラミングを始めるために使われます。
Then, the following formula is entered into
the scratchpad:
スクラッチパッドに次のフォーマットで入力します :
.CHA/Altitude/Heading/Option1/Option2
.CHA/高度/針路/オプション1/オプション2
The formula is then entered into the LEGS
page by pressing the LSK abeam the arbitrary
anchor waypoint.
定型文の入力に続き任意のアンカーウェイポイント真横の
LSK を押すと LEGS ページに入力されます。
This creates the heading to altitude conditional
waypoint.
このようにしてある高度まで針路を維持する条件付ウェイポイントを作成します。
The arbitrary anchor waypoint is then deleted.
その後、任意のアンカーウェイポイントを削除します。
Example: From runway 31L at KJFK, a SID requires
a 315 ー heading until reaching 500 feet,
followed by a left turn on course.
例 : KJFK の滑走路 31L からの SID は 500
フィートまで 315 - 針路を維持し、続いてコースに向けて左旋回を必要とします。
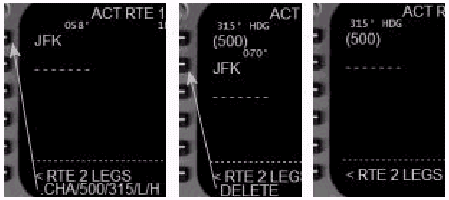
Subsequent waypoints can be added starting
at the 2L LSK.
以降のウェイポイントは 2L LSK から追加できます。
Note: Be sure to press the LSK abeam the arbitrary
waypoint when entering the formula into the
LEGS page.
注意 : LEGS ページに定型文を入力する場合には必ず任意のウェイポイント真横の
LSK を押すようにしてください。
Pressing an LSK for an empty waypoint field
generates an error message.
何もウェイポイントがない LSK を押すと画面にエラーメッセージが表示されます。
Heading to Radial Crossing
ラジアルを通過するまで針路を維持
This type of waypoint can be used for a procedure
that requires a constant heading until crossing
a predetermined fix radial.
このウェイポイントの形式はあらかじめ定められたフィックスのラジアルを通過するまで針路を維持するようなプロシージャに使われます。
The radial to be crossed is only used to
define the waypoint (for radial tracking,
see 迭adial Intercept? section).
ラジアルを通過するウェイポイントを定義するためだけに使われます(ラジアルトラッキングについては
"ラジアルインターセプト" の章を参照してください)。
The anchor waypoint used to start programming
is the fix used to define the crossing radial.
プログラミングを始めるために使われるアンカーウェイポイントは通過するラジアルを定めるために使われるフィックスです。
Then, the following formula is entered into
the scratchpad:
スクラッチパッドに次のフォーマットで入力します。
.VRI/Radial/Heading/Option1/Option2
.VRI/ラジアル/針路/オプション1/オプション2
The formula is entered into the LEGS page
by pressing the LSK abeam the anchor waypoint.
アンカーウェイポイント真横を押すと LEGS ページに定型文が入力されます。
This transforms the anchor waypoint into
a heading to radial intercept waypoint.
これはアンカーウェイポイントをラジアルインターセプトウェイポイントへの針路に変えます。
Example: From runway 31L at KJFK, a SID requires
a 315 ー heading until passing the CRI 043
ー radial followed by a left turn on course.
例 : KJFK の滑走路 31L からの SID は CRI
043 - ラジアルを通過するまで 315 - 針路を維持し、続いてコースに向けて左旋回を必要とします。
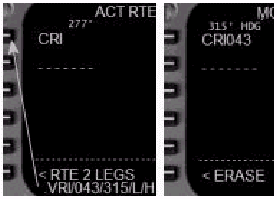
Subsequent waypoints can be added starting
at the 2L LSK.
以降のウェイポイントは 2L LSK から追加できます。
Note: Be sure to press the LSK abeam the anchor
waypoint when entering the formula into the
LEGS page.
注意 : LEGS ページに定型文を入力する場合には必ずアンカーウェイポイント真横の
LSK を押すようにしてください。
Pressing an LSK for any other waypoint field
generates an error message.
他のウェイポイントの LSK を押すと画面にエラーメッセージが表示されます。
Heading To Distance
ある距離まで針路を維持
This type of waypoint can be used for a procedure
that requires a constant heading until reaching
a specific distance from a fix.
この形式のウェイポイントはフィックスから指定した距離に到達するまで針路を維持するようなプロシージャで使われます。
The anchor waypoint used to start programming
is the fix used to define the distance.
プログラムを始めるために使われるアンカーウェイポイントは距離を定めるために使われるフィックスです。
Then, the following formula is entered into
the scratchpad:
スクラッチパッドに次のフォーマットで入力します。
.DMI/Distance/Heading/Option1/Option2
.DMI/距離/針路/オプション1/オプション2
The formula is entered into the LEGS page
by pressing the LSK abeam the anchor waypoint.
アンカーウェイポイント真横を押すと LEGS ページに定型文が入力されます。
This transforms the anchor waypoint into
a heading to distance waypoint.
これはアンカーウェイポイントを距離ウェイポイントへの針路に変えます。
Example: From runway 25R at KLAX, a SID requires
a heading of 220 until the LAX 10 DME and
then a right turn on course.
例 : KLAX の滑走路 25R からの SID は LAX
10 DME まで針路 220 を維持し、コースに向けて右旋回を必要とします。
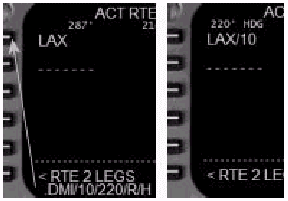
Subsequent waypoints can be added starting
at the 2L LSK.
以降のウェイポイントは 2L LSK から追加できます。
Note: Be sure to press the LSK abeam the anchor
waypoint when entering the formula into the
LEGS page.
注意 : LEGS ページに定型文を入力する場合には必ずアンカーウェイポイント真横の
LSK を押すようにしてください。
Pressing an LSK for any other waypoint field
generates an error message.
他のウェイポイントの LSK を押すと画面にエラーメッセージが表示されます。
Vectors
誘導
This type of waypoint can be used for a procedure
that requires vectors.
この形式のウェイポイントは誘導が要求されるプロシージャで使われます。
An arbitrary anchor waypoint is used to start
the programming.
任意のアンカーウェイポイントはプログラミングを始めるために使われます。
Then, the following formula is entered into
the scratchpad:
スクラッチパッドに次のフォーマットで入力します :
.VEC/Heading/Option1/Option2
.VEC/針路/オプション1/オプション2
The formula is then entered into the LEGS
page by pressing the LSK abeam the arbitrary
anchor waypoint.
定型文の入力に続き任意のアンカーウェイポイント真横の
LSK を押すと LEGS ページに入力されます。
This creates the vector waypoint.
このようにして誘導ウェイポイントを作成します。
The arbitrary anchor waypoint is then deleted.
その後任意のアンカーウェイポイントを削除します。
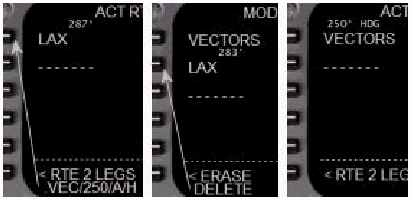
Example: From runway 25R at KLAX, a SID requires
a heading of 250 ー for vectors on course.
例 : KLAX の滑走路 25R からの SID はコースへの誘導のため針路
250 を要求します。
Subsequent waypoints can be added starting
at the 2L LSK.
以降のウェイポイントは 2L LSK から追加できます。
Note: Be sure to press the LSK abeam the arbitrary
waypoint when entering the formula into the
LEGS page.
注意 : LEGS ページに定型文を入力する場合には必ず任意のウェイポイント真横の
LSK を押すようにしてください。
Pressing an LSK for an empty waypoint field
generates an error message.
何もウェイポイントがない LSK を押すと画面にエラーメッセージが表示されます。
Radial Intercept
ラジアルインターセプト
This type of waypoint can be used for a procedure
that requires a constant heading until intercepting
a fix radial.
この形式のウェイポイントはフィックスのラジアルをインターセプトするまで針路を維持するようなプロシージャで使われます。
The intercepted radial is then tracked until
the next waypoint is reached.
ラジアルをインターセプトすると次のウェイポイントに到達するまでトラックされます。
The anchor waypoint used to start programming
is the fix used to define the intercept radial.
プログラムを始めるために使われるアンカーウェイポイントはインターセプトするラジアルを定義するために使われるフィックスです。
Then, the following formula is entered into
the scratchpad:
スクラッチパッドに次のフォーマットで入力します :
.INT/Radial/Heading/Option1/Option2
.INT/ラジアル/針路/オプション1/オプション2
The formula is entered into the LEGS page
by pressing the LSK abeam the anchor waypoint.
アンカーウェイポイント真横を押すと LEGS ページに定型文が入力されます。
This transforms the anchor waypoint into
a radial intercept waypoint.
これはアンカーウェイポイントをラジアルインターセプトウェイポイントへの針路に変えます。
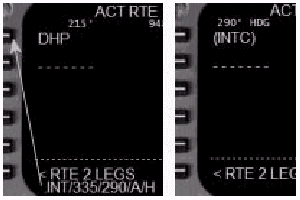
Example: A procedure at KMIA requires a 290
ー heading until intercepting the DHP 335
ー radial outbound.
例 : KMIA でのプロシージャは DHP 335 -
ラジアル アウトバウンドをインターセプトするまで
290 - 針路を必要とします。
Subsequent waypoints can be added starting
at the 2L LSK.
以降のウェイポイントは 2L LSK から追加できます。
Note: Be sure to press the LSK abeam the anchor
waypoint when entering the formula into the
LEGS page.
注意 : LEGS ページに定型文を入力する場合には必ずアンカーウェイポイント真横の
LSK を押すようにしてください。
Pressing an LSK for any other waypoint field
generates an error message.
他のウェイポイントの LSK を押すと画面にエラーメッセージが表示されます。
| <<TOPページ | <Level-D 767 メニュー | <マニュアル目次 | <前のページ | >次のページへ |